pshitt: collect passwords used in SSH bruteforce

Introduction

I’ve been playing lately on analysis SSH bruteforce caracterization. I was a bit frustrated of just getting partial information:

  • ulogd can give information about scanner settings
  • suricata can give me information about software version
  • sshd server logs shows username

But having username without having the password is really frustrating.

So I decided to try to get them. Looking for a SSH server honeypot, I did find kippo but it was going too far for me
by providing a fake shell access. So I’ve decided to build my own based on paramiko.

pshitt, Passwords of SSH Intruders Transferred to Text, was born. It is a lightweight fake SSH server that collect authentication data sent by intruders. It basically collects username and password and writes the extracted data to a file in JSON format. For each authentication attempt, pshitt is dumping a JSON formatted entry:

{"username": "admin", "src_ip": "116.10.191.236", "password": "passw0rd", "src_port": 36221, "timestamp": "2014-06-26T10:48:05.799316"}

The data can then be easily imported in Logstash (see pshitt README) or Splunk.

The setup

As I want to really connect to the box running ssh with a regular client, I needed a setup to automatically redirect the offenders and only them to pshitt server. A simple solution was to used DOM. DOM parses Suricata EVE JSON log file in which Suricata gives us the software version of IP connecting to the SSH server. If DOM sees a
software version containing libssh, it adds the originating IP to an ipset set.

So, the idea of our honeypot setup is simple:

  • Suricata outputs SSH software version to EVE
  • DOM adds IP using libssh to the ipset set
  • Netfilter NAT redirects all IP off the set to pshitt when they try to connect to our ssh server

Getting the setup in place is really easy. We first create the set:

ipset create libssh hash:ip

then we start DOM so it adds all offenders to the set named libssh:

cd DOM
./dom -f /usr/local/var/log/suricata/eve.json -s libssh

A more accurate setup for dom can be the following. If you know that your legitimate client are only based on OpenSSH then you can
run dom to put in the list all IP that do not (-i) use an OpenSSH client (-m OpenSSh):

./dom -f /usr/local/var/log/suricata/eve.json -s libssh -vvv -i -m OpenSSH

If we want to list the elements of the set, we can use:

ipset list libssh

Now, we can start pshitt:

cd pshitt
./pshitt

And finally we redirect the connection coming from IP of the libssh set to the port 2200:

iptables -A PREROUTING -m set --match-set libssh src -t nat -i eth0 -p tcp -m tcp --dport 22 -j REDIRECT --to-ports 2200

Some results

Here’s an extract of the most used passwords when trying to get access to the root account:

real root passwords

And here’s the same thing for the admin account attempt:

Root passwords

Both data show around 24 hours of attempts on an anonymous box.

Conclusion

Thanks to paramiko, it was really fast to code pshitt. I’m now collecting data and I think that they will help to improve the categorization of SSH bruteforce tools.

Suricata and Ulogd meet Logstash and Splunk

Some progress on the JSON side

Suricata 2.0-rc2 is out and it brings some progress on the JSON side. The logging of SSH protocol has been added:

Screenshot from 2014-03-07 18:50:21

and the format of timestamp has been updated to be ISO 8601 compliant and it is now named timestamp instead of time.

Ulogd, the Netfilter logging daemon has seen similar change as it is now also using a ISO 8601 compliant timestamp for the . This feature is available in git and will be part of ulogd 2.0.4.

Thanks to this format change, the integration with logstash or splunk is easier and more accurate.
This permit to fix one problem regarding the timestamp of an event inside of the event and logging manager. At least in logstash, the used date was the one of the parsing which was not really
accurate. It could even be a problem when logstash was parsing a file with old entries because the difference in timestamp could be huge.

It is now possible to update logstash configuration to have a correct parsing of the timestamp. After doing this the internal @timestamp and the timestamp of the event are synchronized as show on the following screenshot:

timestamp

Logstash configuration

Screenshot from 2014-02-02 13:22:34

To configure logstash, you simply needs to tell him that the timestamp field in JSON message is a date. To do so, you need to add a filter:

      date {
        match => [ "timestamp", "ISO8601" ]
      }

A complete logstash.conf would then looks like:

input {
   file {
      path => [ "/usr/local/var/log/suricata/eve.json", "/var/log/ulogd.json" ]
      codec =>   json
      type => "json-log"
   }
}

filter {
   if [type] == "json-log" {
      date {
        match => [ "timestamp", "ISO8601" ]
      }
   }
}

output {
  stdout { codec => rubydebug }
  elasticsearch { embedded => true }
}

Splunk configuration

Screenshot from 2014-03-07 23:30:40

In splunk, auto detection of the file format is failing and it seems you need to define a type to parse JSON in
$SPLUNK_DIR/etc/system/local/props.conf:

[suricata]
KV_MODE = json
NO_BINARY_CHECK = 1
TRUNCATE = 0

Then you can simply declare the log file in $SPLUNK_DIR/etc/system/local/inputs.conf:

[monitor:///usr/local/var/log/suricata/eve.json]
sourcetype = suricata

[monitor:///var/log/ulogd.json]
sourcetype = suricata

you can now build search events and build dashboard based on Suricata or Netfilter packet logging:
Screenshot from 2014-03-05 23:17:12

Using ulogd and JSON output

Ulogd and JSON output

In February 2014, I’ve commited a new output plugin to ulogd, the userspace logging daemon for Netfilter. This is a JSON output plugin which output logs into a file in JSON format. The interest of the JSON format is that it is easily parsed by software just as logstash. And once data are understood by logstash, you can get some nice and useful dashboard in Kibana:

Screenshot from 2014-02-02 13:22:34

This post explains how to configure ulogd and iptables to do packet logging and differentiate accepted and blocked packets. If you want to see how cool is the result, just check my post: Investigation on an attack tool used in China.

Installation

At the time of this writing, the JSON output plugin for ulogd is only available in the git tree. Ulogd 2.0.4 will contain the feature.

If you need to get the source, you can do:

git clone git://git.netfilter.org/ulogd2

Then the build is standard:

./autogen.sh
./configure
make
sudo make install

Please note that at the end of the configure, you must see:

Ulogd configuration:
  Input plugins:
    NFLOG plugin:			yes
...
    NFACCT plugin:			yes
  Output plugins:
    PCAP plugin:			yes
...
    JSON plugin:			yes

If the JSON plugin is not build, you need to install libjansson devel files on your system and rerun configure.

Configuration

Ulogd configuration

All the edits are made in the ulogd.conf file. With default configure option the file is in /usr/local/etc/.

First, you need to activate the JSON plugin:

plugin="/home/eric/builds/ulogd/lib/ulogd/ulogd_output_JSON.so"

Then we define two stacks for logging. It will be used to differentiate accepted packets from dropped packets:

stack=log2:NFLOG,base1:BASE,ifi1:IFINDEX,ip2str1:IP2STR,mac2str1:HWHDR,json1:JSON
stack=log3:NFLOG,base1:BASE,ifi1:IFINDEX,ip2str1:IP2STR,mac2str1:HWHDR,json1:JSON

The first stack will be used to log accepted packet, so we the numeric_label to 1 in set in [log2].
In [log3], we use a numeric_label of 0.

[log2]
group=1 # Group has to be different from the one use in log1
numeric_label=1

[log3]
group=2 # Group has to be different from the one use in log1/log2
numeric_label=0 # you can label the log info based on the packet verdict

The last thing to edit is the configuration of the JSON instance:

[json1]
sync=1
device="My awesome FW"
boolean_label=1

Here we say we want log and write on disk configuration (via sync) and we named our device My awesome FW.
Last value boolean_label is the most tricky. It this configuration variable is set to 1, the numeric_label will
be used to decide if a packet has been accepted or blocked. It this variable is set non null, then the packet is seen as allowed.
If not, then it is seen as blocked.

Sample Iptables rules

In this example, packets to port 22 are logged and accepted and thus are logged in nflog-group 1. Packet in the default drop rule are sent to group 2 because they are dropped.

iptables -A INPUT -m state --state RELATED,ESTABLISHED -j ACCEPT
iptables -A INPUT ! -i lo -p tcp -m tcp --dport 22 --tcp-flags FIN,SYN,RST,ACK SYN -m state --state NEW -j NFLOG --nflog-prefix  "SSH Attempt" --nflog-group 1
iptables -A INPUT -i lo -j ACCEPT
iptables -A INPUT -p tcp -m tcp --dport 22 -m state --state NEW -j ACCEPT
iptables -A INPUT -j NFLOG --nflog-prefix  "Input IPv4 Default DROP" --nflog-group 2

There is no difference in IPv6, we just use nflog-group 1 and 2 with the same purpose:

ip6tables -A INPUT -m state --state RELATED,ESTABLISHED -j ACCEPT
ip6tables -A INPUT ! -i lo -p tcp -m tcp --dport 22 --tcp-flags FIN,SYN,RST,ACK SYN -m state --state NEW -j NFLOG --nflog-prefix  "SSH Attempt" --nflog-group 1
ip6tables -A INPUT ! -i lo -p ipv6-icmp -m icmp6 --icmpv6-type 128 -m state --state NEW -j NFLOG --nflog-prefix  "Input ICMPv6" --nflog-group 1
ip6tables -A INPUT -p ipv6-icmp -j ACCEPT
ip6tables -A INPUT -p tcp -m tcp --dport 22 -m state --state NEW -j ACCEPT
ip6tables -A INPUT -i lo -j ACCEPT
ip6tables -A INPUT -j NFLOG --nflog-prefix  "Input IPv6 Default DROP" --nflog-group 2

Logstash configuration

Logstash configuration is simple. You must simply declare the ulogd.json file as input and optionaly you can activate geoip on the src_ip key:

input {
   file { 
      path => [ "/var/log/ulogd.json"]
      codec =>   json 
   }
}

filter {
  if [src_ip]  {
    geoip {
      source => "src_ip"
      target => "geoip"
      add_field => [ "[geoip][coordinates]", "%{[geoip][longitude]}" ]
      add_field => [ "[geoip][coordinates]", "%{[geoip][latitude]}"  ]
    }
    mutate {
      convert => [ "[geoip][coordinates]", "float" ]
    }
  }
}

output { 
  stdout { codec => rubydebug }
  elasticsearch { embedded => true }
}

Usage

To start ulogd in daemon mode, simply run:

ulogd -d

You can download logstash from their website and start it with the following command line:

java -jar logstash-1.3.3-flatjar.jar agent -f etc/logstash.conf --log log/logstash-indexer.out -- web

Once done, just point your browser to localhost:9292 and enjoy nice and interesting graphs.

Screenshot from 2014-02-02 13:57:19

Logstash and Suricata for the old guys

Introduction

logstash an opensource tool for managing events and logs. It is using elasticsearch for the storage and has a really nice interface named Kibana. One of the easiest to use entry format is JSON.

Suricata is an IDS/IPS which has some interesting logging features. Version 2.0 will feature a JSON export for all logging subsystem. It will then be possible to output in JSON format:

  • HTTP log
  • DNS log
  • TLS log
  • File log
  • IDS Alerts

For now, only File log is available in JSON format. This extract meta data from files transferred over HTTP.

Peter Manev has described how to connect Logstash Kibana and Suricata JSON output. Installation is really simple, just download logstash from logstash website, write your configuration file and start the thing.

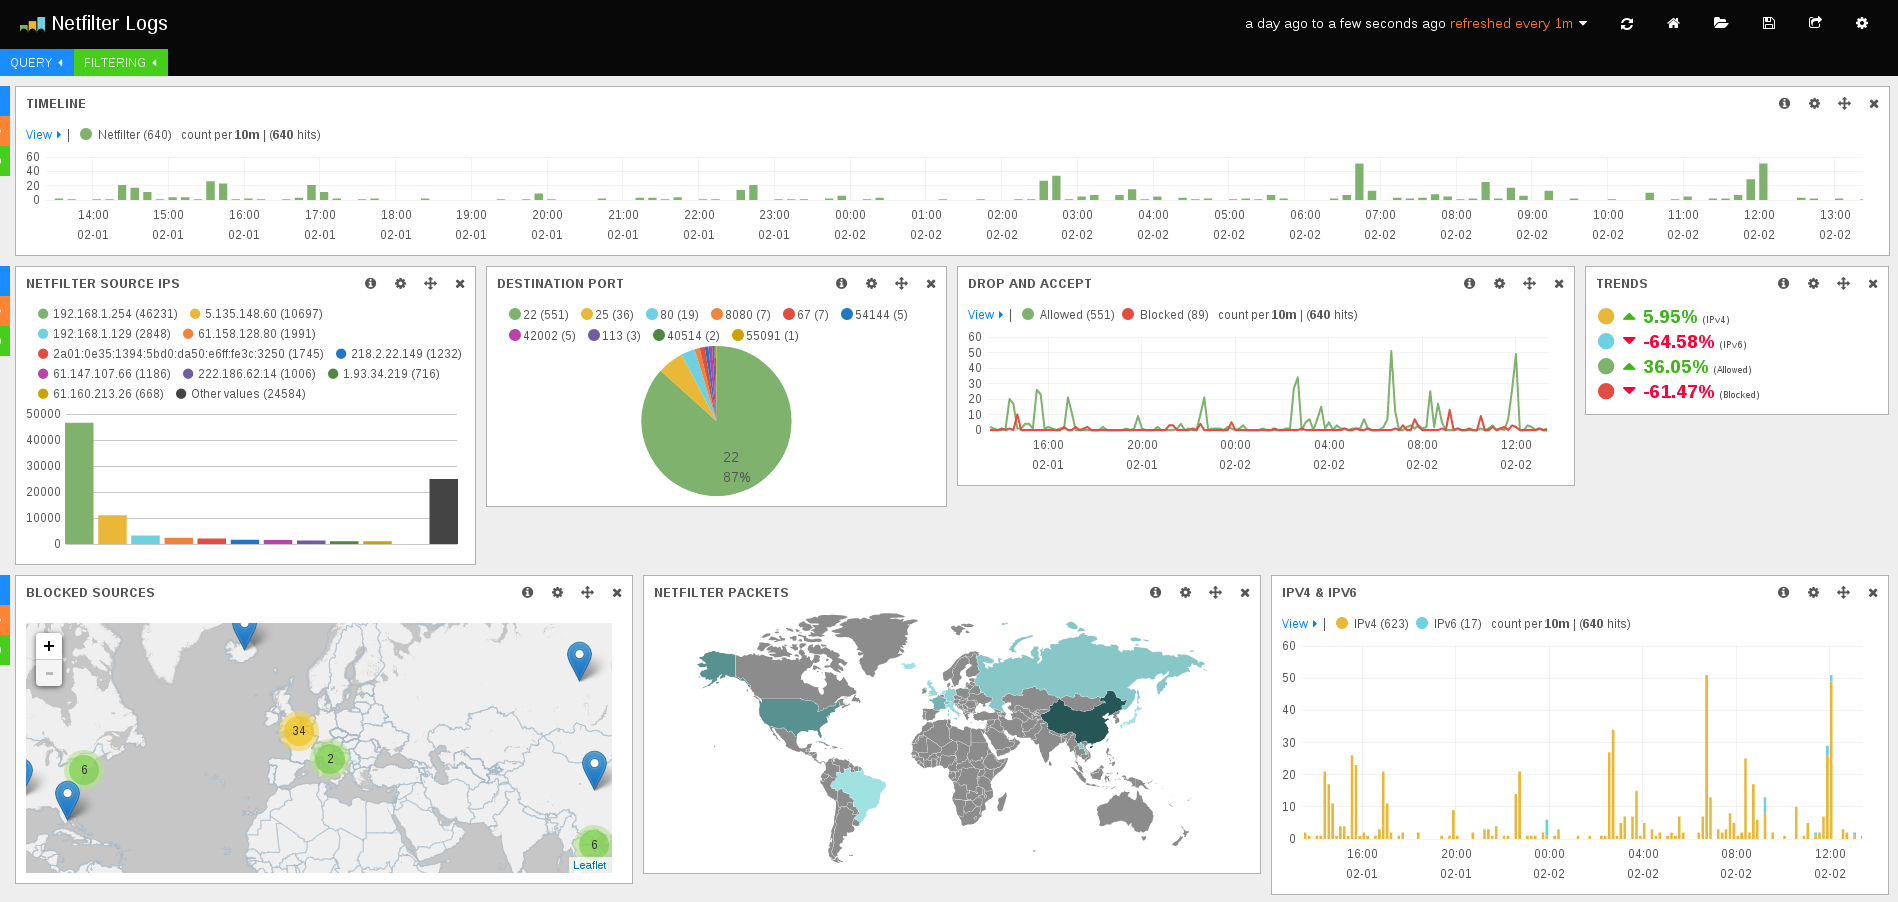
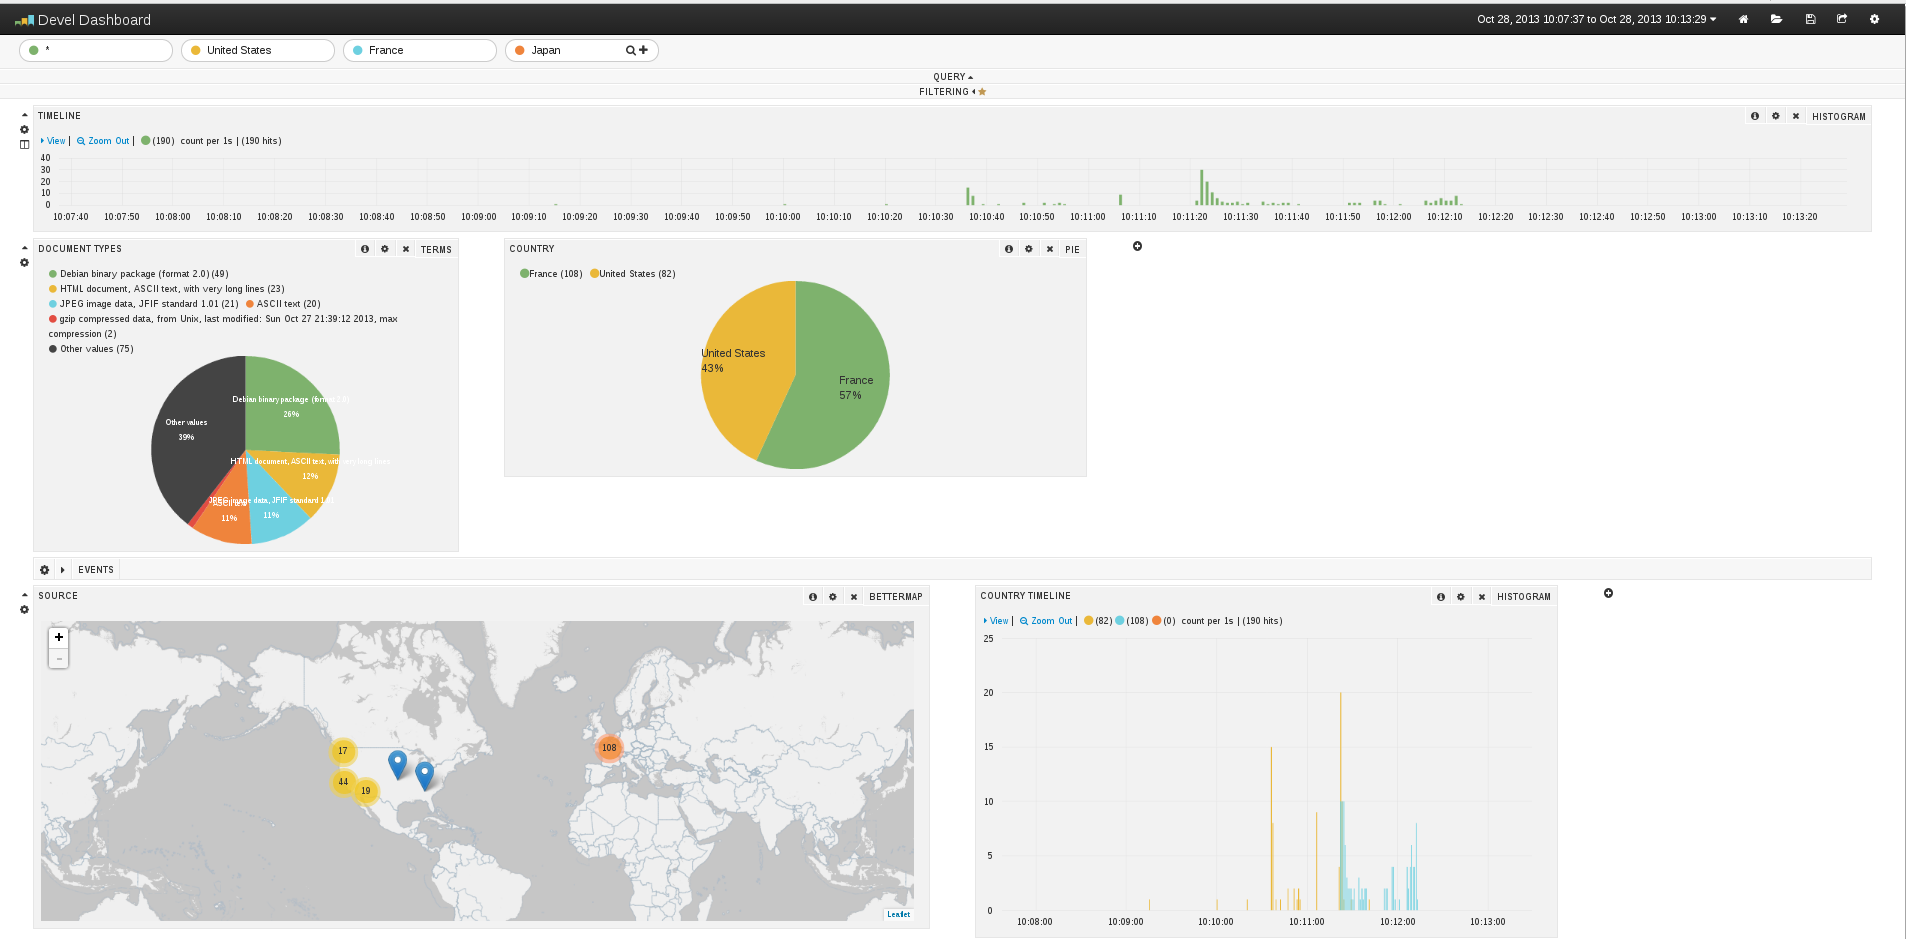
Kibana interface is really impressive:
Kibana Screenshot

But at the time, I started to look at the document, a few things were missing:

  • Geoip is not supported
  • All fields containing space appear as multiple entries

Geoip support

This one was easy. You simply have to edit the logstash.conf file to add a section about geoip:

input {
  file { 
    path => "/home/eric/builds/suricata/var/log/suricata/files-json.log" 
    codec =>   json 
    # This format tells logstash to expect 'logstash' json events from the file.
    #format => json_event 
  }
}

output { 
  stdout { codec => rubydebug }
  elasticsearch { embedded => true }
}

#geoip part
filter {
  if [srcip] {
    geoip {
      source => "srcip"
      target => "geoip"
      add_field => [ "[geoip][coordinates]", "%{[geoip][longitude]}" ]
      add_field => [ "[geoip][coordinates]", "%{[geoip][latitude]}"  ]
    }
    mutate {
      convert => [ "[geoip][coordinates]", "float" ]
    }
  }
}

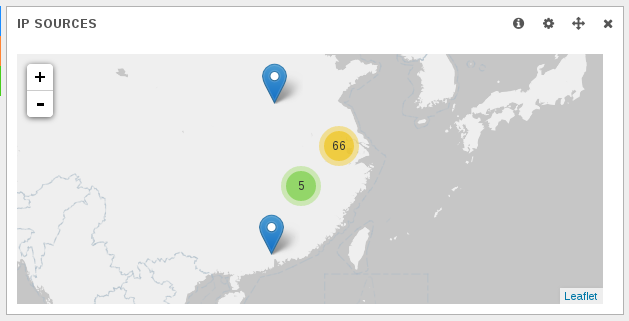
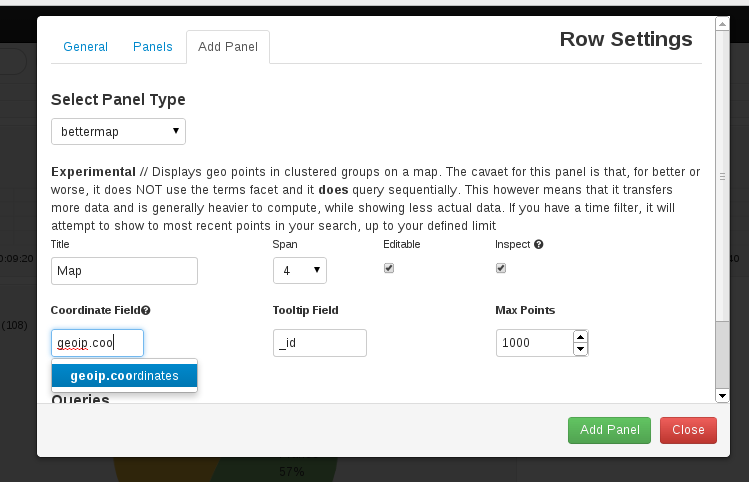
It adds a filter that check for presence of srcip and add geoip information to the entry. The tricky thing is the add_field part that create an array that has to be used when adding a map to kibana dashboard. See following screenshot for explanation:
Creating new map in Kibana

You may have the following error:

You must specify 'database => ...' in your geoip filter"

In this case, you need to specify the path to the geoip database by adding the database keyword to geoip configuration:

#geoip part
filter {
  if [srcip] {
    geoip {
      source => "srcip"
      target => "geoip"
      database => "/path/to/GeoLiteCity.dat"
      add_field => [ "[geoip][coordinates]", "%{[geoip][longitude]}" ]
      add_field => [ "[geoip][coordinates]", "%{[geoip][latitude]}"  ]
    }
    mutate {
      convert => [ "[geoip][coordinates]", "float" ]
    }
  }
}

Once the file is written, you can start logstash

java -jar /home/eric/builds/logstash/logstash-1.2.2-flatjar.jar agent -f /home/eric/builds/logstash/logstash.conf --log /home/eric/builds/logstash/log/logstash-indexer.out -- web

See Logstash Kibana and Suricata JSON output for detailed information on setup.

Logstash indexing and mapping

Before logstash 1.3.1, fixing the space issue was really complex. Since that version, all indexed fields are provided with a .raw field that can be used to avoid the problem with spaces in name. So now, you can simply use in Kibana something like geoip.country_name.raw in the definition of graph instead of geoip.country_name. Doing that United States does not appear anymore as United and States.

Fixing the space issue for lostash previous to 1.3.1 was far more complicated for an old guy like me used to configuration files. If finding the origin of the behavior is easy fixing it was more painful. A simple googling shows me that by default elasticsearch storage split string at spaces when indexing. To fix this, you have to specify that the field should not be analyzed during indexing: "index":"not_analyzed"

That was looking easy at first but logstash is not using a configuration file for indexing and mapping. In fact, you need to interact with elasticsearch via HTTP requests. Second problem is that the index are dynamically generated, so there is a template system that you can use to have indexes created the way you want.

Creating an template is easy. You simply do something like:

curl -XPUT http://localhost:9200/_template/logstash_per_index -d '
{
    "template" : "logstash*",
    MAGIC HERE
}'

This will create a template that will be applied to all newly created indexes with name matching “logstash*”. The difficult part is to know what to to put in MAGIC HERE and to check if “logstash*” will match created index. To check this, you can retrieve all current mappings:

curl -XGET 'http://localhost:9200/_all/_mapping'

You then get a list of mappings and you can check the name. But best part is that you can get a base text to update the mapping definition part. With Suricata file log and geoip activated, the following configuration is working well:

curl -XPUT http://localhost:9200/_template/logstash_per_index -d '
{
    "template" : "logstash*",
    "mappings" : {
      "logs" : {
         "properties": {
            "@timestamp":{"type":"date",
            "format":"dateOptionalTime"},
            "@version":{"type":"string"},
            "dp":{"type":"long"},
            "dstip":{"type":"ip"},
            "filename":{"type":"string"},
            "geoip":{
               "properties":{
                  "area_code":{"type":"long"},
                  "city_name":{"type":"string", "index":"not_analyzed"},
                  "continent_code":{"type":"string"},
                  "coordinates":{"type":"string"},
                  "country_code2":{"type":"string"},
                  "country_code3":{"type":"string"},
                  "country_name":{"type":"string", "index":"not_analyzed"},
                  "dma_code":{"type":"long"},
                  "ip":{"type":"string"},
                  "latitude":{"type":"double"},
                  "longitude":{"type":"double"},
                  "postal_code":{"type":"string"},
                  "real_region_name":{"type":"string", "index":"not_analyzed"},
                  "region_name":{"type":"string", "index":"not_analyzed"},
                  "timezone":{"type":"string"}
               }
            },
            "host":{"type":"string"},
            "http_host":{"type":"string"},
            "http_referer":{"type":"string"},
            "http_uri":{"type":"string"},
            "http_user_agent":{"type":"string", "index":"not_analyzed", "omit_norms":true, "index_options":"docs"},
            "ipver":{"type":"long"},
            "magic":{"type":"string", "index":"not_analyzed", "omit_norms":true, "index_options":"docs"},
            "md5":{"type":"string"},
            "path":{"type":"string"},
            "protocol":{"type":"long"},
            "size":{"type":"long"},
            "sp":{"type":"long"},
            "srcip":{"type":"ip"},
            "state":{"type":"string"},
            "stored":{"type":"boolean"},
            "tags":{"type":"string"},
            "timestamp":{"type":"string"}
      }
    }
  }
}'

I’ve added some “index”:”not_analyzed” and improved the type for some of the fields. For example, srcip has been defined as an IP address. This allow to do range searching in Kibana like

["192.168.42.24" TO "192.168.42.45"]

Next point is to update the index format. To to so, you can get the name of current index, delete it and recreate it. To get the name you can use le mapping listing:

curl -XGET 'http://localhost:9200/_all/_mapping'

The return is something like:

{"logstash-2013.10.27":{"logs":{"properties":

So now, we can destroy this index named “logstash-2013.10.27” and have it recreated with the correct
settings:

curl -XDELETE 'http://localhost:9200/logstash-2013.10.27'
curl -XPUT 'http://localhost:9200/logstash-2013.10.27'

We need data to be reindexed so:

curl -XGET 'http://localhost:9200/logstash-2013.10.27/_refresh'

It may also be a good idea to wait for new data as it seems to trigger update in what elasticsearch is sending.