Nftables port knocking

One of the main advantage of nftables over iptables is its native handling of set. They can be used for multiple purpose and thanks to the timeout capabilities it is easy to do some fun things like implementing port knocking in user space.

The idea of this technic is fairly simple, a closed port is dynamically opened if the user send packets in order to a predetermine series of ports.

To implement that on a system, let’s start from ruleset where Input is closed but for a SSH rule using a set of IPv4 address as parameter:

# nft list ruleset
table inet Filter {
	set Client_SSH_IPv4 {
		type ipv4_addr
		flags timeout
		elements = { 192.168.1.1, 192.168.1.254 }
	}

	chain Input {
		type filter hook input priority 0; policy drop;
		ct state established counter accept
		tcp dport ssh ip saddr @Client_SSH_IPv4 counter accept
		iif "lo" accept
		counter log prefix "Input Dft DROP " drop
	}
}

This gives a control of which IP get access to the SSH server. It contains two fixed IP but there is a timeout flag set allowing the definition of entry with timeout.

To implement a 3 steps port knocking we define two sets with a short timeout. Hitting one port make you enter in the first set then if you are in the first set you can enter the second set by hitting the second port.

To get the first step done we use the fact that nftables can add element to a set in the packet path:

# nft add inet Filter Raw tcp dport 36 set add ip saddr @Step1 drop

Once this is done, second step is a simple derivative of first one:

# nft add inet Filter Raw ip saddr @Step1 tcp dport 15 set add ip saddr @Step2 drop

We add these rules in the prerouting table so kernel won’t do any connection tracking for these packets.

This gets us the following ruleset:

	set Step1 {
		type ipv4_addr
		timeout 5s
	}

	set Step2 {
		type ipv4_addr
		timeout 5s
	}

	chain Raw {
		type filter hook prerouting priority -300; policy accept;
		tcp dport 36 set add ip saddr @Step1 drop
		ip saddr @Step1 tcp dport 15 set add ip saddr @Step2 drop
		ip saddr @Step2 tcp dport 42 set add ip saddr timeout 10s @Client_SSH_IPv4 drop
	}

Poor man testing can be

nmap -p 36 IPKNOCK & sleep 1;  nmap -p 15 IPKNOCK & sleep 1;  nmap -p 42 IPKNOCK

We run this and our IP is in the Client_SSH_IPv4 set:

# nft list set inet Filter Client_SSH_IPv4
table inet Filter {
	set Client_SSH_IPv4 {
		type ipv4_addr
		flags timeout
		elements = { 192.168.2.1 expires 8s, 192.168.1.1,
			     192.168.1.254 }
	}
}

and we can SSH to IPKNOCK 😉

And here is the complete ruleset:

# nft list ruleset
table inet Filter {
	set Client_SSH_IPv4 {
		type ipv4_addr
		flags timeout
		elements = { 192.168.1.1, 192.168.1.254 }
	}

	set Step1 {
		type ipv4_addr
		timeout 5s
	}

	set Step2 {
		type ipv4_addr
		timeout 5s
	}

	chain Input {
		type filter hook input priority 0; policy drop;
		ct state established counter accept
		tcp dport ssh ip saddr @Client_SSH_IPv4 counter packets 0 bytes 0 accept
		iif "lo" accept
		counter log prefix "Input Dft DROP " drop
	}

	chain Raw {
		type filter hook prerouting priority -300; policy accept;
		tcp dport 36 set add ip saddr @Step1 drop
		ip saddr @Step1 tcp dport netstat set add ip saddr @Step2 drop
		ip saddr @Step2 tcp dport nameserver set add ip saddr timeout 10s @Client_SSH_IPv4 drop
	}
}

For more information on nftables feel free to visit the Nftables wiki.

Updated status in vim and bash

Powerline

Powerline is a status extension software changing the prompt or status line for shell, tmux and vim.

The result is nice looking and useful for bash:
Powerline bash prompt

and for gvim:

Powerline in gvim

Only point is that even if documentation is good, installation is not straightforward. So here’s what I’ve done.

Installation on Debian

System
sudo aptitude install fonts-powerline powerline python-powerline

On Ubuntu 16.04 you may have to install python3-powerline instead of python-powerline.

Install configuration

mkdir ~/.config/powerline
cp /usr/share/powerline/config_files/config.json .config/powerline/

Then edit the file to change default theme to default_leftonly that bring git status:

--- /usr/share/powerline/config_files/config.json	2016-07-13 23:43:25.000000000 +0200
+++ .config/powerline/config.json	2016-09-14 00:05:04.368654864 +0200
@@ -18,7 +18,7 @@
 		},
 		"shell": {
 			"colorscheme": "default",
-			"theme": "default",
+			"theme": "default_leftonly",
 			"local_themes": {
 				"continuation": "continuation",
 				"select": "select"

Now, you need to refresh the fonts or restart X.

Bash

Then edit ~/.bashrc and add at then end

. /usr/share/powerline/bindings/bash/powerline.sh
Vim

Easiest way is to have vim addon installed:

sudo aptitude install vim-addon-manager

Then you can simply do:

vim-addons install powerline

Then add to your ~/.vimrc:

set laststatus=2

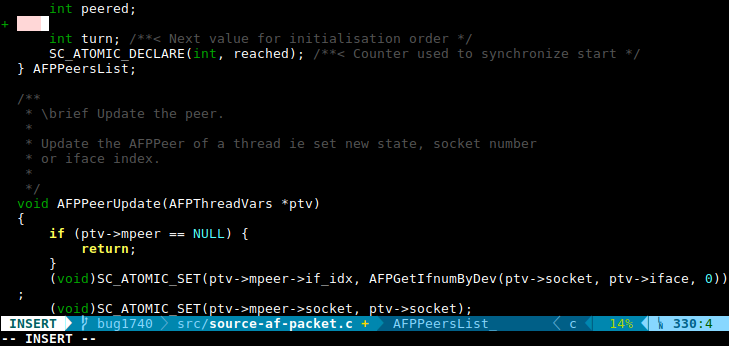
Vim status with powerline

gvim

Installation is a bit more complex as you need to install a patched font from Powerline modified fonts.

In my case:

mkdir ~/.fonts
cd ~/.fonts
wget 'https://github.com/powerline/fonts/raw/master/DejaVuSansMono/DejaVu%20Sans%20Mono%20for%20Powerline.ttf'
fc-cache -vf ~/.fonts/

Then edit .vimrc:

set guifont=DejaVu\ Sans\ Mono\ for\ Powerline\ 10

Out of [name]space issue

Introduction

I’m running Debian sid on my main laptop and if most of the time if works well there is from time to time some issues. Most of them fixes after a few days so most of the time I don’t try to fix them manually if there is no impact on my activity. Since a few weeks, the postinst script of avahi daemon was failing and as it was not fixing by itself during upgrade I’ve decided to have a look at it.

The usual ranting

As Debian sid is using systemd it is super easy to find a decent troll subject. Here it was the usual thing, systemctl was not managing to start correctly the daemon and giving me some commands if I wanted to know more:


So after a little prayer to Linux copy paste god resulting in a call to journalctl I had the message:

-- Unit avahi-daemon.service has begun starting up.
Dec 26 07:35:25 ice-age2 avahi-daemon[3466]: Found user 'avahi' (UID 105) and group 'avahi' (GID 108).
Dec 26 07:35:25 ice-age2 avahi-daemon[3466]: Successfully dropped root privileges.
Dec 26 07:35:25 ice-age2 avahi-daemon[3466]: chroot.c: fork() failed: Resource temporarily unavailable
Dec 26 07:35:25 ice-age2 avahi-daemon[3466]: failed to start chroot() helper daemon.
Dec 26 07:35:25 ice-age2 systemd[1]: avahi-daemon.service: Main process exited, code=exited, status=255/n/a
Dec 26 07:35:25 ice-age2 systemd[1]: Failed to start Avahi mDNS/DNS-SD Stack.
-- Subject: Unit avahi-daemon.service has failed
-- Defined-By: systemd
-- Support: http://lists.freedesktop.org/mailman/listinfo/systemd-devel
-- 
-- Unit avahi-daemon.service has failed.
-- 
-- The result is failed.

So a daemon was not able to fork on a rather quiet system.

Understanding the issue

A little googling lead me to this not a bug explaining the avahi configuration includes ulimit settings. So I checked my configuration and found out that Debian default configuration file as a hardcoded value of 5.

My next command was to check the process running as avahi:

ps auxw|grep avahi
avahi    19159  1.0  3.0 6939804 504648 ?      Ssl  11:31   3:39 /usr/bin/java -Xms256m -Xmx1g -Djava.awt.headless=true -XX:+UseParNewGC -XX:+UseConcMarkSweepGC -XX:CMSInitiatingOccupancyFraction=75 -XX:+UseCMSInitiatingOccupancyOnly -XX:+HeapDumpOnOutOfMemoryError -XX:+DisableExplicitGC -Dfile.encoding=UTF-8 -Djna.nosys=true -Des.path.home=/usr/share/elasticsearch -cp /usr/share/elasticsearch/lib/elasticsearch-2.1.1.jar:/usr/share/elasticsearch/lib/* org.elasticsearch.bootstrap.Elasticsearch start -Des.network.bind_host=0.0.0.0

So an Elasticsearch daemon was using the avahi user. This could seems strange if you did not know I’m running some docker containers (see https://github.com/StamusNetworks/Amsterdam).

In fact in the container I have:

$ docker exec exebox_elasticsearch_1 ps auxw
USER       PID %CPU %MEM    VSZ   RSS TTY      STAT START   TIME COMMAND
elastic+     1  1.0  3.0 6940024 506648 ?      Ssl  10:31   3:46 /usr/bin/java -Xms256m -Xmx1g -Djava.awt.headless=true -XX:+UseParNewGC -XX:+UseConcMarkSweepGC -XX:CMSInitiatingOccupancyFraction=75 -XX:+UseCMSInitiatingOccupancyOnly -XX:+HeapDumpOnOutOfMemoryError -XX:+DisableExplicitGC -Dfile.encoding=UTF-8 -Djna.nosys=true -Des.path.home=/usr/share/elasticsearch -cp /usr/share/elasticsearch/lib/elasticsearch-2.1.1.jar:/usr/share/elasticsearch/lib/* org.elasticsearch.bootstrap.Elasticsearch start -Des.network.bind_host=0.0.0.0

So the issue comes from the fact we have:

$ docker exec exebox_elasticsearch_1 id elasticsearch
uid=105(elasticsearch) gid=108(elasticsearch) groups=108(elasticsearch)
$ id avahi
uid=105(avahi) gid=108(avahi) groups=108(avahi)

That’s a real problem, the space of user ID in the container and in the host are identical and this can result in some really weird side effect.

Fixing it

At the time of the writing I did not found something to setup the user id mapping that is causing this conflict. An experimental feature using the recent user namespace in Linux will permit to avoid this conflict in a near future but it is not currently mainstream.

A super bad workaround was to stop the docker container before doing the upgrade. It did do the job but I’m not sure I will have something working at reboot.

I really hope this new feature in docker will soon reach mainstream to avoid similar issue to other people.

My “Kernel packet capture technologies” talk at KR2015

I’ve just finished my talk on Linux kernel packet capture technologies at Kernel Recipes 2015. I would like to thanks the organizer for their great work. I also thank Frank Tizzoni for the drawing

regit

In that talk, I’ve tried to do an overview of the history of packet capture technologies in the Linux kernel. All that seen from userspace and from a Suricata developer perspective.

You can download the slides here: 2015_kernel_recipes_capture.

Elasticsearch, systemd and Debian Jessie

Now that Debian Jessie is out, it was the time to do an upgrade of my Elasticsearch servers. I’ve got two of them running in LXC containers on my main hardware system

Upgrading to Jessie was straightforward via apt-get dist-upgrade.

But the Elasticsearch server processes were not here after reboot. I’m using the Elasticsearch 1.5 packages provided by Elastic on their website.

Running /etc/init.d/elasticsearch start or service elasticsearch start were not giving any output. Systemd which is now starting the service was not kind enough to provide any debugging information.

After some research, I’ve discovered that the /usr/lib/systemd/system/elasticsearch.service was starting elasticsearch with:

ExecStart=/usr/share/elasticsearch/bin/elasticsearch            \
                            -Des.default.config=$CONF_FILE      \
                            -Des.default.path.home=$ES_HOME     \
                            -Des.default.path.logs=$LOG_DIR     \
                            -Des.default.path.data=$DATA_DIR    \
                            -Des.default.path.work=$WORK_DIR    \
                            -Des.default.path.conf=$CONF_DIR

And the variables like CONF_FILE defined in /etc/default/elasticsearch were commented and it seems it was preventing Elasticsearch to start. So updating the file to have:

# Elasticsearch log directory
LOG_DIR=/var/log/elasticsearch

# Elasticsearch data directory
DATA_DIR=/var/lib/elasticsearch

# Elasticsearch work directory
WORK_DIR=/tmp/elasticsearch

# Elasticsearch configuration directory
CONF_DIR=/etc/elasticsearch

# Elasticsearch configuration file (elasticsearch.yml)
CONF_FILE=/etc/elasticsearch/elasticsearch.yml

was enough to have a working Elasticsearch.

As pointed out by Peter Manev, to enable the service at reboot, you need to run as root:

systemctl enable elasticsearch.service

I hope this will help some of you and let me know if you find better solutions.

Slides of my talks at Lecce

I’ve been invited by SaLUG to Lecce to give some talks during their Geek Evening. I’ve done a talk on nftables and one of suricata.

Lecce by night
Lecce by night

The nftables talk was about the motivation behind the change from iptables.

Here are the slides: Nftables

The talk on Suricata was explaining the different feature of Suricata and was showing how I’ve used it to make a study of SSH bruteforce.

Here are the slides:
Suricata, Netfilter and the PRC.

Thanks a lot to Giuseppe Longo, Luca Greco and all the SaLUG team, you have been wonderful hosts!

Efficient search of string in a list of strings in Python

Introduction

I’m currently working on a script that parses Suricata EVE log files and try to detect if some fields in the log are present in a list of bad patterns. So the script has two parts which are reading the log file and searching for the string in a list of strings. This list can be big with a target of around 20000 strings.

Note: This post may seem trivial for real Python developers but as I did not manage to find any documentation on this here is this blog post.

The tests

For my test I have used a 653Mo log file containing 896077 lines. Reading this JSON formatted file is taking 5.0s. As my list of strings was around 3000 elements so far below targeted size, a thumb rules was saying that I will be ok if script stayed below 6 seconds with the matching added.

First test was a simple Python style inclusion test with the hostname being put in a list:

if event['http']['hostname'] in hostname_list:

For that test, the result was 9.5s so not awful but a bit over my expectation.

Just to check I have run a test with a C-like implementation:

for elt in hostname_list:
   if elt == target:
       # we have a winner

Result was a nice surprise, … for Python, with a execution time of 20.20s.

I was beginning to fear some development to be able to reach the speed I needed and I gave a last try. As I was taking care of match, I can transform my list of strings in a Python set thus only getting unique elements. So I have run the test using:

hostname_set = set(hostname_list)
for event in event_list:
    if event['http']['hostname'] in hostname_set:

Result was an amazing execution time of 5.20s. Only 0.20s were used to check data against my set of strings.

Explanation

Python set required elements to be hashable. It is needed because internal implementation is using dictionary. So looking for an element in a set is equivalent to look for an element in a hash table. And this is really faster than searching in a list where there is no real magic possible.

So if you only care about match and if your elements are hashable then use Python set to test for existence of a object in your set.

Slides of my nftables talk at Kernel Recipes

I’ve been lucky enough to do a talk during the third edition of Kernel Recipes. I’ve presented the evolution of nftables durig the previous year.

You can get the slides from here: 2014_kernel_recipes_nftables.

Thanks to Hupstream for uploading the video of the talk:


Not much material but this slides and a video of the work done during the previous year on nftables and its components:


Using DOM with nftables

DOM and SSH honeypot

DOM is a solution comparable to fail2ban but it uses Suricata SSH log instead of SSH server logs. The goal of DOM is to redirect the attacker based on its SSH client version. This allows to send attacker to a honeypot like pshitt directly after the first attempt. And this can be done for a whole network as Suricata does not need to be on the targeted box.

Using DOM with nftables

I’ve pushed a basic nftables support to DOM. Instead of adding element via ipset it uses a nftables set.

It is simple to use it as you just need to add a -n flag to specify which table the set has been defined in:

./dom -f /usr/local/var/log/suricata/eve.json -n nat -s libssh -vvv -i -m OpenSSH

To activate the network address translation based on the set, you can use something like:

table ip nat {
        set libssh { 
                type ipv4_addr
        }

        chain prerouting {
                 type nat hook prerouting priority -150;
                 ip saddr @libssh ip protocol tcp counter dnat 192.168.1.1:2200
        }
}

A complete basic ruleset

Here’s the ruleset running on the box implementing pshitt and DOM:

table inet filter {
        chain input {
                 type filter hook input priority 0;
                 ct state established,related accept
                 iif lo accept
                 ct state new iif != lo tcp dport {ssh, 2200} tcp flags == syn counter log prefix "SSH attempt" group 1 accept
                 iif br0 ip daddr 224.2.2.4 accept
                 ip saddr 192.168.0.0/24 tcp dport {9300, 3142} counter accept
                 ip saddr 192.168.1.0/24 counter accept
                 counter log prefix "Input Default DROP" group 2 drop
        }
}

table ip nat {
        set libssh { 
                type ipv4_addr
        }

        chain prerouting {
                 type nat hook prerouting priority -150;
                 ip saddr @libssh ip protocol tcp counter dnat 192.168.1.1:2200
        }

        chain postrouting {
                 type nat hook postrouting priority -150;
                 ip saddr 192.168.0.0/24 snat 192.168.1.1
        }
}

There is a interesting rule in this ruleset. The first is:

ct state new iif != lo tcp dport {ssh, 2200} tcp flags == syn counter log prefix "SSH attempt" group 1 accept

It uses a negative construction to match on the interface iif != lo which means interface is not lo. Note that it also uses an unamed set to define the port list via tcp dport {ssh, 2200}. That way we have one single rule for normal and honeypot ssh. At least, this rule is logging and accepting and the logging is done via nfnetlink_log because of the group parameter. This allows to have ulogd to capture log message triggered by this rule.

pshitt: collect passwords used in SSH bruteforce

Introduction

I’ve been playing lately on analysis SSH bruteforce caracterization. I was a bit frustrated of just getting partial information:

  • ulogd can give information about scanner settings
  • suricata can give me information about software version
  • sshd server logs shows username

But having username without having the password is really frustrating.

So I decided to try to get them. Looking for a SSH server honeypot, I did find kippo but it was going too far for me
by providing a fake shell access. So I’ve decided to build my own based on paramiko.

pshitt, Passwords of SSH Intruders Transferred to Text, was born. It is a lightweight fake SSH server that collect authentication data sent by intruders. It basically collects username and password and writes the extracted data to a file in JSON format. For each authentication attempt, pshitt is dumping a JSON formatted entry:

{"username": "admin", "src_ip": "116.10.191.236", "password": "passw0rd", "src_port": 36221, "timestamp": "2014-06-26T10:48:05.799316"}

The data can then be easily imported in Logstash (see pshitt README) or Splunk.

The setup

As I want to really connect to the box running ssh with a regular client, I needed a setup to automatically redirect the offenders and only them to pshitt server. A simple solution was to used DOM. DOM parses Suricata EVE JSON log file in which Suricata gives us the software version of IP connecting to the SSH server. If DOM sees a
software version containing libssh, it adds the originating IP to an ipset set.

So, the idea of our honeypot setup is simple:

  • Suricata outputs SSH software version to EVE
  • DOM adds IP using libssh to the ipset set
  • Netfilter NAT redirects all IP off the set to pshitt when they try to connect to our ssh server

Getting the setup in place is really easy. We first create the set:

ipset create libssh hash:ip

then we start DOM so it adds all offenders to the set named libssh:

cd DOM
./dom -f /usr/local/var/log/suricata/eve.json -s libssh

A more accurate setup for dom can be the following. If you know that your legitimate client are only based on OpenSSH then you can
run dom to put in the list all IP that do not (-i) use an OpenSSH client (-m OpenSSh):

./dom -f /usr/local/var/log/suricata/eve.json -s libssh -vvv -i -m OpenSSH

If we want to list the elements of the set, we can use:

ipset list libssh

Now, we can start pshitt:

cd pshitt
./pshitt

And finally we redirect the connection coming from IP of the libssh set to the port 2200:

iptables -A PREROUTING -m set --match-set libssh src -t nat -i eth0 -p tcp -m tcp --dport 22 -j REDIRECT --to-ports 2200

Some results

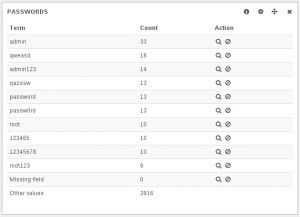
Here’s an extract of the most used passwords when trying to get access to the root account:

real root passwords

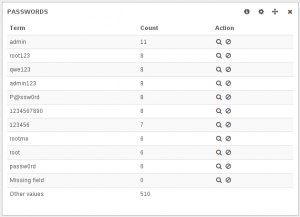
And here’s the same thing for the admin account attempt:

Root passwords

Both data show around 24 hours of attempts on an anonymous box.

Conclusion

Thanks to paramiko, it was really fast to code pshitt. I’m now collecting data and I think that they will help to improve the categorization of SSH bruteforce tools.