Nftables port knocking

One of the main advantage of nftables over iptables is its native handling of set. They can be used for multiple purpose and thanks to the timeout capabilities it is easy to do some fun things like implementing port knocking in user space.

The idea of this technic is fairly simple, a closed port is dynamically opened if the user send packets in order to a predetermine series of ports.

To implement that on a system, let’s start from ruleset where Input is closed but for a SSH rule using a set of IPv4 address as parameter:

# nft list ruleset
table inet Filter {
	set Client_SSH_IPv4 {
		type ipv4_addr
		flags timeout
		elements = { 192.168.1.1, 192.168.1.254 }
	}

	chain Input {
		type filter hook input priority 0; policy drop;
		ct state established counter accept
		tcp dport ssh ip saddr @Client_SSH_IPv4 counter accept
		iif "lo" accept
		counter log prefix "Input Dft DROP " drop
	}
}

This gives a control of which IP get access to the SSH server. It contains two fixed IP but there is a timeout flag set allowing the definition of entry with timeout.

To implement a 3 steps port knocking we define two sets with a short timeout. Hitting one port make you enter in the first set then if you are in the first set you can enter the second set by hitting the second port.

To get the first step done we use the fact that nftables can add element to a set in the packet path:

# nft add inet Filter Raw tcp dport 36 set add ip saddr @Step1 drop

Once this is done, second step is a simple derivative of first one:

# nft add inet Filter Raw ip saddr @Step1 tcp dport 15 set add ip saddr @Step2 drop

We add these rules in the prerouting table so kernel won’t do any connection tracking for these packets.

This gets us the following ruleset:

	set Step1 {
		type ipv4_addr
		timeout 5s
	}

	set Step2 {
		type ipv4_addr
		timeout 5s
	}

	chain Raw {
		type filter hook prerouting priority -300; policy accept;
		tcp dport 36 set add ip saddr @Step1 drop
		ip saddr @Step1 tcp dport 15 set add ip saddr @Step2 drop
		ip saddr @Step2 tcp dport 42 set add ip saddr timeout 10s @Client_SSH_IPv4 drop
	}

Poor man testing can be

nmap -p 36 IPKNOCK & sleep 1;  nmap -p 15 IPKNOCK & sleep 1;  nmap -p 42 IPKNOCK

We run this and our IP is in the Client_SSH_IPv4 set:

# nft list set inet Filter Client_SSH_IPv4
table inet Filter {
	set Client_SSH_IPv4 {
		type ipv4_addr
		flags timeout
		elements = { 192.168.2.1 expires 8s, 192.168.1.1,
			     192.168.1.254 }
	}
}

and we can SSH to IPKNOCK 😉

And here is the complete ruleset:

# nft list ruleset
table inet Filter {
	set Client_SSH_IPv4 {
		type ipv4_addr
		flags timeout
		elements = { 192.168.1.1, 192.168.1.254 }
	}

	set Step1 {
		type ipv4_addr
		timeout 5s
	}

	set Step2 {
		type ipv4_addr
		timeout 5s
	}

	chain Input {
		type filter hook input priority 0; policy drop;
		ct state established counter accept
		tcp dport ssh ip saddr @Client_SSH_IPv4 counter packets 0 bytes 0 accept
		iif "lo" accept
		counter log prefix "Input Dft DROP " drop
	}

	chain Raw {
		type filter hook prerouting priority -300; policy accept;
		tcp dport 36 set add ip saddr @Step1 drop
		ip saddr @Step1 tcp dport netstat set add ip saddr @Step2 drop
		ip saddr @Step2 tcp dport nameserver set add ip saddr timeout 10s @Client_SSH_IPv4 drop
	}
}

For more information on nftables feel free to visit the Nftables wiki.

Updated status in vim and bash

Powerline

Powerline is a status extension software changing the prompt or status line for shell, tmux and vim.

The result is nice looking and useful for bash:
Powerline bash prompt

and for gvim:

Powerline in gvim

Only point is that even if documentation is good, installation is not straightforward. So here’s what I’ve done.

Installation on Debian

System
sudo aptitude install fonts-powerline powerline python-powerline

On Ubuntu 16.04 you may have to install python3-powerline instead of python-powerline.

Install configuration

mkdir ~/.config/powerline
cp /usr/share/powerline/config_files/config.json .config/powerline/

Then edit the file to change default theme to default_leftonly that bring git status:

--- /usr/share/powerline/config_files/config.json	2016-07-13 23:43:25.000000000 +0200
+++ .config/powerline/config.json	2016-09-14 00:05:04.368654864 +0200
@@ -18,7 +18,7 @@
 		},
 		"shell": {
 			"colorscheme": "default",
-			"theme": "default",
+			"theme": "default_leftonly",
 			"local_themes": {
 				"continuation": "continuation",
 				"select": "select"

Now, you need to refresh the fonts or restart X.

Bash

Then edit ~/.bashrc and add at then end

. /usr/share/powerline/bindings/bash/powerline.sh
Vim

Easiest way is to have vim addon installed:

sudo aptitude install vim-addon-manager

Then you can simply do:

vim-addons install powerline

Then add to your ~/.vimrc:

set laststatus=2

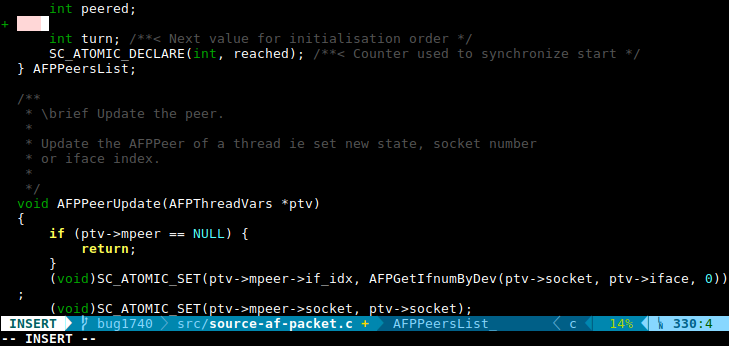
Vim status with powerline

gvim

Installation is a bit more complex as you need to install a patched font from Powerline modified fonts.

In my case:

mkdir ~/.fonts
cd ~/.fonts
wget 'https://github.com/powerline/fonts/raw/master/DejaVuSansMono/DejaVu%20Sans%20Mono%20for%20Powerline.ttf'
fc-cache -vf ~/.fonts/

Then edit .vimrc:

set guifont=DejaVu\ Sans\ Mono\ for\ Powerline\ 10

Out of [name]space issue

Introduction

I’m running Debian sid on my main laptop and if most of the time if works well there is from time to time some issues. Most of them fixes after a few days so most of the time I don’t try to fix them manually if there is no impact on my activity. Since a few weeks, the postinst script of avahi daemon was failing and as it was not fixing by itself during upgrade I’ve decided to have a look at it.

The usual ranting

As Debian sid is using systemd it is super easy to find a decent troll subject. Here it was the usual thing, systemctl was not managing to start correctly the daemon and giving me some commands if I wanted to know more:


So after a little prayer to Linux copy paste god resulting in a call to journalctl I had the message:

-- Unit avahi-daemon.service has begun starting up.
Dec 26 07:35:25 ice-age2 avahi-daemon[3466]: Found user 'avahi' (UID 105) and group 'avahi' (GID 108).
Dec 26 07:35:25 ice-age2 avahi-daemon[3466]: Successfully dropped root privileges.
Dec 26 07:35:25 ice-age2 avahi-daemon[3466]: chroot.c: fork() failed: Resource temporarily unavailable
Dec 26 07:35:25 ice-age2 avahi-daemon[3466]: failed to start chroot() helper daemon.
Dec 26 07:35:25 ice-age2 systemd[1]: avahi-daemon.service: Main process exited, code=exited, status=255/n/a
Dec 26 07:35:25 ice-age2 systemd[1]: Failed to start Avahi mDNS/DNS-SD Stack.
-- Subject: Unit avahi-daemon.service has failed
-- Defined-By: systemd
-- Support: http://lists.freedesktop.org/mailman/listinfo/systemd-devel
-- 
-- Unit avahi-daemon.service has failed.
-- 
-- The result is failed.

So a daemon was not able to fork on a rather quiet system.

Understanding the issue

A little googling lead me to this not a bug explaining the avahi configuration includes ulimit settings. So I checked my configuration and found out that Debian default configuration file as a hardcoded value of 5.

My next command was to check the process running as avahi:

ps auxw|grep avahi
avahi    19159  1.0  3.0 6939804 504648 ?      Ssl  11:31   3:39 /usr/bin/java -Xms256m -Xmx1g -Djava.awt.headless=true -XX:+UseParNewGC -XX:+UseConcMarkSweepGC -XX:CMSInitiatingOccupancyFraction=75 -XX:+UseCMSInitiatingOccupancyOnly -XX:+HeapDumpOnOutOfMemoryError -XX:+DisableExplicitGC -Dfile.encoding=UTF-8 -Djna.nosys=true -Des.path.home=/usr/share/elasticsearch -cp /usr/share/elasticsearch/lib/elasticsearch-2.1.1.jar:/usr/share/elasticsearch/lib/* org.elasticsearch.bootstrap.Elasticsearch start -Des.network.bind_host=0.0.0.0

So an Elasticsearch daemon was using the avahi user. This could seems strange if you did not know I’m running some docker containers (see https://github.com/StamusNetworks/Amsterdam).

In fact in the container I have:

$ docker exec exebox_elasticsearch_1 ps auxw
USER       PID %CPU %MEM    VSZ   RSS TTY      STAT START   TIME COMMAND
elastic+     1  1.0  3.0 6940024 506648 ?      Ssl  10:31   3:46 /usr/bin/java -Xms256m -Xmx1g -Djava.awt.headless=true -XX:+UseParNewGC -XX:+UseConcMarkSweepGC -XX:CMSInitiatingOccupancyFraction=75 -XX:+UseCMSInitiatingOccupancyOnly -XX:+HeapDumpOnOutOfMemoryError -XX:+DisableExplicitGC -Dfile.encoding=UTF-8 -Djna.nosys=true -Des.path.home=/usr/share/elasticsearch -cp /usr/share/elasticsearch/lib/elasticsearch-2.1.1.jar:/usr/share/elasticsearch/lib/* org.elasticsearch.bootstrap.Elasticsearch start -Des.network.bind_host=0.0.0.0

So the issue comes from the fact we have:

$ docker exec exebox_elasticsearch_1 id elasticsearch
uid=105(elasticsearch) gid=108(elasticsearch) groups=108(elasticsearch)
$ id avahi
uid=105(avahi) gid=108(avahi) groups=108(avahi)

That’s a real problem, the space of user ID in the container and in the host are identical and this can result in some really weird side effect.

Fixing it

At the time of the writing I did not found something to setup the user id mapping that is causing this conflict. An experimental feature using the recent user namespace in Linux will permit to avoid this conflict in a near future but it is not currently mainstream.

A super bad workaround was to stop the docker container before doing the upgrade. It did do the job but I’m not sure I will have something working at reboot.

I really hope this new feature in docker will soon reach mainstream to avoid similar issue to other people.

My “Kernel packet capture technologies” talk at KR2015

I’ve just finished my talk on Linux kernel packet capture technologies at Kernel Recipes 2015. I would like to thanks the organizer for their great work. I also thank Frank Tizzoni for the drawing

regit

In that talk, I’ve tried to do an overview of the history of packet capture technologies in the Linux kernel. All that seen from userspace and from a Suricata developer perspective.

You can download the slides here: 2015_kernel_recipes_capture.

Elasticsearch, systemd and Debian Jessie

Now that Debian Jessie is out, it was the time to do an upgrade of my Elasticsearch servers. I’ve got two of them running in LXC containers on my main hardware system

Upgrading to Jessie was straightforward via apt-get dist-upgrade.

But the Elasticsearch server processes were not here after reboot. I’m using the Elasticsearch 1.5 packages provided by Elastic on their website.

Running /etc/init.d/elasticsearch start or service elasticsearch start were not giving any output. Systemd which is now starting the service was not kind enough to provide any debugging information.

After some research, I’ve discovered that the /usr/lib/systemd/system/elasticsearch.service was starting elasticsearch with:

ExecStart=/usr/share/elasticsearch/bin/elasticsearch            \
                            -Des.default.config=$CONF_FILE      \
                            -Des.default.path.home=$ES_HOME     \
                            -Des.default.path.logs=$LOG_DIR     \
                            -Des.default.path.data=$DATA_DIR    \
                            -Des.default.path.work=$WORK_DIR    \
                            -Des.default.path.conf=$CONF_DIR

And the variables like CONF_FILE defined in /etc/default/elasticsearch were commented and it seems it was preventing Elasticsearch to start. So updating the file to have:

# Elasticsearch log directory
LOG_DIR=/var/log/elasticsearch

# Elasticsearch data directory
DATA_DIR=/var/lib/elasticsearch

# Elasticsearch work directory
WORK_DIR=/tmp/elasticsearch

# Elasticsearch configuration directory
CONF_DIR=/etc/elasticsearch

# Elasticsearch configuration file (elasticsearch.yml)
CONF_FILE=/etc/elasticsearch/elasticsearch.yml

was enough to have a working Elasticsearch.

As pointed out by Peter Manev, to enable the service at reboot, you need to run as root:

systemctl enable elasticsearch.service

I hope this will help some of you and let me know if you find better solutions.

Slides of my nftables talk at Kernel Recipes

I’ve been lucky enough to do a talk during the third edition of Kernel Recipes. I’ve presented the evolution of nftables durig the previous year.

You can get the slides from here: 2014_kernel_recipes_nftables.

Thanks to Hupstream for uploading the video of the talk:


Not much material but this slides and a video of the work done during the previous year on nftables and its components:


Suricata and Nftables

Iptables and suricata as IPS

Building a Suricata ruleset with iptables has always been a complicated task when trying to combined the rules that are necessary for the IPS with the firewall rules. Suricata has always used Netfilter advanced features allowing some more or less tricky methods to be used.

For the one not familiar with IPS using Netfilter, here’s a few starting points:

  1. IPS receives the packet coming from kernel via rules using the NFQUEUE target
  2. The IPS must received all packets of a given flow to be able to handle detection cleanly
  3. The NFQUEUE target is a terminal target: when the IPS verdicts a packet, it is or accepted (and leave current chain)

So the ruleset needs to send all packets to the IPS. A basic ruleset for an IPS could thus looks like:

iptables -A FORWARD -j NFQUEUE

With such a ruleset, all packets going through the box are sent to the IPS.

If now you want to combine this with your ruleset, then usually your first try is to add rules to the filter chain:

iptables -A FORWARD -j NFQUEUE
iptables -A FORWARD -m conntrack --ctstate ESTABLISHED -j ACCEPT
# your firewall rules here

But this will not work because of point 2: All packets sent via NFQUEUE to the IPS are or blocked or if accepted, leave the FORWARD chain directly and are going for evaluation to the next chain (mangle POSTROUTING in our case).
With such a ruleset, the result is that there is no firewall but an IPS in place.

As mentioned before there is some existing solutions (see Building a Suricata ruleset for extensive information). The simplest one is to dedicated one another chain such as mangle to IPS:

iptables -A FORWARD -t mangle -j NFQUEUE
iptables -A FORWARD -m conntrack --ctstate ESTABLISHED -j ACCEPT
# your firewall rules here

No conflict here but you have to be sure nothing in your system will use the the mangle table or you will have the same problem as the one seen previously in the filter chain. So there was no universal and simple solution to implement an IPS and a firewall ruleset with iptables.

IPS the easy way with Nftables

In Nftables, chains are defined by the user using nft command line. The user can specify:

  • The hook: the place in packet life where the chain will be set. See this diagram for more info.
    • prerouting: chain will be placed before packet are routed
    • input: chain will receive packets going to the box
    • forward: chain will receive packets routed by the box
    • postrouting: chain will receive packets after routing and before sending packets
    • output: chain will receive packet sent by the host
  • The chain type: define the objective of the chain
    • filter: chain will filter packet
    • nat: chain will only contains NAT rules
    • route: chain is containing rule that may change the route (previously now as mangle)
  • The priority: define the evaluation order of the different chains of a given hook. It is an integer that can be freely specified. But it also permits to place chain before or after some internal operation such as connection tracking.

In our case, we want to act on forwarded packets. And we want to have a chain for filtering followed by a chain for IPS. So the setup is simple of chain is simple

nft -i
nft> add table filter
nft> add chain filter firewall { type filter hook forward priority 0;}
nft> add chain filter IPS { type filter hook forward priority 10;}

With this setup, a packet will reach the firewall chain first where it will be filtered. If the packet is blocked, it will be destroy inside of the kernel. It the packet is accepted it will then jump to the next chain following order of increasing priority. In our case, the packet reaches the IPS chain.

Now, that we’ve got our chains we can add filtering rules, for example:

nft add rule filter firewall ct state established accept
nft add rule filter firewall tcp dport ssh counter accept
nft add rule filter firewall tcp dport 443 accept
nft add rule filter firewall counter log drop

And for our Suricata IPS, that’s just trivial:

nft add rule filter IPS queue

A bit more details

The queue target in nftables

The complete support for the queue target will be available in Linux 3.14. The syntax looks as follow:

nft add rule filter output queue num 3 total 2 options fanout

This rule sends matching packets to 2 load-balanced queues (total 2) starting at 3 (num 3).
fanout is one of the two queue options:

  • fanout: When used together with total load balancing, this will use the CPU ID as an index to map packets to the queues. The idea is that you can improve perfor mance if there’s a queue per CPU. This requires total with a value superior to 1 to be specified.
  • bypass: By default, if no userspace program is listening on an Netfilter queue,then all packets that are to be queued are dropped. When this option is used, the queue rule behaves like ACCEPT instead, and the packet will move on to the next table.

For a complete description of queueing mechanism in Netfilter see Using NFQUEUE and libnetfilter_queue.

If you want to test this before Linux 3.14 release, you can get nft sources from nftables git and use next-3.14 branch.

Chain priority

For reference, here are the priority values of some important internal operations and of iptables static chains:

  • NF_IP_PRI_CONNTRACK_DEFRAG (-400): priority of defragmentation
  • NF_IP_PRI_RAW (-300): traditional priority of the raw table placed before connection tracking operation
  • NF_IP_PRI_SELINUX_FIRST (-225): SELinux operations
  • NF_IP_PRI_CONNTRACK (-200): Connection tracking operations
  • NF_IP_PRI_MANGLE (-150): mangle operation
  • NF_IP_PRI_NAT_DST (-100): destination NAT
  • NF_IP_PRI_FILTER (0): filtering operation, the filter table
  • NF_IP_PRI_SECURITY (50): Place of security table where secmark can be set for example
  • NF_IP_PRI_NAT_SRC (100): source NAT
  • NF_IP_PRI_SELINUX_LAST (225): SELInux at packet exit
  • NF_IP_PRI_CONNTRACK_HELPER (300): connection tracking at exit

For example, one can create in nftables an equivalent of the raw PREROUTING chain of iptables by doing:

# nft -i
nft> add chain filter pre_raw { type filter hook prerouting priority -300;}

A bit of fun with IPv6 setup

When doing some tests on Suricata, I needed to setup a small IPv6 network. The setup is simple with one laptop which is Ethernet connected to a desktop. And the desktop host a Virtualbox system.
This way, the desktop can act as a router with laptop on eth0 and Vbox on vboxnet0.

To setup the desktop/router, I’ve used:

ip a a 4::1/64 dev eth0
ip a a 2::1/64 dev vboxnet0
echo "1">/proc/sys/net/ipv6/conf/all/forwarding

To setup the laptop who already has a IPv6 public address on eth0, I’ve done:

ip a a 4::4/64 dev wlan0
ip -6 r a 2::2/128 via 4::1 src 4::2 metric 128

Almost same thing on the Vbox:

ip a a 2::2/64 dev eth0
ip -6 r a default via 2::1

This setup should be enough but when I tried to do from the laptop:

ping6 2::2

I got a failure.

I then checked the routing on the laptop:

# ip r g 2::2
2::2 via 4::1 dev wlan0  src 2a01:e35:1394:5bd0:f8b3:5a98:2715:6c8d  metric 128

A public IPv6 address is used as source address and this is confirmed by a tcpdump on the desktop:

# tcpdump -i eth0 icmp6 -nv
10:54:48.841761 IP6 (hlim 64, next-header ICMPv6 (58) payload length: 64) 2a01:e35:1394:5bd0:f8b3:5a98:2715:6c8d > 4::1: [icmp6 sum ok] ICMP6, echo request, seq 11

And the desktop does not know how to reach this IP address because it does not have a public IPv6 address.

On the laptop, I’ve dumped wlan0 config to check the address:

# ip a l dev wlan0
3: wlan0:  mtu 1500 qdisc mq state UP group default qlen 1000
    link/ether c4:85:08:33:c4:c8 brd ff:ff:ff:ff:ff:ff
    inet 192.168.1.137/24 brd 192.168.1.255 scope global wlan0
       valid_lft forever preferred_lft forever
    inet6 4::4/64 scope global
       valid_lft forever preferred_lft forever
    inet6 2a01:e35:1434:5bd0:f8b3:5a98:2715:6c8d/64 scope global temporary dynamic
       valid_lft 86251sec preferred_lft 84589sec
    inet6 2a01:e35:1434:5bd0:c685:8ff:fe33:c4c8/64 scope global dynamic
       valid_lft 86251sec preferred_lft 86251sec
    inet6 fe80::c685:8ff:fe33:c4c8/64 scope link
       valid_lft forever preferred_lft forever

And, yes, 2a01:e35:1394:5bd0:f8b3:5a98:2715:6c8d is a dynamic IPv6 address which is used by default to get out (and bring a little privacy).

Deleting the address did fix the ping issue:

# ip a d 2a01:e35:1394:5bd0:f8b3:5a98:2715:6c8d/64 dev wlan0
# ping6 2::2
PING 2::2(2::2) 56 data bytes
64 bytes from 2::2: icmp_seq=1 ttl=63 time=5.47 ms

And getting the route did confirm the fix was working:

# ip r g 2::2
2::2 via 4::1 dev wlan0  src 4::4  metric 128 

All that to say, that it can be useful to desactivate temporary IPv6 address before setting up a test network:

echo "0" > /proc/sys/net/ipv6/conf/wlan0/use_tempaddr

Talk about nftables at Kernel Recipes 2013

I’ve just gave a talk about nftables, the iptables successor, at Kernel Recipes 2013. You can find the slides here:
2013_kernel_recipes_nftables

A description of the talk as well as slides and video are available on Kernel Recipes website

Here’s the video of my talk:

I’ve presented a video of nftables source code evolution:

The video has been generated with gource. Git history of various components have been merged and the file path has been prefixed with project name.

Using tc with IPv6 and IPv4

The first news is that it works! It is possible to use tc to setup QoS on IPv6 but the filter have to be updated.

When working on adding IPv6 support to lagfactory, I found out by reading tc sources and specifically ll_proto.c that the keyword to use for IPv6 was ipv6. Please read that file if you need to find the keyword for an other protocol.
So to send packet with Netfilter mark 5000 to a specific queue, one can use:

/sbin/tc filter add dev vboxnet0 protocol ipv6 parent 1:0 prio 3 handle 5000 fw flowid 1:3

All would have been simple, if I was not trying to have IPv6 and IPv4 support. My first try was to simply do:

${TC} filter add dev ${IIF} protocol ip parent 1:0 prio 3 handle 5000 fw flowid 1:3
${TC} filter add dev ${IIF} protocol ipv6 parent 1:0 prio 3 handle 5000 fw flowid 1:3

But the result was this beautiful message:

RTNETLINK answers: Invalid argument
We have an error talking to the kernel

Please note the second message displayed that warn you you talk to rudely to kernel and that he just kick you out the room.

The fix is simple. In fact, you can not use twice the same prio. So it is successful to use:

${TC} filter add dev ${IIF} protocol ip parent 1:0 prio 3 handle 5000 fw flowid 1:3
${TC} filter add dev ${IIF} protocol ipv6 parent 1:0 prio 4 handle 5000 fw flowid 1:3