Updated status in vim and bash

Powerline

Powerline is a status extension software changing the prompt or status line for shell, tmux and vim.

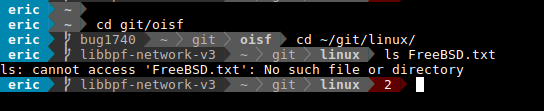
The result is nice looking and useful for bash:
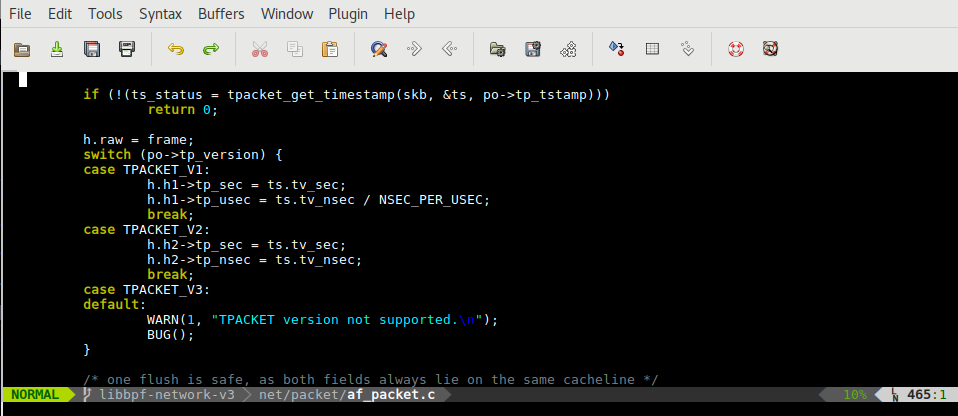
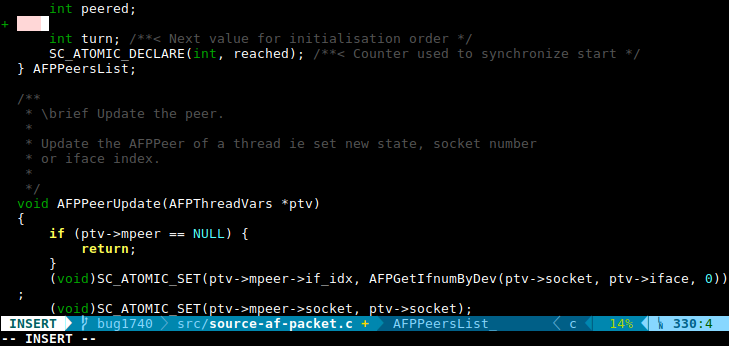
Powerline bash prompt

and for gvim:

Powerline in gvim

Only point is that even if documentation is good, installation is not straightforward. So here’s what I’ve done.

Installation on Debian

System
sudo aptitude install fonts-powerline powerline python-powerline

On Ubuntu 16.04 you may have to install python3-powerline instead of python-powerline.

Install configuration

mkdir ~/.config/powerline
cp /usr/share/powerline/config_files/config.json .config/powerline/

Then edit the file to change default theme to default_leftonly that bring git status:

--- /usr/share/powerline/config_files/config.json	2016-07-13 23:43:25.000000000 +0200
+++ .config/powerline/config.json	2016-09-14 00:05:04.368654864 +0200
@@ -18,7 +18,7 @@
 		},
 		"shell": {
 			"colorscheme": "default",
-			"theme": "default",
+			"theme": "default_leftonly",
 			"local_themes": {
 				"continuation": "continuation",
 				"select": "select"

Now, you need to refresh the fonts or restart X.

Bash

Then edit ~/.bashrc and add at then end

. /usr/share/powerline/bindings/bash/powerline.sh
Vim

Easiest way is to have vim addon installed:

sudo aptitude install vim-addon-manager

Then you can simply do:

vim-addons install powerline

Then add to your ~/.vimrc:

set laststatus=2

Vim status with powerline

gvim

Installation is a bit more complex as you need to install a patched font from Powerline modified fonts.

In my case:

mkdir ~/.fonts
cd ~/.fonts
wget 'https://github.com/powerline/fonts/raw/master/DejaVuSansMono/DejaVu%20Sans%20Mono%20for%20Powerline.ttf'
fc-cache -vf ~/.fonts/

Then edit .vimrc:

set guifont=DejaVu\ Sans\ Mono\ for\ Powerline\ 10

My “Kernel packet capture technologies” talk at KR2015

I’ve just finished my talk on Linux kernel packet capture technologies at Kernel Recipes 2015. I would like to thanks the organizer for their great work. I also thank Frank Tizzoni for the drawing

regit

In that talk, I’ve tried to do an overview of the history of packet capture technologies in the Linux kernel. All that seen from userspace and from a Suricata developer perspective.

You can download the slides here: 2015_kernel_recipes_capture.

Slides of my talks at Lecce

I’ve been invited by SaLUG to Lecce to give some talks during their Geek Evening. I’ve done a talk on nftables and one of suricata.

Lecce by night
Lecce by night

The nftables talk was about the motivation behind the change from iptables.

Here are the slides: Nftables

The talk on Suricata was explaining the different feature of Suricata and was showing how I’ve used it to make a study of SSH bruteforce.

Here are the slides:
Suricata, Netfilter and the PRC.

Thanks a lot to Giuseppe Longo, Luca Greco and all the SaLUG team, you have been wonderful hosts!

Efficient search of string in a list of strings in Python

Introduction

I’m currently working on a script that parses Suricata EVE log files and try to detect if some fields in the log are present in a list of bad patterns. So the script has two parts which are reading the log file and searching for the string in a list of strings. This list can be big with a target of around 20000 strings.

Note: This post may seem trivial for real Python developers but as I did not manage to find any documentation on this here is this blog post.

The tests

For my test I have used a 653Mo log file containing 896077 lines. Reading this JSON formatted file is taking 5.0s. As my list of strings was around 3000 elements so far below targeted size, a thumb rules was saying that I will be ok if script stayed below 6 seconds with the matching added.

First test was a simple Python style inclusion test with the hostname being put in a list:

if event['http']['hostname'] in hostname_list:

For that test, the result was 9.5s so not awful but a bit over my expectation.

Just to check I have run a test with a C-like implementation:

for elt in hostname_list:
   if elt == target:
       # we have a winner

Result was a nice surprise, … for Python, with a execution time of 20.20s.

I was beginning to fear some development to be able to reach the speed I needed and I gave a last try. As I was taking care of match, I can transform my list of strings in a Python set thus only getting unique elements. So I have run the test using:

hostname_set = set(hostname_list)
for event in event_list:
    if event['http']['hostname'] in hostname_set:

Result was an amazing execution time of 5.20s. Only 0.20s were used to check data against my set of strings.

Explanation

Python set required elements to be hashable. It is needed because internal implementation is using dictionary. So looking for an element in a set is equivalent to look for an element in a hash table. And this is really faster than searching in a list where there is no real magic possible.

So if you only care about match and if your elements are hashable then use Python set to test for existence of a object in your set.

Playing with python-git

Introduction

I’m currently working on Scirius, the web management interface for Suricata developed by Stamus Networks.
Scirius is able to fetch IDS signatures from external place and the backend is storing this element in a git tree. As Scirius is a Django application, this means we need to interact with git in Python.

Usually the documentation of Python modules is good and enough to develop. This is sadly not the case for GitPython. There is documentation but the overall quality it not excellent, at least for a non genuine Python developer, and there is some big part missing.

Doing a commit

Doing a commit is really simple once you have understand what to do.
You need to open the repository and work on his index which is the object you add file to commit to. In the following example, I want to add everything under the rules directory:

    repo = git.Repo(source_git_dir)
    index = repo.index
    index.add(["rules"])
    message =  'source version at %s' % (self.updated_date)
    index.commit(message)

Set value in the configuration of a repository

It is possible to edit the configuration of a git repository with GitPython. To do that you need to get the config and
to use the set_value function. For example, the following code snippet create a repository and set user.email and user.name for that repository:

    repo = git.Repo.init(source_git_dir)
    config = repo.config_writer()
    config.set_value("user", "email", "scirius@stamus-networks.com")
    config.set_value("user", "name", "Scirius")

OSError 25: Inappropriate ioctl for device

I’ve encountered this fabulous exception when trying to do a commit in Scirius. The problem is only showing up when running the application in wsfcgi mode. It is documented in Issue 39 on GitHub but there is no workaround proposed.

The error comes from the fact the function used to guess the identity of the user running the application is called even if value are set in the config.
And this function is failing when it is called outside of a real session. This function is in fact trying to get things from environment but these value
are not set when the application is started by init. To fix this, it is possible to force the USERNAME environment variable.

Here’s how it is implemented in Scirius:

+    os.environ['USERNAME'] = 'scirius'
    index.add(["rules"])
    message =  'source version at %s' % (self.updated_date)
    index.commit(message)

You can see the diff on GitHub

Slides of my coccigrep lightning talk at HES2014

I’ve gave a lightning talk about coccigrep at Hackito Ergo Sum to show how it can be used to search in code during audit or hacking party. Here are the slides: coccigrep: a semantic grep for the C language.

The slides of my talk Suricata 2.0, Netfilter and the PRC will soon be available on Stamus Networks website.

Speeding up scapy packets sending

Sending packets with scapy

I’m currently doing some code based on scapy. This code reads data from a possibly huge file and send a packet for each line in the file using the contained information.
So the code contains a simple loop and uses sendp because the frame must be sent at layer 2.

     def run(self):
         filedesc = open(self.filename, 'r')
         # loop on read line
         for line in filedesc:
             # Build and send packet
             sendp(pkt, iface = self.iface, verbose = verbose)
             # Inter packet treatment

Doing that the performance are a bit deceptive. For 18 packets, we’ve got:

    real    0m2.437s
    user    0m0.056s
    sys     0m0.012s

If we strace the code, the explanation is quite obvious:

socket(PF_PACKET, SOCK_RAW, 768)        = 4
setsockopt(4, SOL_SOCKET, SO_RCVBUF, [0], 4) = 0
select(5, [4], [], [], {0, 0})          = 0 (Timeout)
ioctl(4, SIOCGIFINDEX, {ifr_name="lo", ifr_index=1}) = 0
bind(4, {sa_family=AF_PACKET, proto=0x03, if1, pkttype=PACKET_HOST, addr(0)={0, }, 20) = 0
setsockopt(4, SOL_SOCKET, SO_RCVBUF, [1073741824], 4) = 0
setsockopt(4, SOL_SOCKET, SO_SNDBUF, [1073741824], 4) = 0
getsockname(4, {sa_family=AF_PACKET, proto=0x03, if1, pkttype=PACKET_HOST, addr(6)={772, 000000000000}, [18]) = 0
ioctl(4, SIOCGIFNAME, {ifr_index=1, ifr_name="lo"}) = 0
sendto(4, "\377\377\377\377\377\377\0\0\0\0\0\0\10\0E\0\0S}0@\0*\6\265\373\307;\224\24\300\250"..., 97, 0, NULL, 0) = 97
select(0, NULL, NULL, NULL, {0, 0})     = 0 (Timeout)
close(4)                                = 0
socket(PF_PACKET, SOCK_RAW, 768)        = 4
setsockopt(4, SOL_SOCKET, SO_RCVBUF, [0], 4) = 0
select(5, [4], [], [], {0, 0})          = 0 (Timeout)
ioctl(4, SIOCGIFINDEX, {ifr_name="lo", ifr_index=1}) = 0
bind(4, {sa_family=AF_PACKET, proto=0x03, if1, pkttype=PACKET_HOST, addr(0)={0, }, 20) = 0
setsockopt(4, SOL_SOCKET, SO_RCVBUF, [1073741824], 4) = 0
setsockopt(4, SOL_SOCKET, SO_SNDBUF, [1073741824], 4) = 0
getsockname(4, {sa_family=AF_PACKET, proto=0x03, if1, pkttype=PACKET_HOST, addr(6)={772, 000000000000}, [18]) = 0
ioctl(4, SIOCGIFNAME, {ifr_index=1, ifr_name="lo"}) = 0
sendto(4, "\377\377\377\377\377\377\0\0\0\0\0\0\10\0E\0\0004}1@\0*\6\266\31\307;\224\24\300\250"..., 66, 0, NULL, 0) = 66
select(0, NULL, NULL, NULL, {0, 0})     = 0 (Timeout)
close(4)                                = 0

For each packet, a new socket is opened and this takes age.

Speeding up the sending

To speed up the sending, one solution is to build a list of packets and to send that list via a sendp() call.

     def run(self):
         filedesc = open(self.filename, 'r')
         pkt_list = []
         # loop on read line
         for line in filedesc:
             # Build and send packet
             pkt_list.append(pkt)
         sendp(pkt_list, iface = self.iface, verbose = verbose)

This is not possible in our case due to the inter packet treatment we have to do.
So the best way is to reuse the socket. This can be done easily when you’ve read the documentation^W code:

@@ -27,6 +27,7 @@ class replay:
     def run(self):
         # open filename
         filedesc = open(self.filename, 'r')
+        s = conf.L2socket(iface=self.iface)
         # loop on read line
         for line in filedesc:
             # Build and send packet
-            sendp(pkt, iface = self.iface, verbose = verbose)
+            s.send(pkt)

The idea is to create a socket via the function used in sendp() and to use the send() function of the object to send packets.

With that modification, the performance are far better:

    real    0m0.108s
    user    0m0.064s
    sys     0m0.004s

I’m not a scapy expert so ping me if there is a better way to do this.

Using linux perf tools for Suricata performance analysis

Introduction

Perf is a great tool to analyse performances on Linux boxes. For example, perf top will give you this type of output on a box running Suricata on a high speed network:

Events: 32K cycles                                                                                                                                                                                                                            
 28.41%  suricata            [.] SCACSearch
 19.86%  libc-2.15.so        [.] tolower
 17.83%  suricata            [.] SigMatchSignaturesBuildMatchArray
  6.11%  suricata            [.] SigMatchSignaturesBuildMatchArrayAddSignature
  2.06%  suricata            [.] tolower@plt
  1.70%  libpthread-2.15.so  [.] pthread_mutex_trylock
  1.17%  suricata            [.] StreamTcpGetFlowState
  1.10%  libc-2.15.so        [.] __memcpy_ssse3_back
  0.90%  libpthread-2.15.so  [.] pthread_mutex_lock

The functions are sorted by CPU consumption. Using arrow key it is possible to jump into the annotated code to see where most CPU cycles are used.

This is really useful but in the case of a function like pthread_mutex_trylock, the interesting part is to be able to find where this function is called.

Getting function call graph in perf

This stack overflow question lead me to the solution.

I’ve started to build suricata with the -fno-omit-frame-pointer option:

./configure --enable-pfring --enable-luajit CFLAGS="-fno-omit-frame-pointer"
make
make install

Once suricata was restarted (with pid being 9366), I was then able to record the data:

sudo perf record -a --call-graph -p 9366

Extracting the call graph was then possible by running:

sudo perf report --call-graph --stdio

The result is a huge detailed report. For example, here’s the part on pthread_mutex_lock:

     0.94%  Suricata-Main  libpthread-2.15.so     [.] pthread_mutex_lock
            |
            --- pthread_mutex_lock
               |
               |--48.69%-- FlowHandlePacket
               |          |
               |          |--53.04%-- DecodeUDP
               |          |          |
               |          |          |--95.84%-- DecodeIPV4
               |          |          |          |
               |          |          |          |--99.97%-- DecodeVLAN
               |          |          |          |          DecodeEthernet
               |          |          |          |          DecodePfring
               |          |          |          |          TmThreadsSlotVarRun
               |          |          |          |          TmThreadsSlotProcessPkt
               |          |          |          |          ReceivePfringLoop
               |          |          |          |          TmThreadsSlotPktAcqLoop
               |          |          |          |          start_thread
               |          |          |           --0.03%-- [...]
               |          |          |
               |          |           --4.16%-- DecodeIPV6
               |          |                     |
               |          |                     |--97.59%-- DecodeTunnel
               |          |                     |          |
               |          |                     |          |--99.18%-- DecodeTeredo
               |          |                     |          |          DecodeUDP
               |          |                     |          |          DecodeIPV4
               |          |                     |          |          DecodeVLAN
               |          |                     |          |          DecodeEthernet
               |          |                     |          |          DecodePfring
               |          |                     |          |          TmThreadsSlotVarRun
               |          |                     |          |          TmThreadsSlotProcessPkt
               |          |                     |          |          ReceivePfringLoop
               |          |                     |          |          TmThreadsSlotPktAcqLoop
               |          |                     |          |          start_thread
               |          |                     |          |
               |          |                     |           --0.82%-- DecodeIPV4
               |          |                     |                     DecodeVLAN
               |          |                     |                     DecodeEthernet
               |          |                     |                     DecodePfring
               |          |                     |                     TmThreadsSlotVarRun
               |          |                     |                     TmThreadsSlotProcessPkt
               |          |                     |                     ReceivePfringLoop
               |          |                     |                     TmThreadsSlotPktAcqLoop
               |          |                     |                     start_thread
               |          |                     |
               |          |                      --2.41%-- DecodeIPV6
               |          |                                DecodeTunnel
               |          |                                DecodeTeredo
               |          |                                DecodeUDP
               |          |                                DecodeIPV4
               |          |                                DecodeVLAN
               |          |                                DecodeEthernet
               |          |                                DecodePfring
               |          |                                TmThreadsSlotVarRun
               |          |                                TmThreadsSlotProcessPkt
               |          |                                ReceivePfringLoop
               |          |                                TmThreadsSlotPktAcqLoop
               |          |                                start_thread

Adding a force build to all builders

Recent versions of buildbot, the continuous integration framework don’t allow by default the force build feature.
This feature can be used to start a build on demand. It is really useful when you’ve updated the build procedure or when you want to test new branches.

It was a little tricky to add it, so I decided to share it. If c is the name of the configuration you build in your master.cfg, you can add after all builders declarations:

from buildbot.schedulers.forcesched import *
c['schedulers'].append(ForceScheduler(name="force", 
                       builderNames = [ builder.getConfigDict()['name'] for builder in c['builders'] ]))

As was saying one of my physic teacher: “easy when you’ve done it once”.

Some statistics about Suricata 1.4

A huge work

Suricata 1.4 has been released December 13th 2012 and it has been a huge work. The number of modifications is just impressing:

390 files changed, 25299 insertions(+), 11982 deletions(-)

The following video is using gource to display the evolution of Suricata IDS/IPS source code between version 1.3 and version 1.4. It only displays the modified files and do not show the files existing at start.

A collaborative work

A total of 11 different authors have participated to this release. The following graph generated by gitstats shows the number of lines of code by author:

Some words about activity

The activity shows that most of the work is done during week day but there is some work done on sunday:

As shown the following graph, the activity as decreased during the stabilization process:

0

0

0

0

0

1

0

0

6

7

9

10

5

11

11

11

15

51

15

35

23

22

16

24

10

29

32

26

18

16

6

8

32 31 30 29 28 27 26 25 24 23 22 21 20 19 18 17 16 15 14 13 12 11 10 9 8 7 6 5 4 3 2 1