About Suricata performance boost between 1.0 and 1.1beta2

Discovering the performance boost

When doing some coding on both 1.0 and 1.1 branch of suricata, I’ve remarked that there was a huge performance improvement of the 1.1 branch over the 1.0 branch. The parsing of a given real-life pcap file was taking 200 seconds with 1.0 but only 30 seconds with 1.1. This performance boost was huge and I decide to double check and to study how such a performance boost was possible and how it was obtained:

A git bisection shows me that the performance improvement was done in at least two main steps. I then decide to do a more systematic study on the performance improvement by iterating over the revision and by each time running the same test with the same basic and not tuned configuration:

suricata -c ~eric/builds/suricata/etc/suricata.yaml  -r benches/sandnet.pcap

and storing the log output.

Graphing the improvements

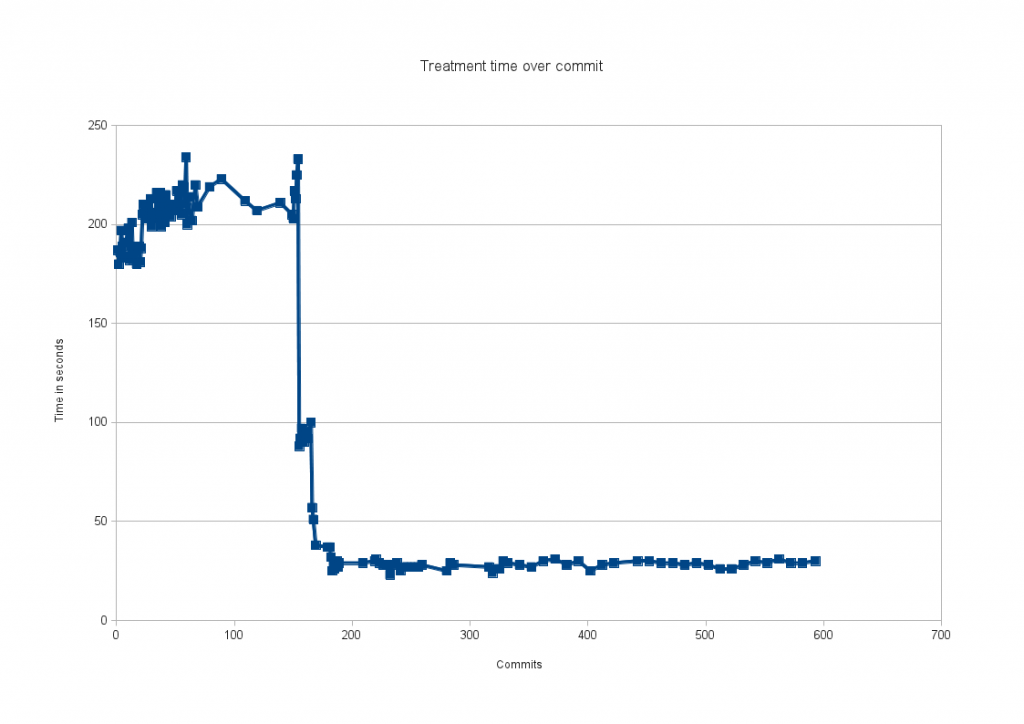
The following graph shows the evolution of treatment time by commits between suricata 1.0.2 and suricata 1.1beta2:

It is impressive to see that improvements are located over a really short period. In term of commit date, almost everything has happened between the December 1th and December 9th.

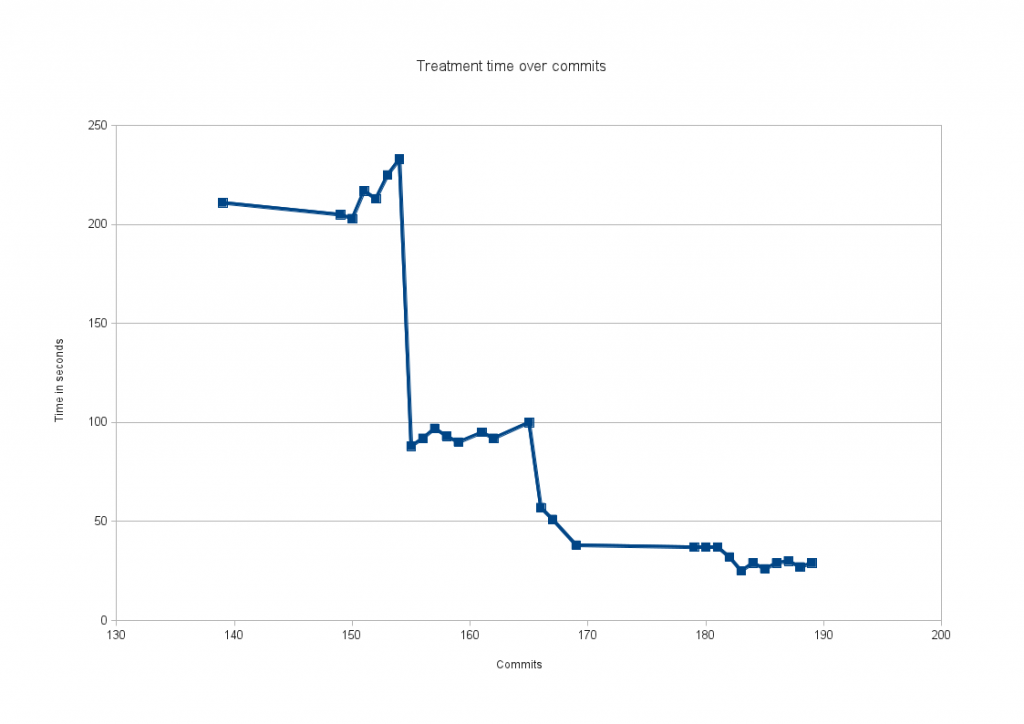
The following graph shows the same data with a zoom on the critical period:

One can see that there is two big steps and a last less noticeable phase.

Identifiying the commits

The first big step in the improvement is due to commit c61c68fd:

commit c61c68fd365bf2274325bb77c8092dfd20f6ca87
Author: Anoop Saldanha
Date:   Wed Dec 1 13:50:34 2010 +0530

    mpm and fast pattern support for http_header. Also support relative modifiers for http_header

This commit has more than double previous performance.

The second step is commit which also double performance. It is again by Anoop Saldanha:

commit 72b0fcf4197761292342254e07a8284ba04169f0
Author: Anoop Saldanha
Date:   Tue Dec 7 16:22:59 2010 +0530

    modify detection engine to carry out uri mpm run before build match array if alproto is http and if sgh has atleast one sig with uri mpm set

Other improvements were made a few hours later by Anoop who succeeded in a 20% improvements with:

commit b140ed1c9c395d7014564ce077e4dd3b4ae5304e
Author: Anoop Saldanha
Date:   Tue Dec 7 19:22:06 2010 +0530

    modify detection engine to run hhd mpm before building the match array

The motivation of this development was the fact that the developers were knowing that the match on http_headers was not optimal because it was using a single pattern search algorithm. By switching to a multi-pattern match algorithm, they know it will do a great prefilter job and increase the speed. Here’s the quote of Victor Julien’s comment and explanation:

We knew that at the time we inspected the http_headers and a few other buffers for each potential signature match over and over again using a single pattern search algorithm. We already knew this was inefficient, so moving to a multi-pattern match algorithm that would prefilter the signatures made a lot of sense even without benching it.

Finaly two days later, there is a serie of two commits which brings a other 20-30% improvements :

commit 8bd6a38318838632b019171b9710b217771e4133
Author: Anoop Saldanha
Date:   Thu Dec 9 17:37:34 2010 +0530

    support relative pcre for http header. All pcre processing for http header moved to hhd engine

commit 2b781f00d7ec118690b0e94405d80f0ff918c871
Author: Anoop Saldanha
Date:   Thu Dec 9 12:33:40 2010 +0530

    support relative pcre for client body. All pcre processing for client body moved to hcbd engine

Conclusion

It appears that all the improvements are linked with modifications on the HTTP handling. Working hard on improving HTTP feature has lead to an impressive performance boost. Thanks a lot to Anoop for this awesome work. As HTTP is now most of the trafic on internet this is a really good news for suricata users !

IPv6 privacy extensions on Linux

IPv6 global address

The global address is used in IPv6 to communicate with the outside world. This is thus the one that is used as source for any communication and thus in a way identify you on Internet.

Below is a dump of an interface configuration:

eth0: <BROADCAST,MULTICAST,UP,LOWER_UP> mtu 1500 qdisc pfifo_fast state UP qlen 1000
    link/ether 00:22:15:64:42:bd brd ff:ff:ff:ff:ff:ff
    inet6 2a01:f123:1234:5bd0:222:15ff:fe64:42bd/64 scope global dynamic 
       valid_lft 86314sec preferred_lft 86314sec
    inet6 fe80::222:15ff:fe64:42bd/64 scope link 
       valid_lft forever preferred_lft forever

The global address is here 2a01:f123:1234:5bd0:222:15ff:fe64:42bd/64. It is build by using the prefix and adding an identifier build with the hardware address. For example, here the hardware address is 00:22:15:64:42:bd and the global IPv6 address is ending with 22:15ff:fe64:42bd.

It is thus easy to go from the IPv6 global address to the hardware address. To fix this issue and increase the privacy of network user, privacy extensions have been developed.

Privacy extensions

The RFC 3041 describes how to build and use temporary addresses that will be used as source address for connection to the outside world.

To activate this feature, you simply have to modify an entry in /proc. For example to activate the feature on eth0, you can do

echo "2">/proc/sys/net/ipv6/conff/eth0/use_tempaddr

The usage of the option is detailled in the must-read ip-sysctl.txt file:

use_tempaddr - INTEGER
        Preference for Privacy Extensions (RFC3041).
          <= 0 : disable Privacy Extensions
          == 1 : enable Privacy Extensions, but prefer public
                 addresses over temporary addresses.
          >  1 : enable Privacy Extensions and prefer temporary
                 addresses over public addresses.
        Default:  0 (for most devices)
                 -1 (for point-to-point devices and loopback devices)

After network restart (a simple ifdown, ifup of the interface is enough), the output of the ip a command looks like that:

eth0: <BROADCAST,MULTICAST,UP,LOWER_UP> mtu 1500 qdisc pfifo_fast state UP qlen 1000
    link/ether 00:22:15:64:42:bd brd ff:ff:ff:ff:ff:ff
    inet 192.168.1.129/24 brd 192.168.1.255 scope global eth0
    inet6 2a01:f123:1234:5bd0:21f1:f624:d2b8:3702/64 scope global temporary dynamic 
       valid_lft 86314sec preferred_lft 2914sec
    inet6 2a01:f123:1234:5bd0:222:15ff:fe64:42bd/64 scope global dynamic 
       valid_lft 86314sec preferred_lft 86314sec
    inet6 fe80::222:15ff:fe64:42bd/64 scope link 
       valid_lft forever preferred_lft forever

A new temporary address has been added. After preferred_lft seconds, it becomes deprecated and a new address is added:

eth0: <BROADCAST,MULTICAST,UP,LOWER_UP> mtu 1500 qdisc pfifo_fast state UP qlen 1000
    link/ether 00:22:15:64:42:bd brd ff:ff:ff:ff:ff:ff
    inet 192.168.1.129/24 brd 192.168.1.255 scope global eth0
    inet6 2a01:f123:1234:5bd0:55c3:7efd:93d1:5057/64 scope global temporary dynamic 
       valid_lft 85009sec preferred_lft 1672sec
    inet6 2a01:f123:1234:5bd0:21f1:f624:d2b8:3702/64 scope global temporary deprecated dynamic 
       valid_lft 82077sec preferred_lft 0sec
    inet6 2a01:f123:1234:5bd0:222:15ff:fe64:42bd/64 scope global dynamic 
       valid_lft 86398sec preferred_lft 86398sec
    inet6 fe80::222:15ff:fe64:42bd/64 scope link 
       valid_lft forever preferred_lft foreverr

The deprecated address is removed when the valid_lft counter reach zero second.

Some more tuning

The default duration for a prefered adress is of one day. This can be changed by modifying the temp_prefered_lft variable.

For example, you can add to sysctl.conf:

net.ipv6.conf.eth0.temp_prefered_lft = 7200

The default validity length of the addresses can be changed via the temp_valid_lft variable.

The max_desync_factor set the max random time to wait before asking a new address. This is used to avoid that all computers in network ask for an address at the same time.
On side effect is that if you set the prefered or valid time to a low value, the max_desync_factor must also be decreased. If not, there will be long time period without temporary address.

If temp_prefered_lft is multiple time lower than temp_valid_lft, then the deprecated addresses will accumulate. To avoid overloading the kernel, a maximum number of addresses is set.
Equal to 16 by default, it can be changed by setting the max_addresses sysctl variable.

Known issues and problems

As the temporary address is used for connection to the outside and has a limited duration, some long duration connections (tink ssh) will be cut when the temporary address is removed.

I’ve also observed a problem when the maximum number of addresses is reached:

ipv6_create_tempaddr(): retry temporary address regeneration.
ipv6_create_tempaddr(): regeneration time exceeded. disabled temporary address support.

The result was that the temporary address support was disabled and the standard global address was used again. When setting temp_prefered_lft to 3600 and keeping temp_valid_ft to default value, the problem is reproduced easily.

Conclusion

The support of IPv6 privacy extensions is correct but the lack of link with existing connection can cause the some services to be disrupted. A easy to use per-software selection of address could be really interesting to avoid these problems.
More about Suricata multithread performance

Following my preceding post on suricata multithread performance I’ve decided to continue to work on the subject.

By using perf-tool, I found out that when the number of detect threads was increasing, more and more time was used in a spin lock. One of the possible explanation is that the default running mode for pcap file (RunModeFilePcapAuto) is not optimal. The only decode thread take some time to treat the packets and he is not fast enough to send data to the multiple detect threads. This is triggering a lot of wait and a CPU usage increase. Following a discussion with Victor Julien, I decide to give a try to an alternate run mode for working on pcap file, RunModeFilePcapAutoFp.

The architecture of this run mode is different. A thread is in charge of the reading of the file and the treatment of packets is done in a pool of threads (from decode to output). The augmentation of the power of decoding and the limitation of the ratio decode/detect would possibly bring some scalability.

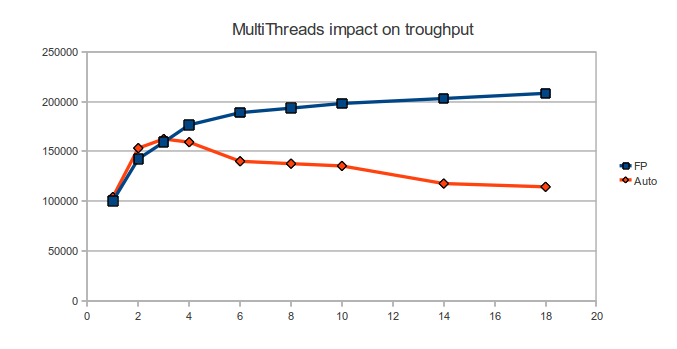
The following graph is a comparison of the Auto mode and the FP mode on the test system described in the previous post (A 24 threads/core server parses a 6.1Go pcap file). It displays the number of packets per second in function of the number of threads:

The performance difference is really interesting. The FP mode shows a increase of the performance with the number of threads. This is far better than the Auto run mode where performance decrease with the number of threads.

As pointed out in a discussion on the OISF-users mailing list, multithread tuning has a real impact on performance. The result of the tests I’ve done are significant but they only apply to the parsing of a big pcap file. You will have to tune Suricata to see how to take the best of it on your system.

Optimizing Suricata on multicore CPUs

Suricata IDS/IPS architecture is heavily using multithreading. On almost every runmode (PCAP, PCAP file, NFQ, …) it is possible to setup the number of thread that are used for detection. This is the most CPU intensive task as it does the detection of alert by checking the packet on the signatures. The configuration of the number of threads is done by setting
a ratio which decide of the number of threads to be run by available CPUs (detect_thread_ratio variable).

A discussion with Florian Westphal at NFWS 2010 convince me that it was necessary for performance to tune with more granularity the thread and CPU link. I thus decide to improve this part of the code in Suricata and I’ve recently submitted a serie of patches that enable a fine setting.

I’ve been able to run some tests on a decent server:

processor : 23
vendor_id : GenuineIntel
cpu family : 6
model : 44
model name : Intel(R) Xeon(R) CPU X5650 @ 2.67GHz

This is a dual 6-core CPUs with hyperthreading activated and something like 12 Go of memory. From a Linux point of view, it has 24 identical processors.

I was not able to produce a decent testing environnement (read able to inject traffic) and all tests have been made on the parsing of a 6.1Go pcap file captured on a real network.

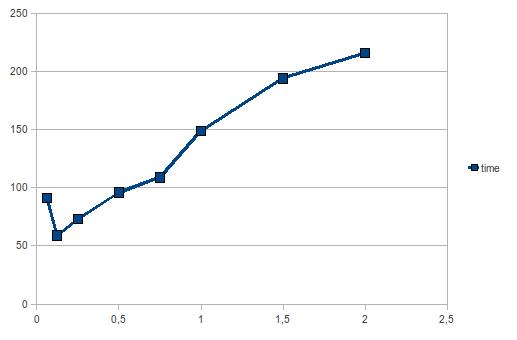
I’ve first tested my modification and soon arrive to the conclusion that limiting the number of threads was a good idea. Following Victor Julien suggestion, I’ve played with the detect_thread_ratio variable to see its influence on the performance. Here’s the graph of performance relatively to the ratio for the given server:

It seems that the 0.125 value (which correspond to 3 threads) is on this server the best value.

If we launch the test with ratio 0.125 more than one time, we can see that the performance vary between 64s and 50s with a mean of 59s. This means the variation is about 30% and the running can not be easily predicted.

It is now time to look at the results we can obtain by tuning the affinity. I’ve setup the following affinity configuration which run 3 threads on selected CPU (for our reader 3 = 0.125 * 24):

  cpu_affinity:
    - management_cpu_set:
        cpu: [ 0 ]  # include only these cpus in affinity settings
    - receive_cpu_set:
        cpu: [ 1 ]  # include only these cpus in affinity settings
    - decode_cpu_set:
        cpu: [ "2" ]
        mode: "balanced"
    - stream_cpu_set:
        cpu: [ "0-4" ]
    - detect_cpu_set:
        #cpu: [ 6, 7, 8 ]
        cpu: [ 6, 8, 10 ]
        #cpu: [ 6, 12, 18 ]
        mode: "exclusive" # run detect threads in these cpus
        threads: 3
        prio:
           low: [ "0-4" ]
           medium: [ "5-23" ]
           default: "medium"
    - verdict_cpu_set:
        cpu: [ 0 ]
        prio:
           default: "high"
    - reject_cpu_set:
        cpu: [ 0 ]
        prio:
           default: "low"
    - output_cpu_set:
        cpu: [ "0" ]
        prio:
           default: "medium"

and I’ve played with detect_cpu_set setting on the cpu variable. By using CPU set coherent with the hardware architecture, we manage to have result with a very small variation between run:

  • All threads including receive one on the same CPU but avoiding hyperthread: 50-52s (detect threads running on 6,8,10)
  • All threads on same CPU but without avoiding hyperthread: 60-62s (detect threads running on 6,7,8)
  • All threads on same hard CPU: 55-57s (avoid hyperthread, 4 threads) (4 6 8 10 on detect)
  • Read and detect on different CPU: 61-65s (detect threads on 6,12,18)

Thus we stabilize the best performance by remaining on the same hardware CPU and avoiding hyperthread CPUs. This also explain the difference between the run of the first tests. The only setting was the number of threads and we can encounter any of the setup (same or different hardware CPU, running two threads on a core with hyperthreading) or even flip during one test. That’s why performance vary a lot between tests run.

Next step for me will be to run perf tool on suricata to estimate where the bottleneck is. More infos to come !

Building a suricata compliant ruleset

Introduction

During Nefilter Workshop 2008, we had an interesting discussion about the fact that NFQUEUE is a terminal decision. This has some strong implication and in particular when working with an IPS like suricata (or snort-inline at the time of the discussion): the IPS must received all packets routed by the gateway and can only issue a terminal DROP or ACCEPT verdict. It thus take precedence over all subsequent rules in the ruleset: any ACCEPT rules before the IPS rules will remove packets from IPS analysis and in the other way, any decision after the IPS rules will be ignored.

IPS rule placement

First question is where to put the IPS rules. From a Netfilter point of view, the NFQUEUE rule for suricata should be put as first rule of the FORWARD filter chain but this is not possible as NFQUEUE is a terminal rule. A classic trick is to use PREROUTING mangle to put the rule in but this is not a good choice as destination NAT has not yet been done: The IPS will not be able to see the real target of packet and will then not be able to use things like OS or server type declaration. Thus, the current best-bet decision seems to use FORWARD mangle.

This solution is not solving the main issue, ACCEPT can be used in the mangle table and thus having a NFQUEUE rules in the last place will not work. Here, we’ve got two possibilities:

  1. We can modify the rules generation
  2. Global filtering is done by an independant tools

IPS rule over independant rules generation system

The NFWS 2008 was covering the second case and Patrick McHardy has proposed an interesting solution. It is not very well known but a NFQUEUE verdict can take three values:

  • NF_ACCEPT: packet is accepted
  • NF_DROP: packet is dropped and send to hell
  • NF_REPEAT: packet is reinjected at start of the hook after the verdict

Patrick proposes to use the NF_REPEAT feature: the IPS rule is put in first place and the IPS issues a NF_REPEAT verdict instead of NF_ACCEPT for accepted packets. As NF_REPEAT will trigger a infinite loop, we need a way to distinguish the packet that have already been treated by the IPS. This can easily be done by putting a mark on the packet during the verdict. This feature is supported by NFQUEUE since its origin and the IPS could do it easily
(the only condition for this solution is to be able to dedicate one bit of the mark to this system).

With this system, the necessary rule to have suricata intercept packet is the following:

iptables -A FORWARD ! -i lo -m mark ! --mark 0x1/0x1 -j NFQUEUE

Here, we’ve got mark and mask set to 1. By adding this simple rule at the top of the FORWARD filter chain, we obtain a ruleset which combine easily the inspection of all packets in the IPS with the traditional filtering ruleset.

I’ve sent a patch to modify suricata in this way. In this new nfq.repeat_mode, suricata issues a NF_REPEAT verdict instead of a NF_ACCEPT verdict and put a mark ($MARK) with respect to a mask ($MASK) on the handled packet.

Building an IPS ready ruleset

The basic

Let suppose now we can modify the rule generation system. We thus have all flexibitlity needed to buid a custom ruleset which combine the filtering and the IPS task.

Let’s recall our main target: they want the IPS to analyse all packets going through the gateway. By analysing this in the Netfilter scope, we could formulate this in this way: We want to send all packets which are accepted in the FORWARD to the IPS. This is equivalent to replace all the ACCEPT verdict by the action of sending the packet to the IPS. To do this we can simply use a custom user chain:

iptables -N IPS
iptables -A IPS -j NFQUEUE --queue-balance 0:1

Then, we replace all ACCEPT rules by a target sending the packet to the IPS chain (use -j IPS instead of -j ACCEPT).

Note: Some reader will have seen that I’m using in the NFQUEUE rules the queue-balance option which specifies a range of queue to use. Please note that packets from the same connections are sent to the same queue and that, at the time fo the writing, Suricata has patches which are currently under review and wich add multiqueue support.

The interest of using a custom chain is that we can defined things like exception or special treatment in the chain. For example, to ignore a specific computer (1.2.3.4 in the example), we can do:

iptables -I IPS -d 1.2.3.4 -j ACCEPT

An objection

Some may object that we don’t get every packets because we send only accepted packets to the IPS. My answer is that this not the IPS role to treat this ones. This is the role of the firewall to send alert on blocked packet. And this is the role of the SIEM to combine firewall logs with IPS information. If you really want all packet to be send to the IPS, then repeat mode is your friend.

Chaining NFQUEUE

One real issue with the setup here described is the handling of multiple programs using the NFQUEUE. The previous method can only applied to one program, as sending to NFQUEUE will be terminal.

Here, we have two solutions. First one is to used the NFQ_REPEAT method on program different than the IPS and using NFQUEUE. The packet will reach after some iteration a -j IPS rule and we will have the wanted result.
An other method is to use the queue routing capabilities of the NFQUEUE. The verdict is a 32 bit integer but only the first 16 bit are used by the verdict. The other 16 bit are used if not null to indicate on which queue the packet have to sent after the verdict by the current program. This method is elegant but requires a support of the feature by the involved programs.

Massive and semantic patching with Coccinelle

I’m currently working on suricata and one of the feature I’m working on change the way the main structure Packet is accessed.

One of the consequences is that almost all unit tests need to be rewritten because the use Packet p construction which has to be replace by an dynamically allocated Packet *. Given the number of tests in suricata, this task is very dangerous:

  • It is error prone
  • Too long to be done correctly

I thus decide to give a try to coccinelle which is a "program matching and transformation engine which provides the language SmPL (Semantic Patch Language) for specifying desired matches and transformations in C code". Well, from user point of view it is a mega over-boosted sed for C.

One of the transformation I had to do was to find all memset() done on a Packet structure and replace it by a memset on the correct length followed by the setting of a pointer. In term of code with "..." meaning some code, I had to found all codes like
[C]func(...)
{
Packet p;
...
memset(&p, 0, ...);
}[/C]
and replace it by
[C]func(...)
{
Packet p;
...
memset(&p, 0, SIZE_OF_PACKET);
p->pkt = (uint8_t *)(p + 1);
}[/C]
To do so, I wrote the following semantic patch which defined the objects and the transformation I want to apply:
[diff]@rule0@
identifier p;
identifier func;
typedef uint8_t;
typedef Packet;
@@
func(...) {
<... Packet p; ... - memset(&p, 0, ...); + memset(&p, 0, SIZE_OF_PACKET); + p.pkt = (uint8_t *)(p + 1); ...>
}
[/diff]
If this semantic patch is saved in the file memset.cocci, you just have to run

spatch -sp_file packet.cocci -in_place detect.c

to modify the file.
The result of the command is that detect.c has been modified. Here's an extract of the resulting diff:
[diff]
@@ -9043,6 +9100,7 @@ static int SigTest...m_type() {
Packet p2;
memset(&p2, 0, SIZE_OF_PACKET);
+ p2.pkt = (uint8_t *)(p2 + 1);
DecodeEthernet(&th_v, &dtv, &p2, rawpkt2, sizeof(rawpkt2), NULL);
[/diff]
As you can see, spatch does not care that the variable is name p2. This is a Packet structure which is defined inside a function and which is memset() afterwards. It does the transformation knowing C and thus you need to think C when writing the semantic patch.

Now let's go for some explanations. The semantic patch start with the declaration of the parameters:
[diff]@rule0@ // name of the rule
identifier p; // this will be replace by the name of a variable
identifier func; // func will be the name of something
typedef uint8_t; // this is a C type we will use
typedef Packet; // same remark
@@
[/diff]
The main point is that, as coccinelle is using variable you must give in the information about what is a variable for you (usage of identifier) but you also need to specify what word are specific to the code (usage of typedef in the example).
The rest is straightforward if we omit an astuce I will detail:
[diff]func(...) { // the modification occurs in any function
<... // there is some code (...) who can occur more than once (<) Packet p; // a variable is a Packet, we named it p ... // some code - memset(&p, 0, ...); // a memset is done on p, we remove it (-) + memset(&p, 0, SIZE_OF_PACKET); // and replace it + p.pkt = (uint8_t *)(p + 1); // by this two lines (+) ...> // the part of the code occuring more than once end here
}
[/diff]

My complete semantic patch for the suricata modification is around 55 lines and the resulting patch on suricata has the following git stat:

30 files changed, 3868 insertions(+), 2745 deletions(-)

and a size of 407Ko. This gives an idea of the power of coccinelle.

Here's a light example of what coccinelle is able to do. If you want to read further just go on coccinelle website or read my "Coccinelle for the newbie" page.

I like to thanks Holger Eitzenberger for talking me about the existence of Coccinelle and I give out a great thanks at Julia Lawall for her expertise and her patience. She helps me a lot during my discovery of Coccinelle.

Using Suricata with CUDA

Suricata is a next generation IDS/IPS engine developed by the Open Information Security Foundation.

This article describes the installation, setup and usage of Suricata with CUDA support on a Ubuntu 10.04 64bit. For 32 bit users, simply remove 64 occurances where you find them.

Preparation

You need to download both Developper driver and Cuda driver from nvidia website. I really mean both because Ubuntu nvidia drivers are not working with CUDA.

I’ve first downloaded and installed CUDA toolkit for Ubuntu 9.04. It was straightforward:

sudo sh cudatoolkit_3.0_linux_64_ubuntu9.04.run

To install the nvidia drivers, you need to disconnect from graphical session and close gdm. Thus I’ve done a CTRL+Alt+F1 and I’ve logged in as normal user. Then I’ve simply run the install script:

sudo stop gdm

sudo sh devdriver_3.0_linux_64_195.36.15.run

sudo modprobe nvidia

sudo start gdm

After a normal graphical login, I was able to start working on suricata build

Suricata building

I describe here compilation of 0.9.0 source. To do so, you can get latest release from OISF download page and extract it to your preferred directory:

wget http://openinfosecfoundation.org/download/suricata-0.9.0.tar.gz

tar xf suricata-0.9.0.tar.gz

cd suricata-0.9.0

Compilation from git should be straight forward (if CUDA support is not broken) by doing:

git clone git://phalanx.openinfosecfoundation.org/oisf.git

cd oisf

./autogen.sh

Configure command has to be passed options to enable CUDA:

./configure –enable-debug –enable-cuda –with-cuda-includes=/usr/local/cuda/include/ –with-cuda-libraries=/usr/local/cuda/lib64/ –enable-nfqueue –prefix=/opt/suricata/ –enable-unittests

After that you can simply use

make

sudo make install

Now you’re ready to run.

Running suricata with CUDA support

Let’s first check, if previous step were correct by running unittests:

sudo /opt/suricata/bin/suricata -uUCuda

It should display a bunch of message and finish with a summary:

==== TEST RESULTS ====
PASSED: 43
FAILED: 0
======================

Now, it is time to configure Suricata. To do so we will first install configuration file in a standard location:

sudo mkdir /opt/suricata/etc

sudo cp suricata.yaml classification.config /opt/suricata/etc/

sudo mkdir /var/log/suricata

Suricata needs some rules. We will use emerging threats one and use configuration method described by Victor Julien in his article.
wget http://www.emergingthreats.net/rules/emerging.rules.tar.gz
cd /opt/suricata/etc/
sudo tar xf /home/eric/src/suricata-0.9.0/emerging.rules.tar.gz
As our install location is not standard, we need to setup location of the rules by modifying suricata.yaml:
default-rule-path: /etc/suricata/rules/
as to become:
default-rule-path: /opt/suricata/etc/rules/
The classification-file variable has to be modified too to become:
classification-file: /opt/suricata/etc/classification.config
To be able to reproduce test,  will use a pcap file obtained via tcpdump. For example my dump was obtained via:
sudo tcpdump -s0 -i br0 -w Desktop/br0.pcap
Now, let’s run suricata to check if it is working correctly:
sudo /opt/suricata/bin/suricata -c /opt/suricata/etc/suricata.yaml -r /home/eric/Desktop/br0.pcap
Once done, we can edit suricata.yaml. We need to replace mpm-algo value:
#mpm-algo: b2g
mpm-algo: b2g_cuda
Now, let’s run suricata with timing enable:
time sudo /opt/suricata/bin/suricata -c /opt/suricata/etc/suricata.yaml -r /home/eric/Desktop/br0.pcap 2>/tmp/out.log
With Suricata 0.9.0, the run time for a 42Mo pcap file is with starting time deduced:
  • 11s without CUDA
  • 19s with CUDA

Conclusion

As said by Victor Julien during an IRC discussion, CUDA current performance is clearly suboptimal for now because packets are sent to the card one at a time. It is thus for the moment really slower than CPU version. He is working currently at an improved version which will fix this issue.
An updated code will be available soon. Stay tuned !

Total annihilation (version C)

Bon, je m’amuse en ce moment à rajouter une fonctionnalité à snort-inline. En finissant mes modifications, je suis tombé sur le morceau de code suivant :

/* Check to see if we got a Reinjection rule or not */
if(!pv.ipfw_reinject_rule)
{
pv.ipfw_reinject_rule = 0;
}

Pour les non développeurs c’est un peu l’équivalent de :

Si t’es mort, meurt encore

Tient, ça pourrait faire un titre de James Bond.