Visualize Netfilter accounting in Graphite

Ulogd Graphite output plugin

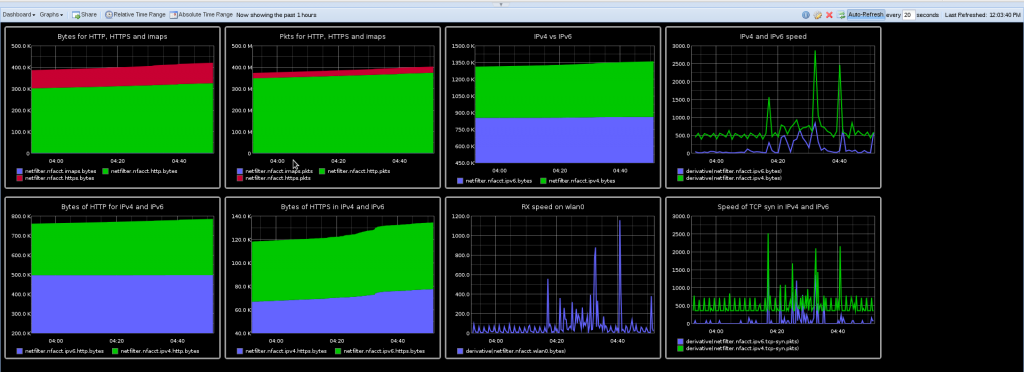
I’m committed a new output plugin for ulogd. The idea is to send NFACCT accounting data to a graphite server to be able to display the received data. Graphite is a web application which provide real-time visualization and storage of numeric time-series data.

Once data are sent to the graphite server, it is possible to use the web interface to setup different dashboard and graphs (including combination and mathematical operation):

Nfacct setup

One really interesting thing is that Graphite is using a tree hierarchy for data and this hierarchy is build by using a dot separator. So it really matches ulogd key system and on top of that nfacct can be used to create this hierarchy:

nfacct add ipv4.http
nfacct add ipv6.http

Once a counter is created in NFACCT it is instantly sent by ulogd to Graphite and can be used to create graph. To really use the counter, some iptables rules needs to be setup. To continue on previous example, we can use:

ip6tables -I INPUT -p tcp --sport 80 -m nfacct --nfacct-name ipv6.http
ip6tables -I OUTPUT -p tcp --dport 80 -m nfacct --nfacct-name ipv6.http
iptables -I INPUT -p tcp --sport 80 -m nfacct --nfacct-name ipv4.http
iptables -I OUTPUT -p tcp --dport 80 -m nfacct --nfacct-name ipv4.http

To save counters, you can use:

nfacct list >nfacct.dump

and you can restore them with:

nfacct restore <nfacct.dump

Ulogd setup

Ulogd setup is easy, simply add a new stack to ulogd.conf:

stack=acct1:NFACCT,graphite1:GRAPHITE

The configuration of NFACCT is simple, there is only one option which is the polling interval. The plugin will dump all nfacct counter at the given interval:

[acct1]
pollinterval = 2

The Graphite output module is easy to setup, you only need to specify the host and the port of the Graphite collector:

[graphite1]
host="127.0.0.1"
port="2003"

Defend your network from Microsoft Word upload with Suricata and Netfilter

Introduction

Some times ago, I’ve blogged about new IPS features in Suricata 1.1 and did not find at the time
any killer application of the nfq_set_mark keyword. When using Suricata in Netfilter IPS mode, this keyword allows you to set the Netfilter mark on the packet when a rule match.
This mark can be used by Netfilter or by other network subsystem to differentiate the treatment to apply to the packet.

It takes some time but I’ve found the idea. People around me know I don’t like Microsoft Office. One of the main reason, is that this is as awful as LibreOffice or OpenOffice.org but, on top of that, you’ve got pay for it. And, even if I don’t consider that people sending MS-Word file on the network should pay for that, I think they should at least benefit from a really slow bandwidth. I thus decided to implement this with Suricata and Netfilter.

If I’ve already told you that we will use the nfq_set_mark to mark the packet, one big task remains: how can I detect when someone upload a MS-Word file ? The answer is in the file extraction capabilities of Suricata. My preferred IDS/IPS is able to inspect HTTP traffic and to extract files that are uploaded or downloaded. You can then access to information about them. One of the new keyword is filemagic which return the same output as if you had run the unix file command on the file.

The setup

Now everything is in place. We just need to:

  • Write a signatures to mark packet relative to upload
  • Set up Suricata as IPS
  • Set up Netfilter to send all HTTP traffic to Suricata

The signature is really simple. We want HTTP traffic and a transferred file which is of type “Composite Document File V2 Document”. When this is the case, we alert and set the mark to 1:

alert http any any -> any any (msg:"Microsoft Word upload"; \
          nfq_set_mark:0x1/0x1; \
          filemagic:"Composite Document File V2 Document"; \
          sid:666 ; rev:1;)

Let suppose we’ve saved this signature into word.rules. Now we can start suricata with:

suricata -q 0 -S word.rules

This is cool, we now have a single packet that will be marked. But, as we want to slow down all the connection, we need to propagate the mark. We call Netfilter to the rescue and our friend here is CONNMARK that will transfer the mark to all packets:

iptables -A PREROUTING -t mangle -j CONNMARK --restore-mark
iptables -A POSTROUTING -t mangle -j CONNMARK --save-mark

If we are masochistic enough to try to slow yourself down, we need to add the following line to take care of OUTPUT packets:

iptables -A OUTPUT -t mangle -j CONNMARK --restore-mark

Now that the marking is done, let’s suppose that eth0 is the interface to Internet. In that case, we can setup the Quality of Service.
We create a HTB disc and create a 1kbps class for our MS-Word uploader:

tc qdisc add dev eth0 root handle 1: htb default 0
tc class add dev eth0 parent 1: classid 1:1 htb rate 1kbps ceil 1kbps

Now, we can do the link with our packet marking by assigning packet of handle 1 fw to the 1kpbs class (flowid 1:1):

tc filter add dev eth0 parent 1: protocol ip prio 1 handle 1 fw flowid 1:1

The job is almost done, last step is to send the port 80 packet to suricata:

iptables -I FORWARD -p tcp –dport 80 -j NFQUEUE
iptables -I FORWARD -p tcp –sport 80 -j NFQUEUE

If we are sadistic, we can also treat the local traffic:

iptables -I OUTPUT -p tcp –dport 80 -j NFQUEUE
iptables -I INPUT -p tcp –sport 80 -j NFQUEUE

That’s all with that setup, all MS-Word uploader share a 1kbps bandwith.

Effort should pay

Even among the MS-Word users, there is some people with brain and they will try to escape the MS-Word curse by changing the extension of their document before uploading them. Effort must pay, so
we will change the setup to provide the 10kbps for uploading. To do so, we add a signature to word.rules that will detect when a MS-Word file is uploaded with a changed extension:

alert http any any -> any any (msg:"Tricky Microsoft Word upload";
                nfq_set_mark:0x2/0x2; \
                fileext:!"doc"; \
                filemagic:"Composite Document File V2 Document";
                filestore;
                sid:667; rev:1;)

End of the task will be to send packet with mark 2 on a privileged pipe:

tc class add dev eth0 parent 1: classid 1:2 htb rate 10kbps ceil 10kbps
tc filter add dev eth0 parent 1: protocol ip prio 1 handle 2 fw flowid 1:2

I’m sure a lot of you think we have been to kind and that the little cheaters must be watch over. We’ve already used the filestore keyword in their signature to put the uploaded file on disk but that is not enough.

Keep an eye on cheaters

The traffic of the cheater must be watch over. To do so, we will send all the packets they exchange inside a pcap file. We will need multiple tools to do so. The first of them will be ipset that we will use to maintain a list of bad guys. And we will use ulogd to store their traffic into a pcap file.

To create the blacklist, we will just do:

ipset create cheaters hash:ip timeout 3600
iptables -A POSTROUTING -t mangle -m mark \
    --mark 0x2/0x2 \
    -j SET --add-set cheaters src --exists

The first line creates a set named cheaters that will contains IP. Every element of the set will stay for 1 hour in the set. The second line send all source IP that send packet which got the mark 2. If the IP is already in the set, it will see its timeout reset to 3600 thanks to the –exists option.

Now we will ask Nefilter to log all traffic of IP of the cheaters set:

iptables -A PREROUTING -t raw \
    -m set --match-set cheaters src,dst \
    -j NFLOG --nflog-group 1

The last step is to use ulogd to store the traffic in a pcap file. We need to modify a standard ulogd.conf to have the following lines not commented:

plugin="/home/eric/builds/ulogd/lib/ulogd/ulogd_output_PCAP.so"
stack=log2:NFLOG,base1:BASE,pcap1:PCAP

Now, we can start ulogd:

ulogd -c ulogd.conf

A PCAP file named /var/log/ulogd.pcap will be created and will contain all the packets of cheaters.

Conclusion

It has been hard. We’ve fight a lot. We’ve coded a lot. But now, they are done! We’re able to know more about them than a Facebook admin does!
Flow accounting with Netfilter and ulogd2

Introduction

Starting with Linux kernel 3.3, there’s a new module called nfnetlink_acct.
This new feature added by Pablo Neira brings interesting accountig capabilities to Netfilter.
Pablo has made an extensive description of the feature in the commit.

System setup

We need to build a set of tools to get all that’s necessary:

  • libmnl
  • libnetfilter_acct
  • nfacct

The build is the same for all projects:

git clone git://git.netfilter.org/PROJECT
cd PROJECT
autoreconf -i
./configure
make
sudo make install

nfacct

This command line tool is here to set up and interact with the accounting subsystem. To get the help you can use the man page or run:

# nfacct help
nfacct v1.0.0: utility for the Netfilter extended accounting infrastructure
Usage: nfacct command [parameters]...

Commands:
  list [reset]		List the accounting object table (and reset)
  add object-name	Add new accounting object to table
  delete object-name	Delete existing accounting object
  get object-name	Get existing accounting object
  flush			Flush accounting object table
  version		Display version and disclaimer
  help			Display this help message

Configuration

Objectives

Let’s have for objectives to get the following statistics:

  • IPv6 data usage
    • http on IPv6 usage
    • https on IPv6 usage
  • IPv4 data usage
    • http on IPv4 usage
    • https on IPv4 usage

Ulogd2 configuration

Let’s start by a simple output to XML. For that we will add the following stack:

stack=acct1:NFACCT,xml1:XML

and this one:

stack=acct1:NFACCT,gp1:GPRINT

nfacct setup

modprobe nfnetlink_acct
nfacct add ipv6
nfacct add http-ipv6
nfacct add https-ipv6
nfacct add ipv4
nfacct add http-ipv4
nfacct add https-ipv4

iptables setup

iptables -I INPUT -m nfacct --nfacct-name ipv4
iptables -I INPUT -p tcp --sport 80 -m nfacct --nfacct-name http-ipv4
iptables -I INPUT -p tcp --sport 443 -m nfacct --nfacct-name https-ipv4
iptables -I OUTPUT -m nfacct --nfacct-name ipv4
iptables -I OUTPUT -p tcp --dport 80 -m nfacct --nfacct-name http-ipv4
iptables -I OUTPUT -p tcp --dport 443 -m nfacct --nfacct-name https-ipv4

ip6tables setup

ip6tables -I INPUT -m nfacct --nfacct-name ipv6
ip6tables -I INPUT -p tcp --sport 80 -m nfacct --nfacct-name http-ipv6
ip6tables -I INPUT -p tcp --sport 443 -m nfacct --nfacct-name https-ipv6
ip6tables -I OUTPUT -m nfacct --nfacct-name ipv6
ip6tables -I OUTPUT -p tcp --dport 80 -m nfacct --nfacct-name http-ipv6
ip6tables -I OUTPUT -p tcp --dport 443 -m nfacct --nfacct-name https-ipv6

Starting the beast

Now we can start ulogd2:

ulogd2 -c /etc/ulogd.conf

In /var/log, we will have the following files:

  • ulogd_gprint.log: display stats for each counter on one line
  • ulogd-sum-14072012-224313.xml: XML dump
  • ulogd.log: the daemon log file to look at in case of problem

Output examples

In the ulogd_gprint.log file, the ouput for a given timestamp is something like that:

timestamp=2012/07/14-22:48:17,sum.name=http-ipv6,sum.pkts=0,sum.bytes=0
timestamp=2012/07/14-22:48:17,sum.name=https-ipv6,sum.pkts=0,sum.bytes=0
timestamp=2012/07/14-22:48:17,sum.name=ipv4,sum.pkts=20563,sum.bytes=70
timestamp=2012/07/14-22:48:17,sum.name=http-ipv4,sum.pkts=0,sum.bytes=0
timestamp=2012/07/14-22:48:17,sum.name=https-ipv4,sum.pkts=16683,sum.bytes=44
timestamp=2012/07/14-22:48:17,sum.name=ipv6,sum.pkts=0,sum.bytes=0

The XML output is the following:

<obj><name>http-ipv6</name><pkts>00000000000000000000</pkts><bytes>00000000000000000000</bytes><hour>22</hour><min>43</min><sec>15</sec><wday>7</wday><day>14</day><month>7</month><year>2012</year></obj>
<obj><name>https-ipv6</name><pkts>00000000000000000000</pkts><bytes>00000000000000000000</bytes><hour>22</hour><min>43</min><sec>15</sec><wday>7</wday><day>14</day><month>7</month><year>2012</year></obj>
<obj><name>ipv4</name><pkts>00000000000000000052</pkts><bytes>00000000000000006291</bytes><hour>22</hour><min>43</min><sec>15</sec><wday>7</wday><day>14</day><month>7</month><year>2012</year></obj>
<obj><name>http-ipv4</name><pkts>00000000000000000009</pkts><bytes>00000000000000000408</bytes><hour>22</hour><min>43</min><sec>15</sec><wday>7</wday><day>14</day><month>7</month><year>2012</year></obj>
<obj><name>https-ipv4</name><pkts>00000000000000000031</pkts><bytes>00000000000000004041</bytes><hour>22</hour><min>43</min><sec>15</sec><wday>7</wday><day>14</day><month>7</month><year>2012</year></obj>
<obj><name>ipv6</name><pkts>00000000000000000002</pkts><bytes>00000000000000000254</bytes><hour>22</hour><min>43</min><sec>15</sec><wday>7</wday><day>14</day><month>7</month><year>2012</year></obj>

Conclusion

nfacct and ulogd2 offers a easy and efficient way to gather network statistics. Some tools and glue are currently lacking to fill the data inside reporting tool but the log structure is clean and it should not be too difficult.

Opensvp, a new tool to analyse the security of firewalls using ALGs

Following my talk at SSTIC, I’ve released a new tool called opensvp. Its aim is to cover the attacks described in this talk. It has been published to be able to determine if the firewall policy related to Application Layer Gateways is correctly implemented.

Opensvp implements two type of attacks:

  • Abusive usage of protocol commands: an protocol message can be forged to open pinhole into firewall. Opensvp currently implements message sending for IRC and FTP ALGs.
  • Spoofing attack: if anti-spooofing is not correctly setup, an attacker can send command which result in arbitrary pinhole being opened to a server.

It has been developed in Python and uses scapy to implement the spoofing attack on ALGs.

For usage and download, you can have a look at opensvp page. The attack against helpers is described in the README of opensvp.

The document “Secure use of iptables and connection tracking helpers” was published some months ago and it describes how to protect a Netfilter firewall when using connection tracking helpers (the Netfilter name for ALGs).

Transparents de ma présentation au SSTIC

Les transparents de ma présentation du SSTIC sont disponibles : Utilisation malveillante des suivis de connexions. Merci aux organisateurs du SSTIC d’avoir accepté mon papier!

Des vidéos de démonstration sont disponibles sur ce post: Playing with Network Layers to Bypass Firewalls’ Filtering Policy

L’outil de test openvsp est disponible sur cette page.

Securing Netfilter connection tracking helpers

Following the presentation I’ve made during the 8th Netfilter Workshop, it was decided to write a document containing the best practices for a secure use of iptables and connection tracking helpers.

This document called “Secure use of iptables and connection tracking helpers” is now available on this site. It contains recommendations that should be followed carefully if you are the administrator of a Netfilter/Iptables or the developer of a Netfilter based software.

Building a suricata compliant ruleset

Introduction

During Nefilter Workshop 2008, we had an interesting discussion about the fact that NFQUEUE is a terminal decision. This has some strong implication and in particular when working with an IPS like suricata (or snort-inline at the time of the discussion): the IPS must received all packets routed by the gateway and can only issue a terminal DROP or ACCEPT verdict. It thus take precedence over all subsequent rules in the ruleset: any ACCEPT rules before the IPS rules will remove packets from IPS analysis and in the other way, any decision after the IPS rules will be ignored.

IPS rule placement

First question is where to put the IPS rules. From a Netfilter point of view, the NFQUEUE rule for suricata should be put as first rule of the FORWARD filter chain but this is not possible as NFQUEUE is a terminal rule. A classic trick is to use PREROUTING mangle to put the rule in but this is not a good choice as destination NAT has not yet been done: The IPS will not be able to see the real target of packet and will then not be able to use things like OS or server type declaration. Thus, the current best-bet decision seems to use FORWARD mangle.

This solution is not solving the main issue, ACCEPT can be used in the mangle table and thus having a NFQUEUE rules in the last place will not work. Here, we’ve got two possibilities:

  1. We can modify the rules generation
  2. Global filtering is done by an independant tools

IPS rule over independant rules generation system

The NFWS 2008 was covering the second case and Patrick McHardy has proposed an interesting solution. It is not very well known but a NFQUEUE verdict can take three values:

  • NF_ACCEPT: packet is accepted
  • NF_DROP: packet is dropped and send to hell
  • NF_REPEAT: packet is reinjected at start of the hook after the verdict

Patrick proposes to use the NF_REPEAT feature: the IPS rule is put in first place and the IPS issues a NF_REPEAT verdict instead of NF_ACCEPT for accepted packets. As NF_REPEAT will trigger a infinite loop, we need a way to distinguish the packet that have already been treated by the IPS. This can easily be done by putting a mark on the packet during the verdict. This feature is supported by NFQUEUE since its origin and the IPS could do it easily
(the only condition for this solution is to be able to dedicate one bit of the mark to this system).

With this system, the necessary rule to have suricata intercept packet is the following:

iptables -A FORWARD ! -i lo -m mark ! --mark 0x1/0x1 -j NFQUEUE

Here, we’ve got mark and mask set to 1. By adding this simple rule at the top of the FORWARD filter chain, we obtain a ruleset which combine easily the inspection of all packets in the IPS with the traditional filtering ruleset.

I’ve sent a patch to modify suricata in this way. In this new nfq.repeat_mode, suricata issues a NF_REPEAT verdict instead of a NF_ACCEPT verdict and put a mark ($MARK) with respect to a mask ($MASK) on the handled packet.

Building an IPS ready ruleset

The basic

Let suppose now we can modify the rule generation system. We thus have all flexibitlity needed to buid a custom ruleset which combine the filtering and the IPS task.

Let’s recall our main target: they want the IPS to analyse all packets going through the gateway. By analysing this in the Netfilter scope, we could formulate this in this way: We want to send all packets which are accepted in the FORWARD to the IPS. This is equivalent to replace all the ACCEPT verdict by the action of sending the packet to the IPS. To do this we can simply use a custom user chain:

iptables -N IPS
iptables -A IPS -j NFQUEUE --queue-balance 0:1

Then, we replace all ACCEPT rules by a target sending the packet to the IPS chain (use -j IPS instead of -j ACCEPT).

Note: Some reader will have seen that I’m using in the NFQUEUE rules the queue-balance option which specifies a range of queue to use. Please note that packets from the same connections are sent to the same queue and that, at the time fo the writing, Suricata has patches which are currently under review and wich add multiqueue support.

The interest of using a custom chain is that we can defined things like exception or special treatment in the chain. For example, to ignore a specific computer (1.2.3.4 in the example), we can do:

iptables -I IPS -d 1.2.3.4 -j ACCEPT

An objection

Some may object that we don’t get every packets because we send only accepted packets to the IPS. My answer is that this not the IPS role to treat this ones. This is the role of the firewall to send alert on blocked packet. And this is the role of the SIEM to combine firewall logs with IPS information. If you really want all packet to be send to the IPS, then repeat mode is your friend.

Chaining NFQUEUE

One real issue with the setup here described is the handling of multiple programs using the NFQUEUE. The previous method can only applied to one program, as sending to NFQUEUE will be terminal.

Here, we have two solutions. First one is to used the NFQ_REPEAT method on program different than the IPS and using NFQUEUE. The packet will reach after some iteration a -j IPS rule and we will have the wanted result.
An other method is to use the queue routing capabilities of the NFQUEUE. The verdict is a 32 bit integer but only the first 16 bit are used by the verdict. The other 16 bit are used if not null to indicate on which queue the packet have to sent after the verdict by the current program. This method is elegant but requires a support of the feature by the involved programs.

Quand ça fonctionne tout seul

Je venais d’avoir l’idée d’une modification d’ulogd2 pour réaliser la chose pratique d’avoir deux sorties sur la même stack. J’ai donc rajouté pour tester la stack suivante à mon fichier ulogd.conf :

stack=log2:NFLOG,base1:BASE,ifi1:IFINDEX,ip2str1:IP2STR, \\

print1:PRINTPKT,sys1:SYSLOG,mark1:MARK,emu1:LOGEMU

Les tests ont montré que c’était déjà fonctionnel ! D’un coup, la neuvième de Beethoven par Harnoncourt est encore plus grandiose.

En route vers le 2.6.30 et encore merci Denis

Oui, bon, vous savez sans doute que le noyau Linux 2.6.30 est en cours de réalisation. Mais saviez-vous que grâce à l’excellent Denis Bodor toute une série de patchs a été incorporée au noyau ?

Lors de la rédaction du Hors Série Netfilter de GLMF, j’ai, avec tous les autres rédacteurs (Gwenael, Haypo, Pollux et Toady), voulu faire découvrir les dernières avancées de Netfilter. Et, forcément, lorsque l’on est sur le fil du rasoir et que l’on pousse les choses à fond pour être le plus précis possible, il arrive que l’on découvre des problèmes ou des choses pas aussi pratiques que on le désirerait.

J’ai donc réalisé une série de patchs pour améliorer l’expérience des lecteurs de ce splendide Hors Série Netfilter :

GLMF Hors série n°41

Merci donc à Denis pour nous avoir fait confiance pour ces articles et merci à Patrick McHardy d’avoir accepté mes patchs.

Mon bureau en mode noyau

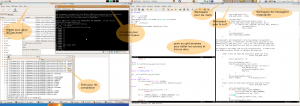
Non, non, vous ne verrez pas dans cet article de screenshots du noyau ! J’ai juste envie de poster ici une capture d’écrans que j’ai réalisée et commentée il y a quelque temps. J’étais à ce moment-là en train de réaliser un des mes développements noyau les plus conséquents et cela m’avait conduit à industrialiser mon environnement de travail pour effectuer développements et tests de la manière la plus efficace possible.

Voici donc la capture :

Espace de travail

La résolution est assez élévée puisque mon bureau est constitué d’un écran 19” et d’un 22” placés côte à côte en mode twinview.

Le 22 pouces me permet d’utiliser confortablement un gvim ouvert sur 2 colonnes. Je peux ainsi éditer un fichier en lisant la documentation, ou bien comparer deux fichiers facilement. Sur le 19 pouces de gauche, j’ai fait tourner :

  • le shell pour la compilation du noyau
  • virtualbox pour les tests de modification noyau sans les reboot de machine physique
  • giggle pour l’analyse du patchset en cours de préparation

Je pouvais ainsi étudier les crashs ou les problèmes noyaux tout en lisant le code pour trouver mes erreurs.