Building Suricata under OpenBSD

Suricata 1.1beta2 has brought OpenBSD to the list of supported operating system. I’m a total newbie to OpenBSD so excuse me for the lack of respect of OpenBSD standards and usages in this documentation.

Here’s the different step, I’ve used to finalize the port starting from a fresh install of OpenBSD.

If you want to use source taken from git, you will need to install building tools:

pkg_add git libtool

automake and autoconf need to be installed to. For a OpenBSD 4.8, one can run:

pkg_add autoconf-2.61p3 automake-1.10.3

For a OpenBSD 5.[01], one can run:

pkg_add autoconf-2.61p3 automake-1.10.3p3

For OpenBDS 5.2:

pkg_add autoconf-2.61p3 automake-1.10.3p6

Autoconf 2.61 is know to work, some other versions triggers a compilation failure.

Then you can simply clone the repository and run autogen:

git clone git://phalanx.openinfosecfoundation.org/oisf.git
cd oisf
export AUTOCONF_VERSION=2.61
export AUTOMAKE_VERSION=1.10
./autogen.sh

Before running configure, you need to add the dependencies:

pkg_add gcc pcre libyaml libmagic libnet-1.1.2.1p0

Now, we’re almost done and we can run configure:

CPPFLAGS="-I/usr/local/include" CFLAGS="-L/usr/local/lib" ./configure --prefix=/opt/suricata

You can now run make and make install to build and install suricata.

Some new features of IPS mode in Suricata 1.1beta2

The IDS/IPS suricata has a native support for Netfilter queue. This brings IPS functionnalities to users running Suricata on Linux.

Suricata 1.1beta2 introduces a lot of new features related to the NFQ mode.

New stream inline mode

One of the main improvement of Suricata IPS mode is related with the new stream engine dedicated to inline. Victor Julien has a great blog post about it.

Multiqueue support

Suricata can now be started on multiple queue by using a comma separated list of queue identifier on the command line. The following syntax:

suricata -q 0 -q 1 -c /etc/suricata.yaml

will start a suricata listening to Netfilter queue 0 and 1.

The option has been added to improve performance of Suricata in NFQ mode. One of the observed limitation is the number of packets per second that can be sent to a single queue. By being able to specify multiple queues, this is possible to increase performances. The best impact is on multicore systems where it adds scalability.

This feature can be used with the queue‐balance option the NFQUEUE target which was added in Linux 2.6.31. When using −−queue−balance x:x+n instead of −−queue−num, packets are then balanced across the given queues and packets belonging to the same connection are put into the same nfqueue.

NFQ mode setting

Presentation

One of the difficulty of IPS usage is to build an adapted firewall ruleset. Following my blog post on this issue, I’ve decided to implement most of the existing mode in Suricata.
When running in NFQ inline mode, it is possible now to use a simulated non-terminal NFQUEUE verdict by using the ‘repeat’ mode.
This permit to send all needed packet to suricata via this a rule:

iptables -I FORWARD -m mark ! --mark $MARK/$MASK -j NFQUEUE

And below, you can have your standard filtering ruleset.

Configuration and other details

To activate this mode, you need to set mode to ‘repeat’ in the nfq section.

nfq:
  mode: repeat
  repeat_mark: 1
  repeat_mask: 1

This option uses the NF_REPEAT verdict instead of using a standard NF_ACCEPT verdict. The effect is that the packet is sent back at the start of the table where the queuing decision has been taken. As Suricata has put on the packet the mark $repeat_mark with respect to the mask $repeat_mask, when the packet reaches again the iptables NFQUEUE rules it does not match anymore because of the mark and the ruleset floowing this rule is used.

The ‘mode’ option in nfq section can have two other values:

  • accept (which is default simple mode)
  • route (which is little bit tricky)

The idea behind the route option is that a program using NFQ can issues a verdict that has for effect to send the packet to an another queue. This is thus possible to chain softwares using NFQ.
To activate this option, you have to use the following syntax:

nfq:
  mode: route
  route_queue: 2

There is not much usage of this option. One mad mind could think at chaining suricata and snort in IPS mode 😉

The nfq_set_mark keyword

Effect and usage of nfq_set_mark

A new keyword nfq_set_mark has been added to the rules option.
This is an enhancement of the NFQ mode. If a packet matches a rule using nfq_set_mark in NFQ mode, it is marked with the mark/mask specified in the option during the verdict.

The usage is really simple. In any rules, you can add the nfq_set_mark keyword to specify the mark to put on a packet and what is the the

pass tcp any any -> any 80 (msg:"TCP port 80"; sid:91000004; nfq_set_mark:0x80/0x80; rev:1;)

That’s great but what can I do with that ?

If you are not familiar with the advanced network capabilities, you may wondering how it can be used. Nefilter mark can be used to modify the handling of a packet by the network stack, ie routing, quality of service, Netfilter. Thus, the concept is the following, you can use Suricata to detect a suspect packet and decide to change the way it is handled by the network stack.
Thanks to the CONNMARK target, you can modify the way all packets of the connection are handled.

Among the possibilities:

  • Degrade QoS for a connection when a suspect packet has been seen
  • Trigger Netfilter logging of all subsequent packets of the connection (logging could be done in pcap for instance)
  • Change routing to send the trafic to a dedicated equipment
More about Suricata multithread performance

Following my preceding post on suricata multithread performance I’ve decided to continue to work on the subject.

By using perf-tool, I found out that when the number of detect threads was increasing, more and more time was used in a spin lock. One of the possible explanation is that the default running mode for pcap file (RunModeFilePcapAuto) is not optimal. The only decode thread take some time to treat the packets and he is not fast enough to send data to the multiple detect threads. This is triggering a lot of wait and a CPU usage increase. Following a discussion with Victor Julien, I decide to give a try to an alternate run mode for working on pcap file, RunModeFilePcapAutoFp.

The architecture of this run mode is different. A thread is in charge of the reading of the file and the treatment of packets is done in a pool of threads (from decode to output). The augmentation of the power of decoding and the limitation of the ratio decode/detect would possibly bring some scalability.

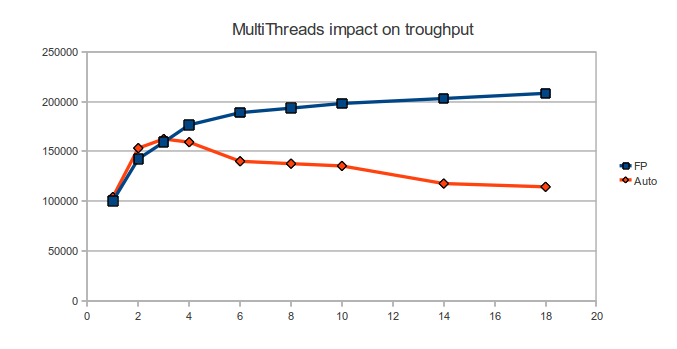
The following graph is a comparison of the Auto mode and the FP mode on the test system described in the previous post (A 24 threads/core server parses a 6.1Go pcap file). It displays the number of packets per second in function of the number of threads:

The performance difference is really interesting. The FP mode shows a increase of the performance with the number of threads. This is far better than the Auto run mode where performance decrease with the number of threads.

As pointed out in a discussion on the OISF-users mailing list, multithread tuning has a real impact on performance. The result of the tests I’ve done are significant but they only apply to the parsing of a big pcap file. You will have to tune Suricata to see how to take the best of it on your system.

Using Suricata with CUDA

Suricata is a next generation IDS/IPS engine developed by the Open Information Security Foundation.

This article describes the installation, setup and usage of Suricata with CUDA support on a Ubuntu 10.04 64bit. For 32 bit users, simply remove 64 occurances where you find them.

Preparation

You need to download both Developper driver and Cuda driver from nvidia website. I really mean both because Ubuntu nvidia drivers are not working with CUDA.

I’ve first downloaded and installed CUDA toolkit for Ubuntu 9.04. It was straightforward:

sudo sh cudatoolkit_3.0_linux_64_ubuntu9.04.run

To install the nvidia drivers, you need to disconnect from graphical session and close gdm. Thus I’ve done a CTRL+Alt+F1 and I’ve logged in as normal user. Then I’ve simply run the install script:

sudo stop gdm

sudo sh devdriver_3.0_linux_64_195.36.15.run

sudo modprobe nvidia

sudo start gdm

After a normal graphical login, I was able to start working on suricata build

Suricata building

I describe here compilation of 0.9.0 source. To do so, you can get latest release from OISF download page and extract it to your preferred directory:

wget http://openinfosecfoundation.org/download/suricata-0.9.0.tar.gz

tar xf suricata-0.9.0.tar.gz

cd suricata-0.9.0

Compilation from git should be straight forward (if CUDA support is not broken) by doing:

git clone git://phalanx.openinfosecfoundation.org/oisf.git

cd oisf

./autogen.sh

Configure command has to be passed options to enable CUDA:

./configure –enable-debug –enable-cuda –with-cuda-includes=/usr/local/cuda/include/ –with-cuda-libraries=/usr/local/cuda/lib64/ –enable-nfqueue –prefix=/opt/suricata/ –enable-unittests

After that you can simply use

make

sudo make install

Now you’re ready to run.

Running suricata with CUDA support

Let’s first check, if previous step were correct by running unittests:

sudo /opt/suricata/bin/suricata -uUCuda

It should display a bunch of message and finish with a summary:

==== TEST RESULTS ====
PASSED: 43
FAILED: 0
======================

Now, it is time to configure Suricata. To do so we will first install configuration file in a standard location:

sudo mkdir /opt/suricata/etc

sudo cp suricata.yaml classification.config /opt/suricata/etc/

sudo mkdir /var/log/suricata

Suricata needs some rules. We will use emerging threats one and use configuration method described by Victor Julien in his article.
wget http://www.emergingthreats.net/rules/emerging.rules.tar.gz
cd /opt/suricata/etc/
sudo tar xf /home/eric/src/suricata-0.9.0/emerging.rules.tar.gz
As our install location is not standard, we need to setup location of the rules by modifying suricata.yaml:
default-rule-path: /etc/suricata/rules/
as to become:
default-rule-path: /opt/suricata/etc/rules/
The classification-file variable has to be modified too to become:
classification-file: /opt/suricata/etc/classification.config
To be able to reproduce test,  will use a pcap file obtained via tcpdump. For example my dump was obtained via:
sudo tcpdump -s0 -i br0 -w Desktop/br0.pcap
Now, let’s run suricata to check if it is working correctly:
sudo /opt/suricata/bin/suricata -c /opt/suricata/etc/suricata.yaml -r /home/eric/Desktop/br0.pcap
Once done, we can edit suricata.yaml. We need to replace mpm-algo value:
#mpm-algo: b2g
mpm-algo: b2g_cuda
Now, let’s run suricata with timing enable:
time sudo /opt/suricata/bin/suricata -c /opt/suricata/etc/suricata.yaml -r /home/eric/Desktop/br0.pcap 2>/tmp/out.log
With Suricata 0.9.0, the run time for a 42Mo pcap file is with starting time deduced:
  • 11s without CUDA
  • 19s with CUDA

Conclusion

As said by Victor Julien during an IRC discussion, CUDA current performance is clearly suboptimal for now because packets are sent to the card one at a time. It is thus for the moment really slower than CPU version. He is working currently at an improved version which will fix this issue.
An updated code will be available soon. Stay tuned !

Lutter contre la faille DNS avec Netfilter

La découverte récente d’une méthode permettant d’exploiter des failles dans la plupart des implémentations DNS à fait beaucoup de bruits. J’en tiens pour preuve des articles dans ZDNET (Colmatage d’une faille de grande envergure sur les serveurs DNS), Le Monde et les échos.

Si l’on étudie ce qu’écrit le CERT dans l’article Multiple DNS implementations vulnerable to cache poisoning, une méthode de contournement de la faille consiste à rendre aléatoire le port source utilisé pour les requêtes DNS.

Lors de recherches faites sur le bloquage de Skype, j’avais implémenté la traduction d’adresse avec attributions de port source aléatoire dans Netfilter et Iptables. Cette modification avait été faite pour empêcher l’établissement de connexions directes entre deux machines situés derrière des routeurs malgré la traduction d’adresse. Cette fonctionnalité est disponible dans Linux depuis le noyau 2.6.21. Elle peut-être utilisée pour lutter contre la faille DNS.

Si les serveurs DNS relais ou les clients se trouvent derrière votre pare-feu Netfilter, il suffit de rajouter la règle de NAT suivante :

iptables -I POSTROUTING -t nat -p udp --dport 53 -j SNAT --to IP --random

Netfilter va alors rendre aléatoire le port source des connexions DNS tel qu’il est vu derrière la passerelle (et donc pour le monde extérieur) luttant ainsi contre les attaques de cache poisonning.

Présentation de ulogd2 et nf3d au SSTIC 2008

J’ai présenté Ulogd2 et nf3d lors de la rump session du SSTIC 2008.
Après une brève introduction sur l’architecture de ulogd2, j’ai montré le résultat de mon travail sur la visualisation des connexions et des paquets loggués, nf3d.
Les slides sont disponibles.

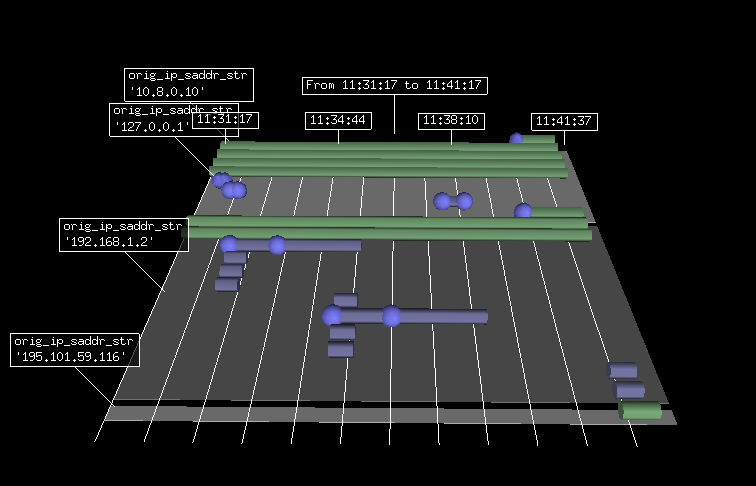
Je me rend compte que je n’ai pas encore parlé de nf3d ici. Il s’agit d’un logiciel représentant sur une vue 3D les connexions Netfilter et les paquets loggués. Comme une image vaut mieux qu’un long discours :


Les cylindres représentent les connexions et les sphères les paquets loggués. L’axe des X est le temps et l’axe des Y indique la succession des connexions. Chaque paquet est représenté sur la connexion dont il est issu.

Wolfotrack ou comment gérer les connexions de Netfilter

Après des années de développements acharnés, l’interface ultime de gestion du suivi de connexions de Netfilter est enfin disponible :


Wolfotrack, c’est son nom, est une interface de gestion du suivi de connexions basé sur wolfeinstein 3D. Chaque soldat réprésente une connexion et pour tuer une connexion, il suffit de tuer le soldat correspondant.

Interview dans le cadre des RMLLs

Je vais donner une conférence sur NuFW et les interactions entre espace utilisateur et noyau dans Netfilter lors des rencontres mondiales du logiciel libre 2008 à Mont-de-Marsans.

Dans ce cadre, Christophe Brocas m’a gentillement interviewé par mail. L’interview est en ligne sur le site des RMLLs : Interview Éric Leblond.

À noter qu’une interview de l’excellent Pablo Neira est elle aussi disponible sur le site.

Spam et astuce d’affichage

J’ai reçu ce spam qui semblait à première vue avoir complètement passé indemne mes logiciels anti-spams. Le sujet notamment n’était pas taggué *SPAM*. Enfin, je ne voyais pas qu’il était taggué :

Received: by d10.nt.com (Postfix, from userid 0)
id D73C21E4490; Thu, 24 Apr 2008 23:03:13 +0200 (CEST)
To: XXXXXXXX@XXX.fr
Subject: Invitation XXXXXXXX 2008
Date: Thu, 24 Apr 2008 23:03:13 +0200
From: SPAMMER <noreply@mailing.spam.com>
Message-ID: <67190e93d75ec77aea41896d6c6d6f89@localhost.localdomain>
X-Priority: 3
X-Mailer: EmailingSoft Powered [version 1.73]
MIME-Version: 1.0
Content-Type: text/html; charset=”iso-8859-1″
Content-Transfer-Encoding: quoted-printable
X-Spam-Score: 7.7 (+++++++)
Subject: *SPAM* Invitation XXXXXXXXX 2008

En mettant le sujet en double, le spammer a réussi à profiter d’une différence de traitement entre le logiciel anti spam et le lecteur de mail. Encore une dépense d’énergie et d’intelligence bien utile…