Ulogd 2.0.2, my first release as maintainer

Objectives of this release

So it is my first ulogd2 release as maintainer. I’ve been in charge of the project since 2012 October 30th and this was an opportunity for me to increase my developments on the project. Roadmap was almost empty so I’ve decided to work on issues that were bothering me as a user of the project. I’ve also included two features which are connection tracking event filtering and a Graphite output module. Ulogd is available on Netfilter web site

Conntrack event filtering

When logging connections entries, there is potentially a lot of events. Filtering the events on network parameters is thus a good idea. This can now be done via a series of options:

  • accept_src_filter: log only a connection if source ip of connection belong to the specified networks. This can be a list of network for example 192.168.1.0/24,1:2::/64
  • accept_dst_filter: log only a connection if destination ip of connection belong to specified networks. This can be a list of networks too.
  • accept_proto_filter: log only connection for the specified layer 4 protocol. It can be a list for example tcp,sctp

A GRAPHITE output module

This is the sexiest part of this release. Seth Hall from the Graphite, a scalable realtime graphing solution. I was playing at the moment with the new Netfilter accounting plugin of ulogd2 and my first thought has been that it was a good idea to add a new output ulogd2 plugin to export data to a Graphite server.

You can read more about Graphite output plugin on this dedicated post.

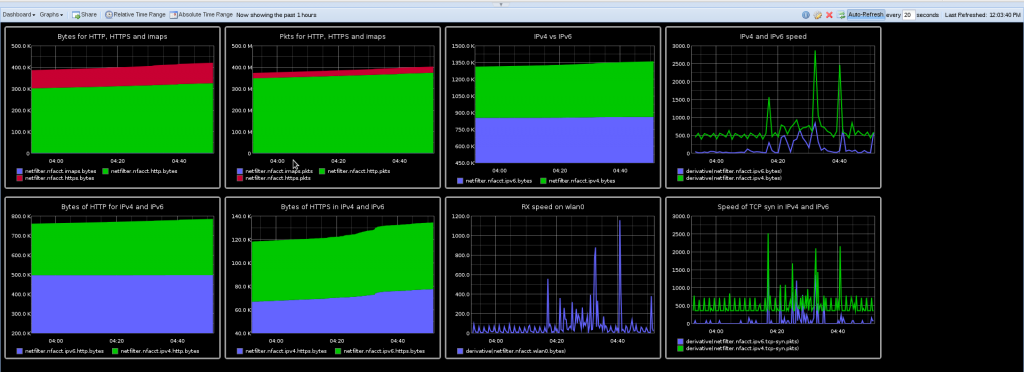
The result was really cool as show the following dashboard:

A better command line

In case of error, ulogd was just dying and telling you to read a log file. It is now possible to add the -v flag which will redirect the output to stdout and let you see what’s going one.

If it is to verbose for you, you can also set log level from command line via the -l option.

Improved build system

I’ve made some light improvement to the build system. First of all, a configuration status is printed at the end of configure. It displays the compiled input and output plugins:

Ulogd configuration:
  Input plugins:
    NFLOG plugin:			yes
    NFCT plugin:			yes
    NFACCT plugin:			yes
  Output plugins:
    PCAP plugin:			yes
    PGSQL plugin:			yes
    MySQL plugin:			yes
    SQLITE3 plugin:			no
    DBI plugin:				no

I’ve also added configure option to disable the building of some input plugins:

  --enable-nflog          Enable nflog module [default=yes]
  --enable-nfct           Enable nfct module [default=yes]
  --enable-nfacct         Enable nfacct module [default=yes]

For example, to disable Netfilter conntrack logging, you can use:

./configure --disable-nfct

.

Visualize Netfilter accounting in Graphite

Ulogd Graphite output plugin

I’m committed a new output plugin for ulogd. The idea is to send NFACCT accounting data to a graphite server to be able to display the received data. Graphite is a web application which provide real-time visualization and storage of numeric time-series data.

Once data are sent to the graphite server, it is possible to use the web interface to setup different dashboard and graphs (including combination and mathematical operation):

Nfacct setup

One really interesting thing is that Graphite is using a tree hierarchy for data and this hierarchy is build by using a dot separator. So it really matches ulogd key system and on top of that nfacct can be used to create this hierarchy:

nfacct add ipv4.http
nfacct add ipv6.http

Once a counter is created in NFACCT it is instantly sent by ulogd to Graphite and can be used to create graph. To really use the counter, some iptables rules needs to be setup. To continue on previous example, we can use:

ip6tables -I INPUT -p tcp --sport 80 -m nfacct --nfacct-name ipv6.http
ip6tables -I OUTPUT -p tcp --dport 80 -m nfacct --nfacct-name ipv6.http
iptables -I INPUT -p tcp --sport 80 -m nfacct --nfacct-name ipv4.http
iptables -I OUTPUT -p tcp --dport 80 -m nfacct --nfacct-name ipv4.http

To save counters, you can use:

nfacct list >nfacct.dump

and you can restore them with:

nfacct restore <nfacct.dump

Ulogd setup

Ulogd setup is easy, simply add a new stack to ulogd.conf:

stack=acct1:NFACCT,graphite1:GRAPHITE

The configuration of NFACCT is simple, there is only one option which is the polling interval. The plugin will dump all nfacct counter at the given interval:

[acct1]
pollinterval = 2

The Graphite output module is easy to setup, you only need to specify the host and the port of the Graphite collector:

[graphite1]
host="127.0.0.1"
port="2003"

Flow reconstruction and normalization in Suricata

The naive approach would consider that an IDS is just taking packet and doing a lot of matching on it. In fact, this is not at all what is happening. An IDS/IPS like Suricata is in fact rebuilding the data stream and in case of known protocols it is even normalizing the data stream and providing keyword which can be used to match on specific field of a protocol.

Let’s say, we a rule to match on a HTTP request where method is GET and the URL is “/download.php”.

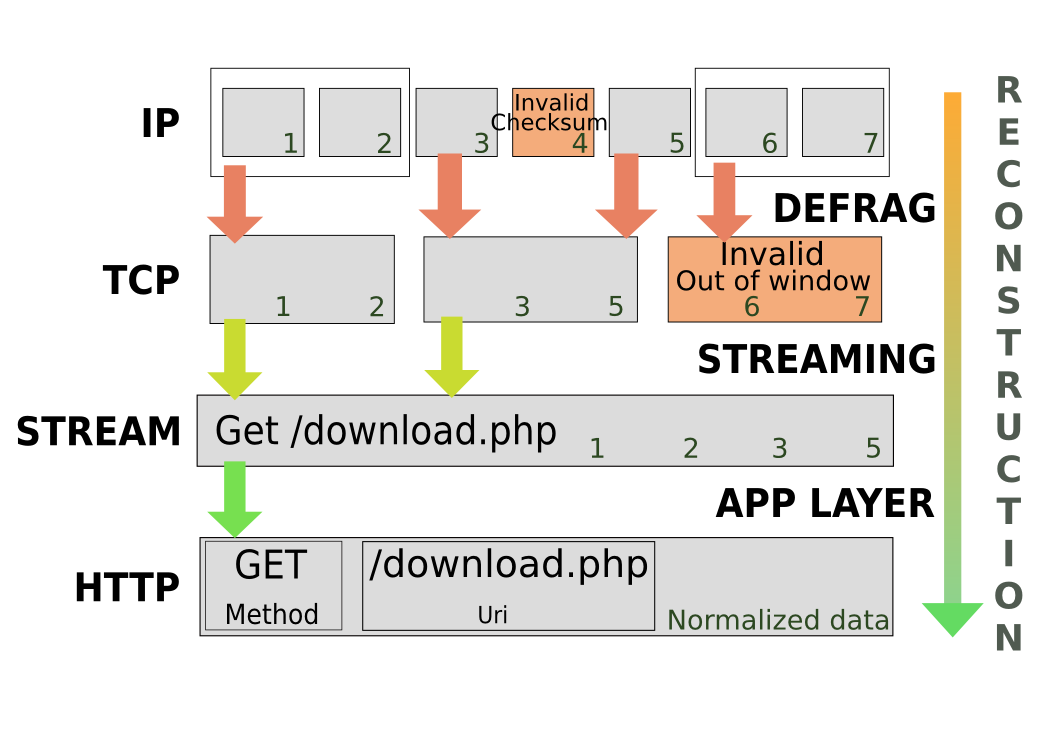
But what happen inside Suricata when want to do such a match ? Let’s try to visualize this matching on a fictive example packets stream. With such a stream, we could have the following process:

Flow reconstruction by Suricata

If you click on the image, you will get access to an interactive svg showing the alerting signatures.

A series of 7 IP packets are seen. They belong to the same flow but because of fragmentation they need to be assembled by the defrag engine. The #4 packet is invalid due to an invalid checksum.
Suricata can alert on this packet if the following rule is activated:

alert ip any any -> any any (msg:"SURICATA IPv4 invalid checksum"; ipv4-csum:invalid; sid:2200073; rev:1;)

This rule is included in the provided signature file decoder-events.rules.

To match on individual TCP packet after defragmentation, one can use the following rule:

alert tcp-pkt any any -> any 80 (msg:"HTTP dl"; content:"Get /download.php"; sid:1; rev:1;)

It will try to find a per-packet match. This means that if the request is cut in two parts, there will be no detection.

At the TCP level, we’ve got three packets but one of them is invalid because of an invalid TCP windows. Suricata can alert on this by using the following rules:

alert tcp any any -> any any (msg:"SURICATA STREAM ESTABLISHED packet out of window"; stream-event:est_packet_out_of_window; sid:2210020; rev:1;)

This rule is included in the provided signature file stream-events.rules.

So at the stream level, we’ve got data made of packets #1, #2, #3 and #5. A matching rule at this level would be:

alert tcp any any -> any any (msg:"HTTP download"; flow:established,to_server; content:"Get /download.php";)

This is a case sensitive rule and this is not resistant to basic transformation on the request such as adding spaces between Get and the URI.

The data is part of an HTTP stream and it is normalized to avoid any application level manipulation that could alter the detection by signatures.
In Suricata, we can use the following rule to have a match on normalized field:

alert http any any -> any any (msg:"Download"; content: "GET"; http_method; content: "/download.php"; http_uri)

The match is made when the traffic is identified as HTTP and we want the HTTP request method to be GET and the URL to match “/download.php”. We’ve got here one of the biggest advantage of Suricata, dedicated keywords and protocol recognition allow to write rule which are almost direct expression of our thinking.

I’m sure most of you are happy not to have this job cleanly done by Suricata!

Suricata, to 10Gbps and beyond

Introduction

Since the beginning of July 2012, OISF team is able to access to a server where one interface is receiving
some mirrored real European traffic. When reading "some", think between 5Gbps and 9.5Gbps
constant traffic. With that traffic, this is around 1Mpps to 1.5M packet per seconds we have to study.

The box itself is a standard server with the following characteristics:

  • CPU: One Intel(R) Xeon(R) CPU E5-2680 0 @ 2.70GHz (16 cores counting Hyperthreading)
  • Memory: 32Go
  • capture NIC: Intel 82599EB 10-Gigabit SFI/SFP+

The objective is simple: be able to run Suricata on this box and treat the whole
traffic with a decent number of rules. With the constraint not to use any non
official system code (plain system and kernel if we omit a driver).

The code on the box have been updated October 4th:

  • It runs Suricata 1.4beta2
  • with 6719 signatures
  • and 0% packet loss
  • with setup described below

The setup is explained by the following schema:
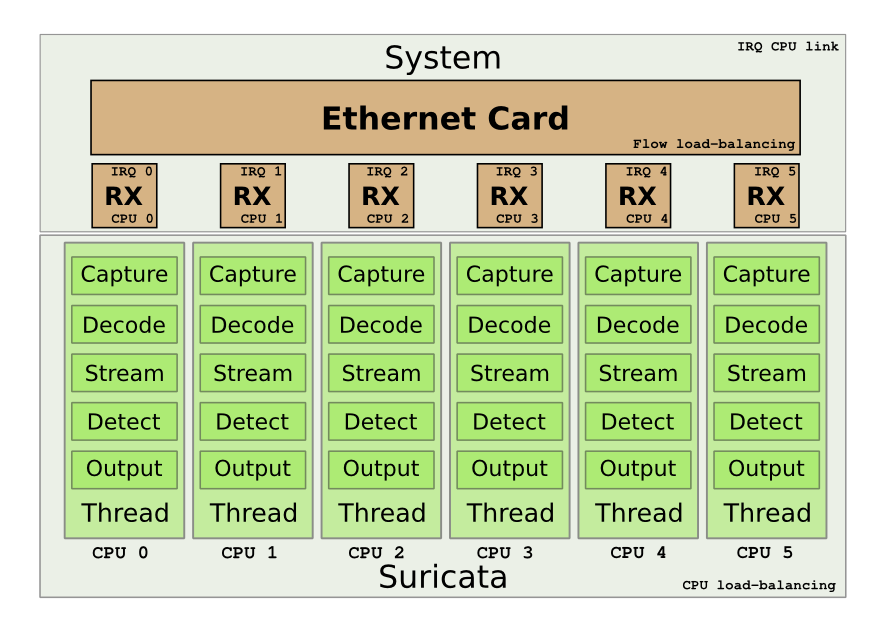
We want to use the multiqueue system on the Intel card to be able to load balance the treatment. Next goal is to have one single CPU to treat the packet from the start to the end.

Peter Manev, Matt Jonkmann, Anoop Saldanha and Eric Leblond (myself) have been involved in
the here described setup.

Detailed method

The Intel NIC benefits from a multiqueue system. The RX/TX traffic can be load-balanced
on different interrupts. In our case, this permit to handle a part of the flow on each
CPU. One really interesting thing is that the load-balancing can be done with respect
to the IP flows. By default, one RX queue is created per-CPU.

More information about multiqueue ethernet devices can be found in the document
networking/scaling.txt in the Documentation directory of Linux sources.

Suricata is able to do zero-copy in AF_PACKET capture mode. One other interesting feature
of this mode is that you can have multiple threads listening to the same interface. In
our case, we can start one threads per queue to have a load-balancing of capture on all
our resources.

Suricata has different running modes which define how the different parts of the engine
(decoding, streaming, siganture, output) are chained. One of the mode is the ‘workers’
mode where all the treatment for a packet is made on a single thread. This mode is
adapted to our setup as it will permit to keep the work from start to end on a single
thread. By using the CPU affinity system available in Suricata, we can assign each
thread to a single CPU. By doing this the treatment of each packet can be done on
a single CPU.

But this does not solve one problem which is the link between the CPU receiving the packet
and the one used in Suricata.
To do so we have to ensure that when a packet is received on a queue, the CPU that will
handle the packet will be the same as the one treating the packet in Suricata. David
Miller had already planned this kind of setup when coding the fanout mode of AF_PACKET.
One of the flow load balancing mode is flow_cpu. In this mode, the packet is delivered to
the same track depending on the CPU.

The dispatch is made by using the formula "cpu % num" where cpu is the cpu number and
num is the number of socket bound to the same fanout socket. By the way, this imply
you can’t have a number of sockets superior to the number of CPUs.
A code study shows that the assignement in the array of sockets is incrementally made.
Thus first socket to bind will be assigned to the first CPU, etc..
In case, a socket disconnect from the set, the last socket of the array will take the empty place.
This implies the optimizations will be partially lost in case of a disconnect.

By using the flow_cpu dispatch of AF_PACKET and the workers mode of Suricata, we can
manage to keep all work on the same CPU.

Preparing the system

The operating system running on is an Ubuntu 12.04 and the driver igxbe
was outdated.
Using the instruction available on Intel website (README.txt),
we’ve updated the driver.
Next step was to unload the old driver and load the new one

sudo rmmod ixgbe
sudo modprobe ixgbe FdirPballoc=3

Doing this we’ve also tried to use the RSS variable. But it seems there is an issue, as we still having 16 queues although the RSS params was
set to 8.

Once done, the next thing is to setup the IRQ handling to have each CPU linked in order with
the corresponding RX queue. irqbalance was running on the system and the setup was
correctly made.

The interface was using IRQ 101 to 116 and /proc/interrupts show a diagonale indicating
that each CPU was assigned to one interrupt.

If not, it was possible to use the instruction contained in IRQ-affinity.txt available
in the Documentation directory of Linux sources.

But the easy way to do it is to use the script provided with the driver:

ixgbe-3.10.16/scripts$ ./set_irq_affinity.sh eth3

Note: Intel latest driver was responsible of a decrease of CPU usage. With Ubuntu kernel version, the CPU usage as 80% and it is 45% with latest Intel driver.

The card used on the system was not load-balancing UDP flow using port. We had to use
‘ethtool’ to fix this

regit@suricata:~$ sudo ethtool -n eth3 rx-flow-hash udp4
UDP over IPV4 flows use these fields for computing Hash flow key:
IP SA
IP DA

regit@suricata:~$ sudo ethtool -N eth3 rx-flow-hash udp4 sdfn
regit@suricata:~$ sudo ethtool -n eth3 rx-flow-hash udp4
UDP over IPV4 flows use these fields for computing Hash flow key:
IP SA
IP DA
L4 bytes 0 & 1 [TCP/UDP src port]
L4 bytes 2 & 3 [TCP/UDP dst port]

In our case, the default setting of the ring parameters of the card, seems
to indicate it is possible to increase the ring buffer on the card

regit@suricata:~$ ethtool -g eth3
Ring parameters for eth3:
Pre-set maximums:
RX:             4096
RX Mini:        0
RX Jumbo:       0
TX:             4096
Current hardware settings:
RX:             512
RX Mini:        0
RX Jumbo:       0
TX:             512

Our system is now ready and we can start configuring Suricata.

Suricata setup

Global variables

The run mode has been set to ‘workers’

max-pending-packets: 512
runmode: workers

As pointed out by Victor Julien, this is not necessary to increase max-pending-packets too much because only a number of packets equal to the total number of worker threads can be treated simultaneously.

Suricata 1.4beta1 introduce a delayed-detect variable under detect-engine. If set to yes, this trigger a build of signature after the packet capture threads have started working. This is a potential issue if your system is short in CPU as the task of building the detect engine is CPU intensive and can cause some packet loss. That’s why it is recommended to let it to the default value of no.

AF_PACKET

The AF_PACKET configuration is almost straight forward

af-packet:
  - interface: eth3
    threads: 16
    cluster-id: 99
    cluster-type: cluster_cpu
    defrag: yes
    use-mmap: yes
    ring-size: 300000
Affinity

Affinity settings permit to assign thread to set of CPUs. In our case, we onlSet to have in exclusive mode one packet thread dedicated to each CPU. The setting
used to define packet thread property in ‘workers’ mode is ‘detect-cpu-set’

threading:
  set-cpu-affinity: yes
  cpu-affinity:
    - management-cpu-set:
      cpu: [ "all" ]
      mode: "balanced"
      prio:
        default: "low"

  - detect-cpu-set:
      cpu: ["all"]
      mode: "exclusive" # run detect threads in these cpus
      prio:
        default: "high"

The idea is to assign the highest prio to detect threads and to let the OS do its best
to dispatch the remaining work among the CPUs (balanced mode on all CPUs for the management).

Defrag

Some tuning was needed here. The network was exhibing some serious fragmentation
and we have to modify the default settings

defrag:
  memcap: 512mb
  trackers: 65535 # number of defragmented flows to follow
  max-frags: 65535  # number of fragments

The ‘trackers’ variable was not documented in the original YAML configuration file.
Although defined in the YAML, the ‘max-frags’ one was not used by Suricata. A patch
has been made to implement this.

Streaming

The variables relative to streaming have been set very high

stream:
  memcap: 12gb
  max-sessions: 20000000
  prealloc-sessions: 10000000
  inline: no                    # no inline mode
  reassembly:
    memcap: 14gb
    depth: 6mb                  # reassemble 1mb into a stream
    toserver-chunk-size: 2560
    toclient-chunk-size: 2560

To detect the potential issue with memcap, one can read the ‘stats.log’ file
which contains various counters. Some of them matching the ‘memcap’ string.

Running suricata

Suricata can now be runned with the usual command line

sudo suricata -c /etc/suricata.yaml --af-packet=eth3

Our affinity setup is working as planned as show the following log line

Setting prio -2 for "AFPacketeth34" Module to cpu/core 3, thread id 30415

Tests

Tests have been made by simply running Suricata against the massive traffic
mirrored on the eth3 interface.

At first, we started Suricata without rules to see if it was able to deal
with the amount of packets for a long period. Most of the tuning was done
during this phase.

To detect packet loss, the capture keyword can be search in ‘stats.log’.
If ‘kernel_drops’ is set to 0, this is good

capture.kernel_packets    | AFPacketeth315            | 1436331302
capture.kernel_drops      | AFPacketeth315            | 0
capture.kernel_packets    | AFPacketeth316            | 1449320230
capture.kernel_drops      | AFPacketeth316            | 0

The statistics are available for each thread. For example, ‘AFPacketeth315’ is
the 15th AFPacket thread bound to eth3.

When this phase was complete we did add some rules by using Emerging Threat PRO rules
for malware, trojan and some others:

rule-files:
 - trojan.rules
 - malware.rules
 - chat.rules
 - current_events.rules
 - dns.rules
 - mobile_malware.rules
 - scan.rules
 - user_agents.rules
 - web_server.rules
 - worm.rules

This ruleset has the following characterics:

  • 6719 signatures processed
  • 8 are IP-only rules
  • 2307 are inspecting packet payload
  • 5295 inspect application layer
  • 0 are decoder event only

This is thus a decent ruleset with a high part of application level event which require a
complex processing. With that ruleset, there is more than 16 alerts per second (output in unified2 format).

With the previously mentioned ruleset, the load of each CPU is around 60% and Suricata
is remaining stable during hours long run.

In most run, we’ve observed some packet loss between capture start and first time Suricata grab the statistics. It seems the initialization phase is not fast enough.

Conclusion

OISF team has access to the box for a week now and has already
managed to get real performance. We will continue to work on it to provide
the best possible experience to all Suricata’s users.

Feel free to made any remark and suggestion about this blog post and this setup.
Flow accounting with Netfilter and ulogd2

Introduction

Starting with Linux kernel 3.3, there’s a new module called nfnetlink_acct.
This new feature added by Pablo Neira brings interesting accountig capabilities to Netfilter.
Pablo has made an extensive description of the feature in the commit.

System setup

We need to build a set of tools to get all that’s necessary:

  • libmnl
  • libnetfilter_acct
  • nfacct

The build is the same for all projects:

git clone git://git.netfilter.org/PROJECT
cd PROJECT
autoreconf -i
./configure
make
sudo make install

nfacct

This command line tool is here to set up and interact with the accounting subsystem. To get the help you can use the man page or run:

# nfacct help
nfacct v1.0.0: utility for the Netfilter extended accounting infrastructure
Usage: nfacct command [parameters]...

Commands:
  list [reset]		List the accounting object table (and reset)
  add object-name	Add new accounting object to table
  delete object-name	Delete existing accounting object
  get object-name	Get existing accounting object
  flush			Flush accounting object table
  version		Display version and disclaimer
  help			Display this help message

Configuration

Objectives

Let’s have for objectives to get the following statistics:

  • IPv6 data usage
    • http on IPv6 usage
    • https on IPv6 usage
  • IPv4 data usage
    • http on IPv4 usage
    • https on IPv4 usage

Ulogd2 configuration

Let’s start by a simple output to XML. For that we will add the following stack:

stack=acct1:NFACCT,xml1:XML

and this one:

stack=acct1:NFACCT,gp1:GPRINT

nfacct setup

modprobe nfnetlink_acct
nfacct add ipv6
nfacct add http-ipv6
nfacct add https-ipv6
nfacct add ipv4
nfacct add http-ipv4
nfacct add https-ipv4

iptables setup

iptables -I INPUT -m nfacct --nfacct-name ipv4
iptables -I INPUT -p tcp --sport 80 -m nfacct --nfacct-name http-ipv4
iptables -I INPUT -p tcp --sport 443 -m nfacct --nfacct-name https-ipv4
iptables -I OUTPUT -m nfacct --nfacct-name ipv4
iptables -I OUTPUT -p tcp --dport 80 -m nfacct --nfacct-name http-ipv4
iptables -I OUTPUT -p tcp --dport 443 -m nfacct --nfacct-name https-ipv4

ip6tables setup

ip6tables -I INPUT -m nfacct --nfacct-name ipv6
ip6tables -I INPUT -p tcp --sport 80 -m nfacct --nfacct-name http-ipv6
ip6tables -I INPUT -p tcp --sport 443 -m nfacct --nfacct-name https-ipv6
ip6tables -I OUTPUT -m nfacct --nfacct-name ipv6
ip6tables -I OUTPUT -p tcp --dport 80 -m nfacct --nfacct-name http-ipv6
ip6tables -I OUTPUT -p tcp --dport 443 -m nfacct --nfacct-name https-ipv6

Starting the beast

Now we can start ulogd2:

ulogd2 -c /etc/ulogd.conf

In /var/log, we will have the following files:

  • ulogd_gprint.log: display stats for each counter on one line
  • ulogd-sum-14072012-224313.xml: XML dump
  • ulogd.log: the daemon log file to look at in case of problem

Output examples

In the ulogd_gprint.log file, the ouput for a given timestamp is something like that:

timestamp=2012/07/14-22:48:17,sum.name=http-ipv6,sum.pkts=0,sum.bytes=0
timestamp=2012/07/14-22:48:17,sum.name=https-ipv6,sum.pkts=0,sum.bytes=0
timestamp=2012/07/14-22:48:17,sum.name=ipv4,sum.pkts=20563,sum.bytes=70
timestamp=2012/07/14-22:48:17,sum.name=http-ipv4,sum.pkts=0,sum.bytes=0
timestamp=2012/07/14-22:48:17,sum.name=https-ipv4,sum.pkts=16683,sum.bytes=44
timestamp=2012/07/14-22:48:17,sum.name=ipv6,sum.pkts=0,sum.bytes=0

The XML output is the following:

<obj><name>http-ipv6</name><pkts>00000000000000000000</pkts><bytes>00000000000000000000</bytes><hour>22</hour><min>43</min><sec>15</sec><wday>7</wday><day>14</day><month>7</month><year>2012</year></obj>
<obj><name>https-ipv6</name><pkts>00000000000000000000</pkts><bytes>00000000000000000000</bytes><hour>22</hour><min>43</min><sec>15</sec><wday>7</wday><day>14</day><month>7</month><year>2012</year></obj>
<obj><name>ipv4</name><pkts>00000000000000000052</pkts><bytes>00000000000000006291</bytes><hour>22</hour><min>43</min><sec>15</sec><wday>7</wday><day>14</day><month>7</month><year>2012</year></obj>
<obj><name>http-ipv4</name><pkts>00000000000000000009</pkts><bytes>00000000000000000408</bytes><hour>22</hour><min>43</min><sec>15</sec><wday>7</wday><day>14</day><month>7</month><year>2012</year></obj>
<obj><name>https-ipv4</name><pkts>00000000000000000031</pkts><bytes>00000000000000004041</bytes><hour>22</hour><min>43</min><sec>15</sec><wday>7</wday><day>14</day><month>7</month><year>2012</year></obj>
<obj><name>ipv6</name><pkts>00000000000000000002</pkts><bytes>00000000000000000254</bytes><hour>22</hour><min>43</min><sec>15</sec><wday>7</wday><day>14</day><month>7</month><year>2012</year></obj>

Conclusion

nfacct and ulogd2 offers a easy and efficient way to gather network statistics. Some tools and glue are currently lacking to fill the data inside reporting tool but the log structure is clean and it should not be too difficult.

Opensvp, a new tool to analyse the security of firewalls using ALGs

Following my talk at SSTIC, I’ve released a new tool called opensvp. Its aim is to cover the attacks described in this talk. It has been published to be able to determine if the firewall policy related to Application Layer Gateways is correctly implemented.

Opensvp implements two type of attacks:

  • Abusive usage of protocol commands: an protocol message can be forged to open pinhole into firewall. Opensvp currently implements message sending for IRC and FTP ALGs.
  • Spoofing attack: if anti-spooofing is not correctly setup, an attacker can send command which result in arbitrary pinhole being opened to a server.

It has been developed in Python and uses scapy to implement the spoofing attack on ALGs.

For usage and download, you can have a look at opensvp page. The attack against helpers is described in the README of opensvp.

The document “Secure use of iptables and connection tracking helpers” was published some months ago and it describes how to protect a Netfilter firewall when using connection tracking helpers (the Netfilter name for ALGs).

Transparents de ma présentation au SSTIC

Les transparents de ma présentation du SSTIC sont disponibles : Utilisation malveillante des suivis de connexions. Merci aux organisateurs du SSTIC d’avoir accepté mon papier!

Des vidéos de démonstration sont disponibles sur ce post: Playing with Network Layers to Bypass Firewalls’ Filtering Policy

L’outil de test openvsp est disponible sur cette page.

Using Scapy lfilter

Scapy BPF filtering is not working when some exotic interface are used. This includes Virtualbox interface such as vboxnet.

For example, the following code will not work if the interface is a virtualbox interface:

build_filter = "src host %s and src port 21"
sniff(iface=iface, prn=callback, filter=build_filter)

To fix this, you can use the lfilter option. The filtering is now done inside Scapy. This is powerful but less efficient.

The code can be modified like this:

build_lfilter = lambda (r): TCP in r and r[TCP].sport == 21 and r[IP].src == ip
sniff(iface=iface, prn=callback, lfilter=build_lfilter)

Tanks a lot to Guillaume Valadon for the tips!

IPv6 privacy extensions on Linux

IPv6 global address

The global address is used in IPv6 to communicate with the outside world. This is thus the one that is used as source for any communication and thus in a way identify you on Internet.

Below is a dump of an interface configuration:

eth0: <BROADCAST,MULTICAST,UP,LOWER_UP> mtu 1500 qdisc pfifo_fast state UP qlen 1000
    link/ether 00:22:15:64:42:bd brd ff:ff:ff:ff:ff:ff
    inet6 2a01:f123:1234:5bd0:222:15ff:fe64:42bd/64 scope global dynamic 
       valid_lft 86314sec preferred_lft 86314sec
    inet6 fe80::222:15ff:fe64:42bd/64 scope link 
       valid_lft forever preferred_lft forever

The global address is here 2a01:f123:1234:5bd0:222:15ff:fe64:42bd/64. It is build by using the prefix and adding an identifier build with the hardware address. For example, here the hardware address is 00:22:15:64:42:bd and the global IPv6 address is ending with 22:15ff:fe64:42bd.

It is thus easy to go from the IPv6 global address to the hardware address. To fix this issue and increase the privacy of network user, privacy extensions have been developed.

Privacy extensions

The RFC 3041 describes how to build and use temporary addresses that will be used as source address for connection to the outside world.

To activate this feature, you simply have to modify an entry in /proc. For example to activate the feature on eth0, you can do

echo "2">/proc/sys/net/ipv6/conff/eth0/use_tempaddr

The usage of the option is detailled in the must-read ip-sysctl.txt file:

use_tempaddr - INTEGER
        Preference for Privacy Extensions (RFC3041).
          <= 0 : disable Privacy Extensions
          == 1 : enable Privacy Extensions, but prefer public
                 addresses over temporary addresses.
          >  1 : enable Privacy Extensions and prefer temporary
                 addresses over public addresses.
        Default:  0 (for most devices)
                 -1 (for point-to-point devices and loopback devices)

After network restart (a simple ifdown, ifup of the interface is enough), the output of the ip a command looks like that:

eth0: <BROADCAST,MULTICAST,UP,LOWER_UP> mtu 1500 qdisc pfifo_fast state UP qlen 1000
    link/ether 00:22:15:64:42:bd brd ff:ff:ff:ff:ff:ff
    inet 192.168.1.129/24 brd 192.168.1.255 scope global eth0
    inet6 2a01:f123:1234:5bd0:21f1:f624:d2b8:3702/64 scope global temporary dynamic 
       valid_lft 86314sec preferred_lft 2914sec
    inet6 2a01:f123:1234:5bd0:222:15ff:fe64:42bd/64 scope global dynamic 
       valid_lft 86314sec preferred_lft 86314sec
    inet6 fe80::222:15ff:fe64:42bd/64 scope link 
       valid_lft forever preferred_lft forever

A new temporary address has been added. After preferred_lft seconds, it becomes deprecated and a new address is added:

eth0: <BROADCAST,MULTICAST,UP,LOWER_UP> mtu 1500 qdisc pfifo_fast state UP qlen 1000
    link/ether 00:22:15:64:42:bd brd ff:ff:ff:ff:ff:ff
    inet 192.168.1.129/24 brd 192.168.1.255 scope global eth0
    inet6 2a01:f123:1234:5bd0:55c3:7efd:93d1:5057/64 scope global temporary dynamic 
       valid_lft 85009sec preferred_lft 1672sec
    inet6 2a01:f123:1234:5bd0:21f1:f624:d2b8:3702/64 scope global temporary deprecated dynamic 
       valid_lft 82077sec preferred_lft 0sec
    inet6 2a01:f123:1234:5bd0:222:15ff:fe64:42bd/64 scope global dynamic 
       valid_lft 86398sec preferred_lft 86398sec
    inet6 fe80::222:15ff:fe64:42bd/64 scope link 
       valid_lft forever preferred_lft foreverr

The deprecated address is removed when the valid_lft counter reach zero second.

Some more tuning

The default duration for a prefered adress is of one day. This can be changed by modifying the temp_prefered_lft variable.

For example, you can add to sysctl.conf:

net.ipv6.conf.eth0.temp_prefered_lft = 7200

The default validity length of the addresses can be changed via the temp_valid_lft variable.

The max_desync_factor set the max random time to wait before asking a new address. This is used to avoid that all computers in network ask for an address at the same time.
On side effect is that if you set the prefered or valid time to a low value, the max_desync_factor must also be decreased. If not, there will be long time period without temporary address.

If temp_prefered_lft is multiple time lower than temp_valid_lft, then the deprecated addresses will accumulate. To avoid overloading the kernel, a maximum number of addresses is set.
Equal to 16 by default, it can be changed by setting the max_addresses sysctl variable.

Known issues and problems

As the temporary address is used for connection to the outside and has a limited duration, some long duration connections (tink ssh) will be cut when the temporary address is removed.

I’ve also observed a problem when the maximum number of addresses is reached:

ipv6_create_tempaddr(): retry temporary address regeneration.
ipv6_create_tempaddr(): regeneration time exceeded. disabled temporary address support.

The result was that the temporary address support was disabled and the standard global address was used again. When setting temp_prefered_lft to 3600 and keeping temp_valid_ft to default value, the problem is reproduced easily.

Conclusion

The support of IPv6 privacy extensions is correct but the lack of link with existing connection can cause the some services to be disrupted. A easy to use per-software selection of address could be really interesting to avoid these problems.