A month in the life of Debian in 2000 and 2012

Visualizing Debian packages upload

Ultimate Debian Database provide a way to get information about all packages upload on Debian repositories accros time. After a discussion with Lucas Nussbaum at Distro Recipes, he made available a webpage to access to a gource compatible file format of packages upload.

Using this I was able to create videos of Debian evolution over time. I’ve generated two videos showing on month of packages upload in 2000 and to compare one month in 2012.

The first video is really peaceful even if the lack of activity cause gource to do some jump in time:

The second video is made with exactly the same time scale and the rhythm is completely crazy:

More info about video generation

The raw data are the following: udd.gource.log.bz2. I’ve transformed them to add section information to package name by using the following script:

[python]
#!/usr/bin/python

import fileinput
import apt

cache = apt.Cache()

for line in fileinput.input():
[date, user, mode, package] = line.split(“|”)
pack = package.rstrip()

if len(user) == 0:
continue

try:
pkg = cache[pack] # Access the Package object for python-apt
package = pkg.section + “/” + pack
except KeyError:
package = “undef” + “/” + pack

print date + “|” + user + “|” + mode + “|” + package
[/python]

The result is the following file: udd.gource-section.log.bz2. Once extracted, it can be visualized in gource:

gource --log-format custom  udd.gource-section.log

Next step was to extract the upload at start (in 2000) and the latest upload (in 2012). I’ve simply used tail and head to do so. The generation of the videos was made using indication given on gource website:

gource -1920x1080 -o - udd.gource-end.log | ffmpeg -y -r 60 -f image2pipe -vcodec ppm -i - -vcodec libvpx -b 13000K debian-2012.webm

Installing Debian sid on a XPS 15

Since this morning, I’m the owner of a XPS 15 end-2012 edition. The model I have come with a hard drive and a SSD and it is pre-installed with Windows 8. As it is not a good choice for a OS you want to use the laptop for real work, I’ve installed a Debian sid on it.

On the laptop, I’ve received the 32Go SSD was formatted with a single 8Go partition which was not used by Windows. The Windows installation was made on the classic hard drive.

From Windows, I was able to change the size of the system partition on the hard drive (the big one host OS and data) and doing so, I’ve managed to create a new partition to host my Linux data.

I’ve made the installation using an USB stick prepared with unetbootin. I had to choose the HD media mode to be able to correctly run the install procedure.

To start the install, you need to go in the bios by pressing F2. You then have to activate the legacy mode which will allow you to run an OS like Debian. To switch between the different OS, you have to hit F12 at start to be able to choose between Legacy (for GNU/Linux) and UEFI (for Windows).

The major trick during the install was to delete the partition table on the SSD which was in GPT style (and thus difficultly supported by grub). I’ve created instead a standard old-style partition table on it. I was then able to put my Debian system on the SSD without any problem.

All devices seems to work fine with Debian Sid. So if we omit the optimus Nvidia card issue, this is a computer that I recommend.

Minimal linux kernel config for Virtualbox

I was looking for some minimal Linux kernel configuration for Virtualbox guest and did only find some old one. I thus decide to build one and to publish them.
They are available on github: regit-config

For now, the only published configuration are for Linux kernel 3.5:

Upgrading Galaxy S from Android 2.1 to 2.3.3 under Linux

After some time lost by trying in vain to have Kies (of Death) from Samsung oder Odin working under Virtualbox, I’ve found about the exitence of Heimdall. This software has been developped to flash firmware onto Samsung Galaxy S devices.

It did work quiet easily. Upgrade procedure only requires some files download and in my case some usage of the tar command.

The command line was long but simple:
[bash]heimdall flash -pit s1_odin_20100512.pit –factoryfs factoryfs.rfs \
–cache cache.rfs –dbdata dbdata.rfs –param param.lfs \
–kernel zImage –modem modem.bin \
–primary-boot boot.bin –secondary-boot Sbl.bin \
–verbose[/bash]

A GUI named heimdall-frontend is available for people who do not like command line.

Here’s a list of problems I’ve encountered during this update :

  • Going to download mode was not possible on the phone: I had to use adb
  • adb is 32 bit and I had to install 32 bit libs: aptitude install ia32-libs
  • heimdall uses a device /dev/ttyACM0 which is read/write for dialout (and I was not in the group)
  • I had to chain command adp reboot download with heimdall command to have the upgrade starting
  • The first restart was blocked at “Galaxy S” display, I’ve run an adb reboot recover to return to normal behaviour
  • I had no data connection (3G) after upgrade: Restoring default APN configuration fixed the issue

If we omit this little points, the upgrade procedure was fine. Heimdall was very efficient compare to every crap I’ve tried to use on the Windows. Thanks a lot for their work !

IPv6 privacy extensions on Linux

IPv6 global address

The global address is used in IPv6 to communicate with the outside world. This is thus the one that is used as source for any communication and thus in a way identify you on Internet.

Below is a dump of an interface configuration:

eth0: <BROADCAST,MULTICAST,UP,LOWER_UP> mtu 1500 qdisc pfifo_fast state UP qlen 1000
    link/ether 00:22:15:64:42:bd brd ff:ff:ff:ff:ff:ff
    inet6 2a01:f123:1234:5bd0:222:15ff:fe64:42bd/64 scope global dynamic 
       valid_lft 86314sec preferred_lft 86314sec
    inet6 fe80::222:15ff:fe64:42bd/64 scope link 
       valid_lft forever preferred_lft forever

The global address is here 2a01:f123:1234:5bd0:222:15ff:fe64:42bd/64. It is build by using the prefix and adding an identifier build with the hardware address. For example, here the hardware address is 00:22:15:64:42:bd and the global IPv6 address is ending with 22:15ff:fe64:42bd.

It is thus easy to go from the IPv6 global address to the hardware address. To fix this issue and increase the privacy of network user, privacy extensions have been developed.

Privacy extensions

The RFC 3041 describes how to build and use temporary addresses that will be used as source address for connection to the outside world.

To activate this feature, you simply have to modify an entry in /proc. For example to activate the feature on eth0, you can do

echo "2">/proc/sys/net/ipv6/conff/eth0/use_tempaddr

The usage of the option is detailled in the must-read ip-sysctl.txt file:

use_tempaddr - INTEGER
        Preference for Privacy Extensions (RFC3041).
          <= 0 : disable Privacy Extensions
          == 1 : enable Privacy Extensions, but prefer public
                 addresses over temporary addresses.
          >  1 : enable Privacy Extensions and prefer temporary
                 addresses over public addresses.
        Default:  0 (for most devices)
                 -1 (for point-to-point devices and loopback devices)

After network restart (a simple ifdown, ifup of the interface is enough), the output of the ip a command looks like that:

eth0: <BROADCAST,MULTICAST,UP,LOWER_UP> mtu 1500 qdisc pfifo_fast state UP qlen 1000
    link/ether 00:22:15:64:42:bd brd ff:ff:ff:ff:ff:ff
    inet 192.168.1.129/24 brd 192.168.1.255 scope global eth0
    inet6 2a01:f123:1234:5bd0:21f1:f624:d2b8:3702/64 scope global temporary dynamic 
       valid_lft 86314sec preferred_lft 2914sec
    inet6 2a01:f123:1234:5bd0:222:15ff:fe64:42bd/64 scope global dynamic 
       valid_lft 86314sec preferred_lft 86314sec
    inet6 fe80::222:15ff:fe64:42bd/64 scope link 
       valid_lft forever preferred_lft forever

A new temporary address has been added. After preferred_lft seconds, it becomes deprecated and a new address is added:

eth0: <BROADCAST,MULTICAST,UP,LOWER_UP> mtu 1500 qdisc pfifo_fast state UP qlen 1000
    link/ether 00:22:15:64:42:bd brd ff:ff:ff:ff:ff:ff
    inet 192.168.1.129/24 brd 192.168.1.255 scope global eth0
    inet6 2a01:f123:1234:5bd0:55c3:7efd:93d1:5057/64 scope global temporary dynamic 
       valid_lft 85009sec preferred_lft 1672sec
    inet6 2a01:f123:1234:5bd0:21f1:f624:d2b8:3702/64 scope global temporary deprecated dynamic 
       valid_lft 82077sec preferred_lft 0sec
    inet6 2a01:f123:1234:5bd0:222:15ff:fe64:42bd/64 scope global dynamic 
       valid_lft 86398sec preferred_lft 86398sec
    inet6 fe80::222:15ff:fe64:42bd/64 scope link 
       valid_lft forever preferred_lft foreverr

The deprecated address is removed when the valid_lft counter reach zero second.

Some more tuning

The default duration for a prefered adress is of one day. This can be changed by modifying the temp_prefered_lft variable.

For example, you can add to sysctl.conf:

net.ipv6.conf.eth0.temp_prefered_lft = 7200

The default validity length of the addresses can be changed via the temp_valid_lft variable.

The max_desync_factor set the max random time to wait before asking a new address. This is used to avoid that all computers in network ask for an address at the same time.
On side effect is that if you set the prefered or valid time to a low value, the max_desync_factor must also be decreased. If not, there will be long time period without temporary address.

If temp_prefered_lft is multiple time lower than temp_valid_lft, then the deprecated addresses will accumulate. To avoid overloading the kernel, a maximum number of addresses is set.
Equal to 16 by default, it can be changed by setting the max_addresses sysctl variable.

Known issues and problems

As the temporary address is used for connection to the outside and has a limited duration, some long duration connections (tink ssh) will be cut when the temporary address is removed.

I’ve also observed a problem when the maximum number of addresses is reached:

ipv6_create_tempaddr(): retry temporary address regeneration.
ipv6_create_tempaddr(): regeneration time exceeded. disabled temporary address support.

The result was that the temporary address support was disabled and the standard global address was used again. When setting temp_prefered_lft to 3600 and keeping temp_valid_ft to default value, the problem is reproduced easily.

Conclusion

The support of IPv6 privacy extensions is correct but the lack of link with existing connection can cause the some services to be disrupted. A easy to use per-software selection of address could be really interesting to avoid these problems.

Optimizing Suricata on multicore CPUs

Suricata IDS/IPS architecture is heavily using multithreading. On almost every runmode (PCAP, PCAP file, NFQ, …) it is possible to setup the number of thread that are used for detection. This is the most CPU intensive task as it does the detection of alert by checking the packet on the signatures. The configuration of the number of threads is done by setting
a ratio which decide of the number of threads to be run by available CPUs (detect_thread_ratio variable).

A discussion with Florian Westphal at NFWS 2010 convince me that it was necessary for performance to tune with more granularity the thread and CPU link. I thus decide to improve this part of the code in Suricata and I’ve recently submitted a serie of patches that enable a fine setting.

I’ve been able to run some tests on a decent server:

processor : 23
vendor_id : GenuineIntel
cpu family : 6
model : 44
model name : Intel(R) Xeon(R) CPU X5650 @ 2.67GHz

This is a dual 6-core CPUs with hyperthreading activated and something like 12 Go of memory. From a Linux point of view, it has 24 identical processors.

I was not able to produce a decent testing environnement (read able to inject traffic) and all tests have been made on the parsing of a 6.1Go pcap file captured on a real network.

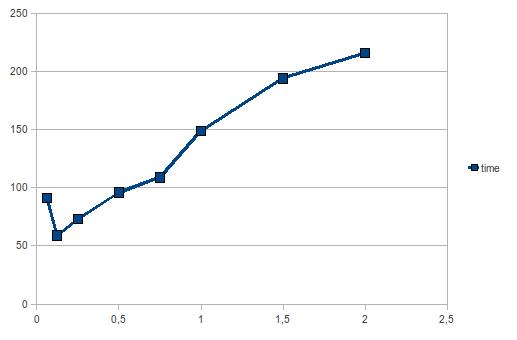
I’ve first tested my modification and soon arrive to the conclusion that limiting the number of threads was a good idea. Following Victor Julien suggestion, I’ve played with the detect_thread_ratio variable to see its influence on the performance. Here’s the graph of performance relatively to the ratio for the given server:

It seems that the 0.125 value (which correspond to 3 threads) is on this server the best value.

If we launch the test with ratio 0.125 more than one time, we can see that the performance vary between 64s and 50s with a mean of 59s. This means the variation is about 30% and the running can not be easily predicted.

It is now time to look at the results we can obtain by tuning the affinity. I’ve setup the following affinity configuration which run 3 threads on selected CPU (for our reader 3 = 0.125 * 24):

  cpu_affinity:
    - management_cpu_set:
        cpu: [ 0 ]  # include only these cpus in affinity settings
    - receive_cpu_set:
        cpu: [ 1 ]  # include only these cpus in affinity settings
    - decode_cpu_set:
        cpu: [ "2" ]
        mode: "balanced"
    - stream_cpu_set:
        cpu: [ "0-4" ]
    - detect_cpu_set:
        #cpu: [ 6, 7, 8 ]
        cpu: [ 6, 8, 10 ]
        #cpu: [ 6, 12, 18 ]
        mode: "exclusive" # run detect threads in these cpus
        threads: 3
        prio:
           low: [ "0-4" ]
           medium: [ "5-23" ]
           default: "medium"
    - verdict_cpu_set:
        cpu: [ 0 ]
        prio:
           default: "high"
    - reject_cpu_set:
        cpu: [ 0 ]
        prio:
           default: "low"
    - output_cpu_set:
        cpu: [ "0" ]
        prio:
           default: "medium"

and I’ve played with detect_cpu_set setting on the cpu variable. By using CPU set coherent with the hardware architecture, we manage to have result with a very small variation between run:

  • All threads including receive one on the same CPU but avoiding hyperthread: 50-52s (detect threads running on 6,8,10)
  • All threads on same CPU but without avoiding hyperthread: 60-62s (detect threads running on 6,7,8)
  • All threads on same hard CPU: 55-57s (avoid hyperthread, 4 threads) (4 6 8 10 on detect)
  • Read and detect on different CPU: 61-65s (detect threads on 6,12,18)

Thus we stabilize the best performance by remaining on the same hardware CPU and avoiding hyperthread CPUs. This also explain the difference between the run of the first tests. The only setting was the number of threads and we can encounter any of the setup (same or different hardware CPU, running two threads on a core with hyperthreading) or even flip during one test. That’s why performance vary a lot between tests run.

Next step for me will be to run perf tool on suricata to estimate where the bottleneck is. More infos to come !

Splitting and shrinking a git repository

I have recently faced the challenge to rewrite a git repository. It has two problems:

  • First problem was small: an user has commited with a badly setup git and E-mail as well as username were not correctly set.
  • Second problem seems more tricky: I was needing to split the git repository in two different one. To be precise on that issue, from the two directories at root (src and deps) have to become the root of their own repository.

I then dig into the doc and it leads me directly to ‘filter-branch’ which was the solution of my two problems. The names of the command is almost self-explanatory: it is used to rewrite branches.

Splitting the git repository

A rapid reading of ‘git help filter-branch’ convince me to give a try to the ‘subdirectory-filter’ subcommand:

--subdirectory-filter

Only look at the history which touches the given subdirectory. The result will contain that directory (and only that) as its project root. Implies
--remap-to-ancestor

Thus to split the directory, I have simply to copy my repository via a clone call and run the filter command:

git clone project project-src
cd project-src
git filter-branch --subdirectory-filter src

Doing once again for the deps directory and I had my two new repositories ready to go.

At once during this cleaning task, I wanted to avoid to loose my directory structure. I mean I want to keep the ‘src’ directory in the ‘src’ repository. Thanks to the examples at the end of ‘git help filter-branch’, I’ve found this trickier command:

git filter-branch --prune-empty --index-filter \\
 'git rm -r --cached --ignore-unmatch deps' HEAD

This literally do the following : for each commit (--index-filter), suppress (rm) recursively (-r) all items of the ‘deps’ directory. If a commit is empty then suppress it from history (--prune-empty).

Shrinking the resulting repository

‘deps’ directory was known to take a lot of disk space and I thus done a check to see the size of the ‘src’ directory. My old friend ‘du’ sadly told me that the split repository has the same size as the whole one ! There is something tricky here. After googling a little bi I’ve found out (mainly by reading Luke Palmer post) that git never destroy immediately a commit. It is always present has an object in the .git/objects directory. To ask for an effective suppression, you’ve got to tell git that some objects are expired and can now be destroyed. The following command will destroy all objects unreachable since more than one day:

git gc --aggressive --prune=1day

Unreachable objects means objects that exist but that aren’t readable from any of the reference nodes. This last definition is taken from ‘git help fsck’. The ‘fsck’ command can be used to check the validity
and connectivity of objects in the database. For example to display unreachable object, you can run:

git fsck --unreachable

Fixing commiter name

My problem on badly authored commits was still remaining. From the documentation, --env-filter subcommand was the one I need to use. The idea of the command is that it will iterate on every commit of the branch giving you some environnement variables:

GIT_COMMITTER_NAME=Eric Leblond
GIT_AUTHOR_EMAIL=eleblond@example.com
GIT_COMMIT=fbf7d74174bf4097fe5b0ec559426232c5f7b540
GIT_DIR=/home/regit/git/oisf/.git
GIT_AUTHOR_DATE=1280686086 +0200
GIT_AUTHOR_NAME=Eric Leblond
GIT_COMMITTER_EMAIL=eleblond@example.com
GIT_INDEX_FILE=/home/regit/git/oisf/.git-rewrite/t/../index
GIT_COMMITTER_DATE=1280686086 +0200
GIT_WORK_TREE=.

If you modify one of them and export the result, the commit will be modifed accordingly. For example, my problem was that commit
from ‘jdoe’ are in fact from ‘John Doe’ which mail is ‘john.doe@example.com’. I thus run the following command:

git filter-branch -f --env-filter '
if [ "${GIT_AUTHOR_NAME}" = "jdoe" ]; then
GIT_AUTHOR_EMAIL=john.doe@example.com;
GIT_AUTHOR_NAME="John Doe";
fi
export GIT_AUTHOR_NAME
export GIT_AUTHOR_EMAIL
'

Git show here once again it has been made by semi-god hackers that have developped it to solve their own source management problems.

Using Suricata with CUDA

Suricata is a next generation IDS/IPS engine developed by the Open Information Security Foundation.

This article describes the installation, setup and usage of Suricata with CUDA support on a Ubuntu 10.04 64bit. For 32 bit users, simply remove 64 occurances where you find them.

Preparation

You need to download both Developper driver and Cuda driver from nvidia website. I really mean both because Ubuntu nvidia drivers are not working with CUDA.

I’ve first downloaded and installed CUDA toolkit for Ubuntu 9.04. It was straightforward:

sudo sh cudatoolkit_3.0_linux_64_ubuntu9.04.run

To install the nvidia drivers, you need to disconnect from graphical session and close gdm. Thus I’ve done a CTRL+Alt+F1 and I’ve logged in as normal user. Then I’ve simply run the install script:

sudo stop gdm

sudo sh devdriver_3.0_linux_64_195.36.15.run

sudo modprobe nvidia

sudo start gdm

After a normal graphical login, I was able to start working on suricata build

Suricata building

I describe here compilation of 0.9.0 source. To do so, you can get latest release from OISF download page and extract it to your preferred directory:

wget http://openinfosecfoundation.org/download/suricata-0.9.0.tar.gz

tar xf suricata-0.9.0.tar.gz

cd suricata-0.9.0

Compilation from git should be straight forward (if CUDA support is not broken) by doing:

git clone git://phalanx.openinfosecfoundation.org/oisf.git

cd oisf

./autogen.sh

Configure command has to be passed options to enable CUDA:

./configure –enable-debug –enable-cuda –with-cuda-includes=/usr/local/cuda/include/ –with-cuda-libraries=/usr/local/cuda/lib64/ –enable-nfqueue –prefix=/opt/suricata/ –enable-unittests

After that you can simply use

make

sudo make install

Now you’re ready to run.

Running suricata with CUDA support

Let’s first check, if previous step were correct by running unittests:

sudo /opt/suricata/bin/suricata -uUCuda

It should display a bunch of message and finish with a summary:

==== TEST RESULTS ====
PASSED: 43
FAILED: 0
======================

Now, it is time to configure Suricata. To do so we will first install configuration file in a standard location:

sudo mkdir /opt/suricata/etc

sudo cp suricata.yaml classification.config /opt/suricata/etc/

sudo mkdir /var/log/suricata

Suricata needs some rules. We will use emerging threats one and use configuration method described by Victor Julien in his article.
wget http://www.emergingthreats.net/rules/emerging.rules.tar.gz
cd /opt/suricata/etc/
sudo tar xf /home/eric/src/suricata-0.9.0/emerging.rules.tar.gz
As our install location is not standard, we need to setup location of the rules by modifying suricata.yaml:
default-rule-path: /etc/suricata/rules/
as to become:
default-rule-path: /opt/suricata/etc/rules/
The classification-file variable has to be modified too to become:
classification-file: /opt/suricata/etc/classification.config
To be able to reproduce test,  will use a pcap file obtained via tcpdump. For example my dump was obtained via:
sudo tcpdump -s0 -i br0 -w Desktop/br0.pcap
Now, let’s run suricata to check if it is working correctly:
sudo /opt/suricata/bin/suricata -c /opt/suricata/etc/suricata.yaml -r /home/eric/Desktop/br0.pcap
Once done, we can edit suricata.yaml. We need to replace mpm-algo value:
#mpm-algo: b2g
mpm-algo: b2g_cuda
Now, let’s run suricata with timing enable:
time sudo /opt/suricata/bin/suricata -c /opt/suricata/etc/suricata.yaml -r /home/eric/Desktop/br0.pcap 2>/tmp/out.log
With Suricata 0.9.0, the run time for a 42Mo pcap file is with starting time deduced:
  • 11s without CUDA
  • 19s with CUDA

Conclusion

As said by Victor Julien during an IRC discussion, CUDA current performance is clearly suboptimal for now because packets are sent to the card one at a time. It is thus for the moment really slower than CPU version. He is working currently at an improved version which will fix this issue.
An updated code will be available soon. Stay tuned !

Quand ça fonctionne tout seul

Je venais d’avoir l’idée d’une modification d’ulogd2 pour réaliser la chose pratique d’avoir deux sorties sur la même stack. J’ai donc rajouté pour tester la stack suivante à mon fichier ulogd.conf :

stack=log2:NFLOG,base1:BASE,ifi1:IFINDEX,ip2str1:IP2STR, \\

print1:PRINTPKT,sys1:SYSLOG,mark1:MARK,emu1:LOGEMU

Les tests ont montré que c’était déjà fonctionnel ! D’un coup, la neuvième de Beethoven par Harnoncourt est encore plus grandiose.

En route vers le 2.6.30 et encore merci Denis

Oui, bon, vous savez sans doute que le noyau Linux 2.6.30 est en cours de réalisation. Mais saviez-vous que grâce à l’excellent Denis Bodor toute une série de patchs a été incorporée au noyau ?

Lors de la rédaction du Hors Série Netfilter de GLMF, j’ai, avec tous les autres rédacteurs (Gwenael, Haypo, Pollux et Toady), voulu faire découvrir les dernières avancées de Netfilter. Et, forcément, lorsque l’on est sur le fil du rasoir et que l’on pousse les choses à fond pour être le plus précis possible, il arrive que l’on découvre des problèmes ou des choses pas aussi pratiques que on le désirerait.

J’ai donc réalisé une série de patchs pour améliorer l’expérience des lecteurs de ce splendide Hors Série Netfilter :

GLMF Hors série n°41

Merci donc à Denis pour nous avoir fait confiance pour ces articles et merci à Patrick McHardy d’avoir accepté mes patchs.